
How to perform the wireless LAN setup using WPS connection (Macintosh) - MX882
| Article ID: ART108282 | | | Date published: 05/11/2015 | | | Date last updated: 08/15/2015 |
Description
Solution
- Before performing the wireless setup
Wireless Setup Using WPS (Wi-Fi Protected Setup)
1.
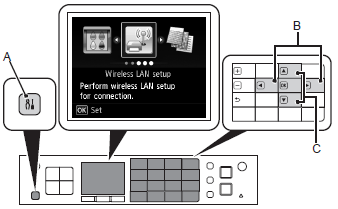
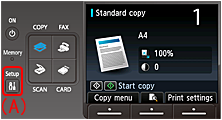
(1) Press the Setup button (A).
(2) Use the  or
or  button (B) to select Wireless LAN setup.
(3) Press the OK button.
2.
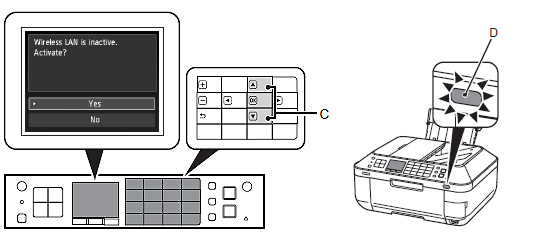
Use the  or
or  button (C) to select Yes, then press the OK button.
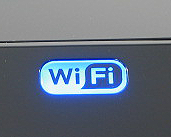
When wireless connection is enabled, the Wi-Fi lamp (D) lights blue.
3.
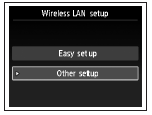
Select Other setup, then press the OK button.
4.
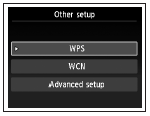
Select WPS, then press the OK button.
5.
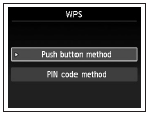
Select Push button method, then press the OK button.
6.
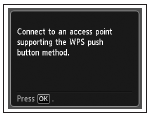
Press the OK button.
- To use the PIN code method for setup
Select PIN code method in 5, then press the OK button. Follow the on-screen instructions to
operate the machine and access point. When the screen in 8 appears, press the OK button.
- If the setup is not completed within 10 minutes and the timeout error screen appears, press the OK button to perform the setup again and set the new PIN code displayed on the screen to the access point. If another error is displayed, refer to the printed manual: Network Setup Troubleshooting.
7.
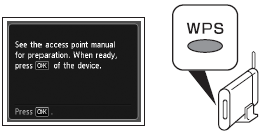
Press and hold the WPS button on the access point (for about 5 seconds), then press the OK button on the machine within 2 minutes.

For details on the WPS button pressing, refer to the manual of your access point.
The Wi-Fi lamp (blue) on the machine flashes while searching for or connecting to an access point.
8.
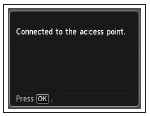
When the above screen appears, press the OK button.
- If the timeout error screen appears, press the OK button, then start over from 7.
- If another error appears, refer to the printed manual: Network Setup Troubleshooting.
Install the Software (Network Connection)
To use the machine by connecting it to a computer, software including the drivers needs to be copied (installed) to the computer's hard disk.
The installation process takes about 20 minutes. (The installation time varies depending on the computer environment or the number of application software to be installed.)
- Quit all running applications before installation.
- If the firewall function of your security software is turned on, a warning message may appear that Canon software is attempting to access the network. If such a warning message appears, set the security software to always allow access.
- Log on as the administrator (or a member of the Administrators group).
- Do not switch users during the installation process.
- Internet connection may be required during the installation. Connection fees may apply. Consult the internet service provider.
- It may be necessary to restart your computer during the installation process. Follow the on-screen instructions and do not remove the Setup CD-ROM during restart. The installation resumes once your computer has restarted.
- Easy-WebPrint EX
Easy-WebPrint EX is Web print software that is installed on the computer when installing the supplied software.
Safari 4 or later (Mac OS X v.10.5 or later) is required to use this software. An Internet connection is required for installation.
1.
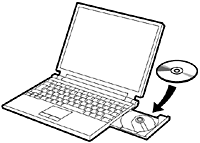
Turn on the computer, then insert the Setup CD-ROM into the CD-ROM drive.
If you are using Windows, the setup program starts automatically.
2.
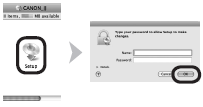
Double-click the Setup icon of the CD-ROM folder to proceed to the following screen. Enter your administrator name and password, then click OK.

If the CD-ROM folder does not open automatically, double-click the CD-ROM icon on the desktop.

If you do not know your administrator name or password, click the help button, then follow the on-screen instructions.
3.

Click Easy Install.
The drivers, application software, and on-screen manuals are installed.
If you want to select particular items to install, click Custom Install.
4.

Click Install.
5.

Select Use the printer with wireless LAN connection, then click Next.
Follow any on-screen instructions to proceed with the software installation.
6.

When the Printer Detection screen appears, click Next.
7.

When the Detected Printers List dialog box appears, select Canon MX xxx series, then click Next.
XXX: xxx refers to the model name you are using.
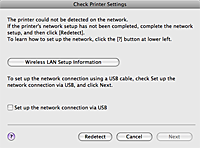
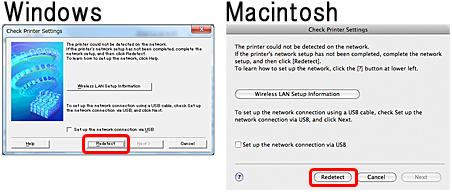
- When this printer has not been detected, the Check Printer Settings dialog box is displayed. In such a case, refer to [Check Printer Settings ].
Registration
- The alphanumeric characters after Canon xxx series is the machine's Bonjour service name or MAC address.
- If the machine is not detected, make sure of the following.
- The machine is turned on.
- The firewall function of any security software is turned off.
- The computer is connected to the access point.
1.
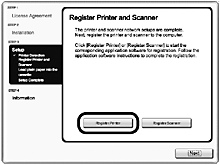
When the Register Printer and Scanner screen appears, click Register Printer.
Mac OS X
v.10.6.x v.10.5.x -> 2-A
v.10.4.11 -> 2-B
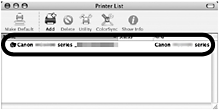
2-A Mac OS X v.10.6.x/v.10.5.x
(1)
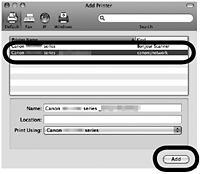
Select Canon xxx series canonijnetwork and click Add.
-> Go to 3
2-B Mac OS X v.10.4.11
(1)
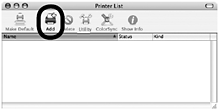
When the Printer List window appears, click Add.
- When the You have no printers available. screen appears, click Add.
(2)
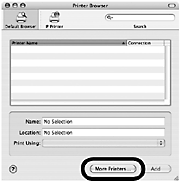
Click More Printers in the Printer Browser window.
(3)
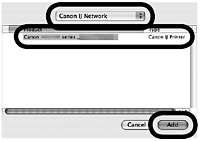
Select Canon IJ Network in the pop-up menu, select Canon xxx series in the list of printers, then click Add.
(4)
Make sure that Canon xxx series is added to the list of printers.
-> Go to 3
3.
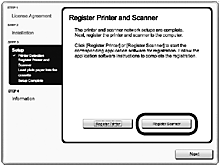
When the Register Printer and Scanner screen appears, click Register Scanner.
4.
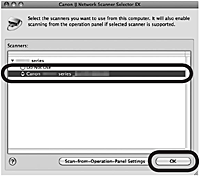
Select Canon xxx series on the Canon IJ Network Scanner Selector EX screen, then click OK.
5.
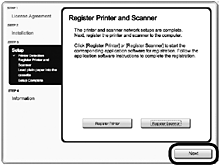
Click Next on the Register Printer and Scanner screen.
Install the Software (Information)1.
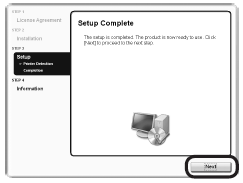
Click Next.
Follow any on-screen instructions to proceed with the software installation.
- Important Information for the Installation
If the serial number is not displayed on the registration screen, input the number found inside the machine.
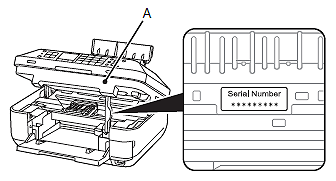
- If the power is on, the Print Head Holder will move when the Scanning Unit (Cover) (A) is opened.
- If the Extended Survey Program screen appears

If you can agree to Extended Survey Program, click Agree.
If you click Do not agree, the Extended Survey Program will not be installed. (This has no effect on the machine's functionality.)
2.
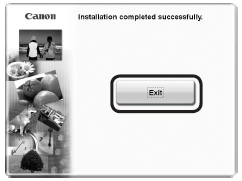
Click Exit to complete the installation.
It is necessary to restart the computer before scanning using the Operation Panel on the machine for the first time.
3.
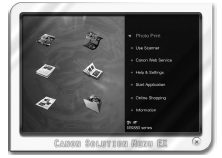
Solution Menu EX starts when clicking OK in the Canon Solution Menu EX dialog.
Remove the Setup CD-ROM and keep it in a safe place.
The buttons displayed on Solution Menu EX may vary depending on the country or region of purchase.
The end of the procedure of the wireless LAN setup.
Check Printer Settings
During the wireless setup in the software installation, when the Check Printer Settings dialog box is displayed, try the solutions 1 to 4 one by one in order.
1. Confirm the condition for the wireless connection
1-1. First make sure all devices, namely, i) printer, ii) access point or iii) router is powered ON. Then, turn OFF every device and turn them ON again.
1-2. Set the printer near the access point or the router to perform the setup.
After doing step 1 and 2, click [ Redetect ] to continue the setup.
If you still have the problem, try the next solution menu [ 2. Confirm the connection between the printer and the access point or between the printer and the router ]
2. Confirm the connection between the printer and the access point or between the printer and the router
2-1. Confirm that the WiFi lamp is ON.
If the WiFi lamp is not ON, the wireless function of the printer is not enabled yet.
Please do the wireless setting again.
When the WiFi lamp is ON, go to 2-2 and 2-3.
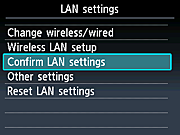
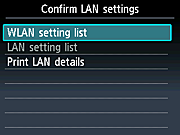
2-2. From the operation panel of the printer, confirm the connection by following the steps below.
Step 1.
Push the setup button on the operation panel, shown above as (A).
Step 2.
Use the
Step 3.
Use the
Step 4.
Use the
Step 5.
Use the
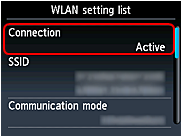
step 6.
When "WLAN setting list" is displayed, confirm that "Active" is displayed in "Connection".
If "Active" is not displayed in "Connection" ("Inactive" is displayed), the printer is not connected with the access point or the router. Please do the wireless setting again.
2-3. Enter the network key again.
You might have entered an incorrect network key.
Please enter the correct network key from the operation panel.
If you forgot the network key, you may be able to retrieve it using the Canon PIXMA Wireless Setup Assistant.
If you cannot obtain it, refer to the instruction manual for the access point or the router, or you may contact each manufacturer for help.
If you still have the problem, try the next solution menu [ 3. Review the setting of the "Firewall" security software ]

3. Review the setting of the "Firewall" security software
3-1. The "Firewall" software interferes with the necessary network communication.
[How to confirm]
The operation of the "Firewall" security software may interfere with the communication for the wireless setup.
Perform the software installation with the "Firewall" security software paused.
After the installation is completed, activate the "Firewall" security software again. When the message alerting that Canon software is about to access the network is displayed on the computer screen, click "Allow" .
attention:
important:
If you still have the problem, try the next solution menu "4. Review the setting of the access point or the router."
4. Review the setting of the access point or the router
4-1. As the following setting interferes with the communication for the wireless setup, change the setting. After the setting is changed, perform the installation.
attention:
- MAC address filtering function is enabled:
Change the setting of the access point so that the MAC address of the printer can be permitted.
- The same SSID is used between the computer and the printer, and the Privacy Separator function is enabled.
Disable the Privacy Separator function.
- The different SSID is used between the computer and the printer, and the Privacy Separator function is enabled.
Use the same SSID for the computer as the one for the printer.
reference:
Use the
Step 3.
Use the
Step 4.
Use the
Step 5.
Use the
Step 6.
When "WLAN setting list" is displayed, confirm the MAC address using the
