Load the Paper Correctly
Notes:
- When loading two or more sheets of paper, flip through the paper before loading.

- When loading two or more sheets of paper, align the edges of the sheets before loading.
- When loading two or more sheets of paper, make sure that the paper stack does not exceed the paper load limit. However, proper feeding of paper may not be possible at this maximum capacity depending on the type of paper or environmental conditions (either very high or low temperature and humidity). In such cases, reduce the sheets of paper you load at a time to less than half of the paper load limit.
- Always load the paper in portrait orientation, either in the Rear Tray or the Cassette, regardless of the printing orientation.
- When you load the paper on the Rear Tray, load the paper with the print side facing UP and slide the Paper Guides to align with the sides of the paper.
- When loading paper in the Cassette, load the paper with the print side facing DOWN. Align the right edge of the paper stack against the right edge of the Cassette and slide the Paper Guides against the left and bottom edges of the stack.
Paper Source to Load Paper
The printer has two paper sources to feed paper; Cassette and Rear Tray.
You can load paper in either one of the paper sources, depending on the page size and media type of paper. Paper is fed from the Cassette or Rear Tray depending on the selection of the page size or media type set in the printer driver. By default, the printer is set to feed plain paper from the Cassette and other paper types from the Rear Tray.
 Note
Note
- When printing, select the correct page size and media type. If you select the wrong page size or media type, the printer may feed paper from the wrong paper source or may not print with the proper print quality. For details on how to load paper in each paper source, see [ Loading Paper in the Cassette ] or [ Loading Paper in the Rear Tray ].
- Loading Plain Paper in the Cassette
When you use Letter-sized plain paper, load it in the Cassette.
The printer feeds paper from the Cassette automatically by selecting plain paper (Letter size) in the print settings with the printer driver when printing.
- Loading Photo Paper / Envelopes in the Rear Tray
When you use photo paper, load it in the Rear Tray.
The printer feeds paper from the Rear Tray automatically by selecting the media types other than plain paper, such as photo paper, in the print settings with the printer driver when printing.
When you use plain paper other than Letter size, also load it in the Rear Tray.
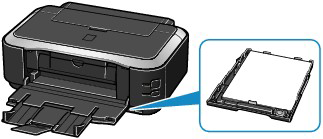
Loading Paper in the Cassette
You can load only Letter-sized plain paper in the Cassette.
Load other sizes or types of paper in the Rear Tray.
Note
- We recommend Canon genuine photo paper for printing photos.
- You can use general copy paper.
- Prepare paper.
Align the edges of paper. If paper is curled, flatten it.

Note
- Align the edges of paper neatly before loading. Loading paper without aligning the edges may cause paper jams.
- If paper is curled, hold the curled corners and gently bend them in the opposite direction until the paper becomes completely flat.
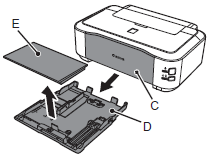
- Load Paper.
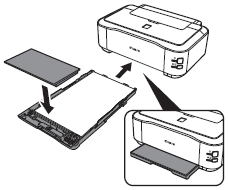
- Close the Paper Output Tray (C), pull out the Cassette (D) and remove the Cover (E).
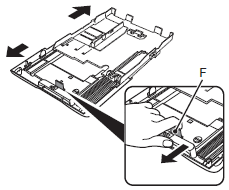
- Pull the Tab (F) in the direction of the arrow and extend the Cassette.
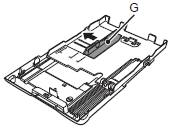
- Move the left Paper Guide (G) to the edge.
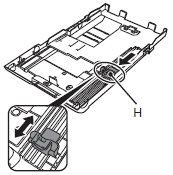
- Slide the front Paper Guide (H) to align with the actual size of the paper.
The front Paper Guide will click and stop when it aligns with the corresponding mark of paper size.
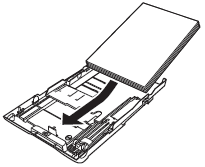
- Load plain paper.
Load the paper stack WITH THE PRINT SIDE FACING DOWN and THE LEADING EDGE TO THE FAR SIDE, and align it against the right side of the Cassette.
Note
- There may be a little space between the Paper Guide (H) and the paper stack.
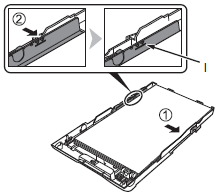
- Align the paper to the right side of the Cassette (
 ),and slide the left Paper Guide completely against the left edge of the paper (
 ).
).
Make sure that the height of the paper stack does not exceed the line (I).
- Attach the Cover and insert the Cassette into the printer until it clicks into place.
- Open the Paper Output Tray gently, and extend the Output Tray Extension to open.
Note
- After loading paper, select the size and type of the loaded paper in Printer Paper Size and Media Type in the printer driver.
Return to Top
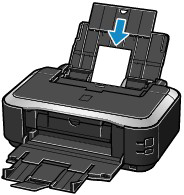
Loading Paper in the Rear Tray
You can load photo paper or envelopes in the Rear Tray.
 Important
- If you cut plain paper into small size such as 4" x 6" / 10 x 15 cm, 4" x 8" / 101.6 x 203.2 mm, 5" x 7" / 13 x 18 cm, or 2.16" x 3.58" / 55.0 x 91.0 mm (Card size) to perform trial print, it can cause paper jams.
- Prepare paper.
See step 1 in Loading Paper in the Cassette.
Align the edges of paper. If paper is curled, flatten it.
- Load paper.
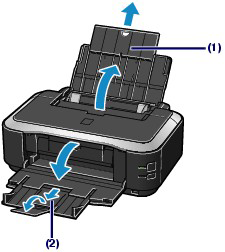
- Open the Paper Support, and pull it out.
- Open the Paper Output Tray gently, and extend the Output Tray Extension to open.
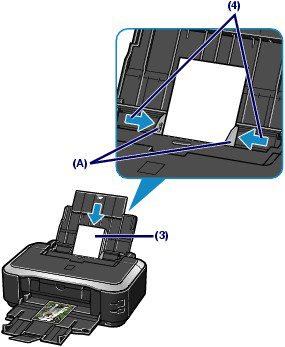
- Slide the Paper Guides (A) to open them, and load the paper in the center of the Rear Tray WITH THE PRINT SIDE FACING YOU.
- Slide the Paper Guides (A) to align them with sides of the paper stack.
Do not slide the Paper Guides too hard. The paper may not be fed properly.
Important
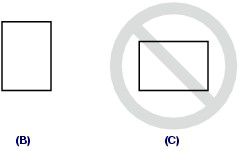
- Always load paper in the portrait orientation (B). Loading paper in the landscape orientation (C) can cause paper jams.
Note
- Do not load sheets of paper higher than the Load Limit Mark (D).

Note
- After loading paper, select the size and type of the loaded paper in Printer Paper Size and Media Type in the printer driver.
Return to Top
