Setting the IP Address Using the Printer's Control Panel
Before setting the IP address
- Make sure that the printer is connected to the network and the printer is ON.
NOTE
If you changed the IP address after installing the printer driver
- Specify the port to be used again in the printer driver. For details on the procedure for setting a port, see "e-Manual" (HTML manual) in the CD-ROM supplied with the printer.
Setting the IP Address Using the Printer's Control Panel
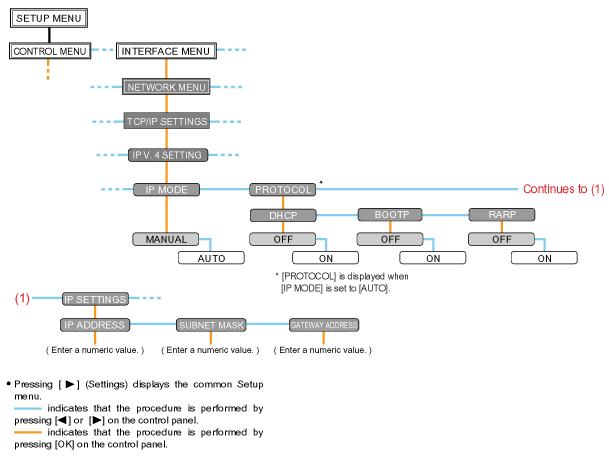
To set the IP address using the printer's control panel, use the following menu hierarchies.
IMPORTANT
After setting the IP address
- To enable the settings, perform a hard reset or restart the printer. For details on a hard reset, see "e-Manual" (HTML manual) in the CD-ROM supplied with the printer.
To go back up the hierarchy
- Press [
 ].
].
1. Press [  ] (Settings), select [INTERFACE MENU] using [
  ] and [
  ], and then press [OK].
* You can set the IP address when the printer is either online (the Online indicator is on) or offline (the Online indicator is off).
2. Select [NETWORK MENU] using [ ] and [ ], and then press [OK].
3. Select [TCP/IP SETTINGS] using [ ] and [ ], and then press [OK].
4. Select [IP V. 4 SETTING] using [ ] and [ ], and then press [OK].
5. Select the method for setting the IP address.
(1): Select [IP MODE] using [ ] and [ ], and then press [OK].
(2): Select a method for setting the IP address using [ ] and [ ], and then press [OK].
| [AUTO]: |
When setting the IP address using any one of DHCP, BOOTP, or RARP, select this option. |
| [MANUAL]: |
When specifying the IP address to the printer directly, select this option. |
6. Set the IP address.
 If You Selected [AUTO] in Step 5
6-A-1. Select [PROTOCOL] using [ ] and [ ], and then press [OK].
6-A-2. Select [ON] for the option to be used when setting the IP address.
| [DHCP]: |
Obtains an IP address using DHCP. (The DHCP server needs to be running.) |
| [BOOTP]: |
Obtains an IP address using BOOTP. (The BOOTP daemon needs to be running.) |
| [RARP]: |
Obtains an IP address using RARP. (The RARP daemon needs to be running.) |
NOTE
When using DHCP, BOOTP, or RARP
- You can select only one from RARP, BOOTP, or DHCP.
- Because it takes approximately two minutes to check whether DHCP, BOOTP, and RARP are available, we recommend that you set the unused protocol(s) to [OFF].
When using DHCP
- If you cycle the power of the printer, you may not be able to print. This is because a different IP address from the one that has been used is assigned.
- When using DHCP, consult your network administrator and perform either of the following settings.
- Specifying the DNS Dynamic Update function (For details on the procedure for specifying the DNS Dynamic Update function, see "e-Manual" (HTML manual) in the CD-ROM supplied with the printer.)
- Specifying the settings so that the same IP address is always assigned when the printer starts up
6-A-3. Set the IP address, the subnet mask, and the gateway address manually as needed.
When setting them manually, go back up the hierarchy by pressing [ ], and then perform the procedure in "If You Selected [MANUAL] in Step 5."
* Even if you are using any one of DHCP, BOOTP, or RARP, specify the IP address, subnet mask, and gateway address. If you cannot obtain information from the servers of DHCP, BOOTP, and RARP, the values specified manually are used.
NOTE
When using DHCP, BOOTP, or RARP
- You can select only one from RARP, BOOTP, or DHCP.
- After the printer restarts, the values obtained from DHCP, BOOTP, and RARP are displayed.
(If the values were specified previously, they overwrite the obtained ones.)
6-A-4. Proceed to Step 7.
If You Selected [MANUAL] in Step 5
6-B-1. Select [IP SETTINGS] using [ ] and [ ], and then press [OK].
6-B-2. Specify [IP ADDRESS], [SUBNET MASK], and [GATEWAY ADDRESS].
NOTE
How to enter values in [IP ADDRESS], [SUBNET MASK], and [GATEWAY ADDRESS].
1. Press [ ] and [ ] to move the cursor to each field (an area separated by periods to enter three-digit numbers) in which you want to enter respective values of the address.
(The numbers in the field blinks, allowing you to enter the value.)
2. Enter the value. (Pressing [ ] increases the value and [  ] decreases the value.)
3. After entering values in all the fields, press [OK] to confirm the setting.
6-B-3. Proceed to Step 7.
7. Perform a hard reset or restart the printer.
After performing a hard reset or restarting the printer, the settings are effective.
