Basic Methods for Scanning Documents from a Networked Computer
With the Color Network ScanGear driver installed in your computer, you can remotely scan an original set on the machine and import the scanned image over the network to a TWAIN-compliant application*. (* See the notes below for more information on TWAIN-compliant applications.)

Before proceeding to the procedure below, see "," and make sure that all the setups are complete for scanning originals from a computer.
note:
- Color Network ScanGear cannot be used as an independent application software. To use the Color Network ScanGear driver, a TWAIN-compliant application (such as Adobe Photoshop, Adobe Acrobat, Microsoft Word/Excel/PowerPoint of Microsoft Office 2000 or later, etc.) is required. TWAIN is a technical standard for connecting a computer to an image capturing device, such as a scanner, digital camera, etc.
- The Color Network ScanGear driver cannot store scanned images or convert them to PDF or other file formats. Store the imported images with the TWAIN-compliant application.
- The Color Network ScanGear driver is a software used with the machine connected to a computer over the network. The software does not support USB connection.
1. Press  (Main Menu).
2. Use [  ] , [
] , [  ] or
] or  (Scroll Wheel) to select <Scan to Store>, then press [OK].

3. Use [ ] , [ ] or (Scroll Wheel) to select <Remote Scan>, then press [OK].

4. Use [ ] , [ ] or (Scroll Wheel) to select <Online>, then press [OK].

note:
- When scanning originals remotely from a computer, you must switch the machine online.
- If you want to continue scanning another original, keep the Use Remote Scan screen in step 4 displayed. If you change the screen, the machine will automatically go offline when scanning is complete or as soon as the preview image is displayed.
- If you press (Main Menu) while the machine is online, the machine will automatically go offline.
5. Place your original on the platen glass or in the feeder.

6. Start Color Network ScanGear from the application on your computer. (As an example, this manual provides instructions on how to import scans to Microsoft Word 2007/Microsoft Word 2003.)
The following is an example of a scanning method for other TWAIN-compliant applications:
- Select Color Network ScanGear as the scanner to be used.
The command names for this operation includes [Select a scanner], [Select a device], etc.
- Then, start the Color Network ScanGear driver and scan originals.
The command names for this operation includes [New scan], [Import from TWAIN source].
For details, see the documentation that comes with the application software used.
7. Open the [Insert] tab sheet and click [Clip Art].
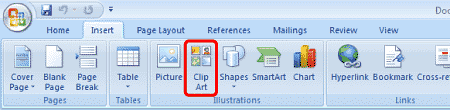
In Microsoft Word 2003, select [Picture] from the [Insert] menu and click [From Scanner or Camera]. Skip to step 11.
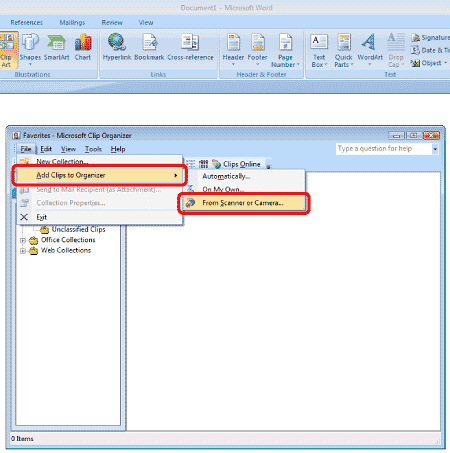
8. In the [Clip Art] task pane, click [Organize clips].

The Clip Organizer is launched.
9. Open the [File] menu of the Clip Organizer.

10. Select [Add Clips to Organizer] and click [From Scanner or Camera].
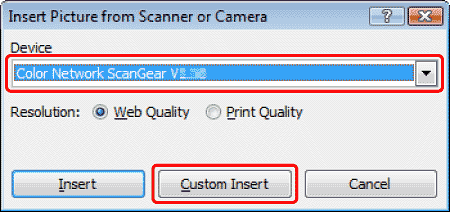
11. Select [Color Network ScanGear Vx.xx] and click [Custom Insert].
-
On the actual display, 'x' in [Color Network ScanGear Vx.xx] is replaced by the version number of your Color Network ScanGear.
-
If Color Network ScanGear does not appear on the list, or clicking on [Custom Insert] does not launch Color Network ScanGear, check if all the setups are complete for scanning originals from a computer.
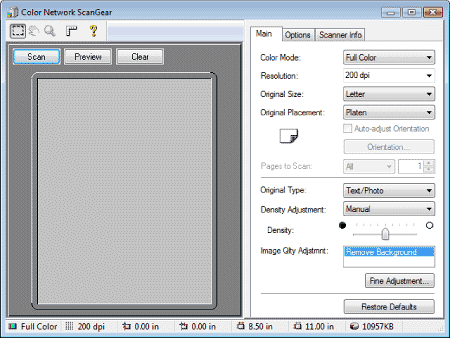
12. On the Color Network ScanGear [Main] sheet, select [Platen], [Feeder (1-sided)], or [Feeder (2-sided)] from [Original Placement] according to the location of the original placed in step 5.
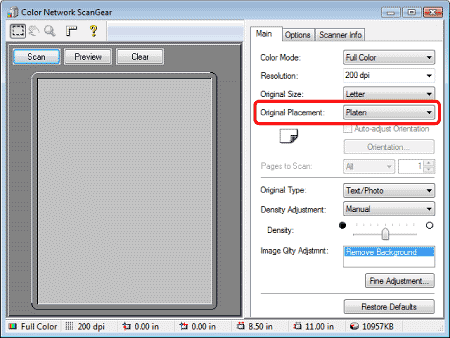
If [Platen] is selected, clicking on [Preview] allows you to see the preview image of your scan.
13. On the [Main] and [Options] sheets, select the desired settings for Color Mode, Resolution, etc.

Some of the settings on the Color Network ScanGear [Main] sheet, as listed below, may not be fully functional:
[Color Mode]: neither [Grayscale] or [Auto-color Select] is supported.
-
[Resolution]: Resolution can be set between 100 dpi and 600 dpi. You cannot specify a resolution not in the list by entering a number directly from the key board.
-
[Original Size]: [Custom] is not supported.
-
[Density Adjustment]: [Auto] is not supported.
For more information on the settings on each sheet, see the Online Help (displayed when the Help icon '  ' on the toolbar is clicked).
14. Click [Scan].
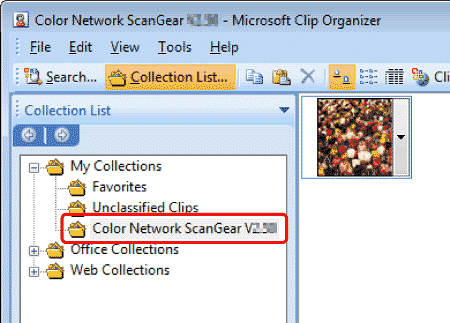
By default, the scanned images are stored in [Collection List] m² [My Collections] m² the [Color Network ScanGear Vx.xx] folder.
-
In Microsoft Word 2003, the scanned images are inserted in the document, as shown in step 17. Skip to step 18.
-
To cancel scanning, click [Cancel] in the [Transfer Pages] dialog box.

15. See your scans located in the [Color Network ScanGear Vx.xx] folder and close the Clip Organizer.
16. Return to the Microsoft Word window. In the [Clip Art] task pane, open the [Search in] drop-down listbox m² [My Collections]. Make sure that [Color Network ScanGear Vx.xx] is selected, and click [Go].
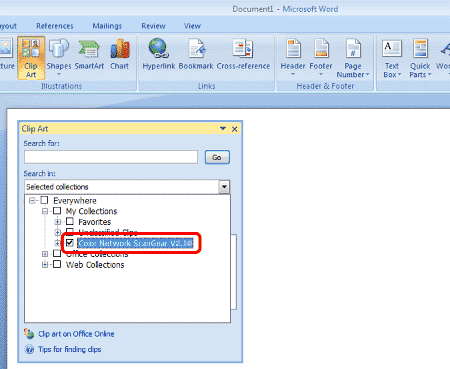
17. Click the scanned image file to insert the image in the open document.


18. After scanning is complete, switch the scanner offline. (Use se [ ] , [ ] or (Scroll Wheel) to select <Offline>, then press [OK].)

To use other functions of the machine, such as copying, you must switch the machine offline.
19. Press (Main Menu) to return to the Main Menu screen.
