
Setting the IP Address (IPv4) (MF9200 Series)
| Article ID: ART108850 | | | Date published: 05/11/2015 | | | Date last updated: 08/16/2015 |
Description
Solution
Setting the IP Address (IPv4)
Setting the IP address to the machine allows it to communicate with computers on the network. This section describes only IPv4 as a compatible protocol for the sending function.
The procedures below are for specifying the IPv4 Address settings. After configuring the IPv4 Address settings, proceed to "Checking Network Connection (IPv4)" to check if the machine is connected to the network successfully.
- Setting IPv4 Address Manually
- Setting IPv4 Address Automatically
- Confirming IPv4 Address Setting
- Checking Network Connection (IPv4)
Setting IPv4 Address Manually
If you assign fixed IP addresses to the devices on the network, manually assign an IP address (IPv4) to the machine.
The default setting is <Off>.
1. Press  (Main Menu).
2. Press the right Any key to select <Additional Func.>.

3. Use [  ] , [
] , [  ] or
] or  (Scroll Wheel) to select <System Management Set.>, then press [OK].
If the screen appears prompting you to enter the System Manager ID and System Password, enter the System Manager ID and System Password using  -
-  (numeric keys), then press
  (Log In/Out).

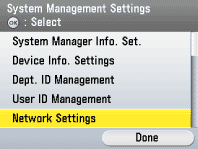
4. Use [ ] , [ ] or (Scroll Wheel) to select <Network Settings>, then press [OK].
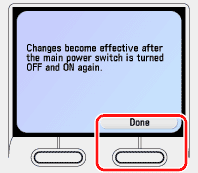
5. Confirm that a screen shown left appears on the display, then press the right Any key to select <Done>.
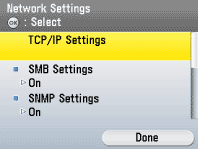
6. Use [ ] , [ ] or (Scroll Wheel) to select <TCP/IP Settings>, then press [OK].
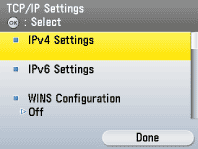
7. Use [ ] , [ ] or (Scroll Wheel) to select <IPv4 Settings>, then press [OK].
8. Use [ ] , [ ] or (Scroll Wheel) to select <IP Address Settings>, then press [OK].

9. Use [ ] , [ ] or (Scroll Wheel) to select <Manual Settings>, then press [OK].
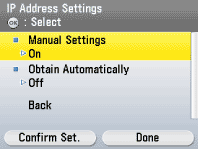
10. Use - (numeric keys) to enter the IP address, then press [OK].

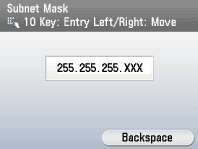
11. Use - (numeric keys) to enter the subnet mask address, then press [OK].
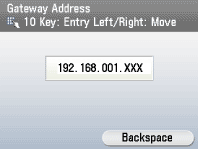
12. Use - (numeric keys) to enter the gateway address, then press [OK].
13. Press (Main Menu) to return to the Main Menu screen.
14. Restart the machine.
Turn OFF the machine and wait at least 10 seconds before turning it ON again.
Proceed to "Confirming IPv4 Address Settings."
Setting IPv4 Address Automatically
If you use a network environment which can automatically assign IP addresses, such as a network with a router (a DHCP server), you can set the machine to automatically obtain an IPv4 address. In this setting, the machine will automatically obtain an IP address after being connected to the network for a few moments.
The default setting is <On>.
note:
The IP address currently assigned to the machine may be changed when the server or machine is restarted. In these cases, check the IP address and make the necessary settings. Additionally, most routers have functions that can assign specific IP addresses even under a DHCP environment. Use of these functions are recommended.
1. Press (Main Menu).
2. Press the right Any key to select <Additional Func.>.
3. Use [ ] , [ ] or (Scroll Wheel) to select <System Management Set.>, then press [OK].
If the screen appears prompting you to enter the System Manager ID and System Password, enter the System Manager ID and System Password using - (numeric keys), then press (Log In/Out).
4. Use [ ] , [ ] or (Scroll Wheel) to select <Network Settings>, then press [OK].
5. Confirm that a screen shown left appears on the display, then press the right Any key to select <Done>.
6. Use [ ] , [ ] or (Scroll Wheel) to select <TCP/IP Settings>, then press [OK].
7. Use [ ] , [ ] or (Scroll Wheel) to select <IPv4 Settings>, then press [OK].
8. Use [ ] , [ ] or (Scroll Wheel) to select <IP Address Settings>, then press [OK].
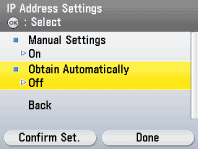
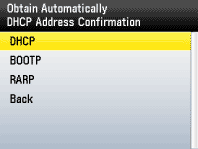
9. Use [ ] , [ ] or (Scroll Wheel) to select <Obtain Automatically>, then press [OK].
10. Use [ ] , [ ] or (Scroll Wheel) to select the desired protocol, then press [OK].
- <DHCP>: The machine obtains the necessary information for communication via DHCP.
- <BOOTP>: The machine obtains the necessary information for communication via BOOTP.
- <RARP>: The machine obtains the necessary information for communication via RARP.
11. Use - (numeric keys) to enter the IP address, then press [OK].
The settings entered in this step are used when the machine cannot obtain the necessary information for communication via DHCP, BOOTP or RARP.

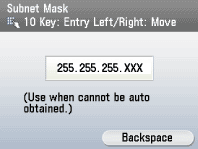
12. Use - (numeric keys) to enter the subnet mask address, then press [OK].
The settings entered in this step are used when the machine cannot obtain the necessary information for communication via DHCP, BOOTP or RARP.
13. Use - (numeric keys) to enter the gateway address, then press [OK].
The settings entered in this step are used when the machine cannot obtain the necessary information for communication via DHCP, BOOTP or RARP.

14. Press (Main Menu) to return to the Main Menu screen.
15. Restart the machine.
Turn OFF the machine and wait at least 10 seconds before turning it ON again.
Proceed to "Confirming IPv4 Address Settings."
Confirming IPv4 Address Settings
To confirm IPv4 address settings, follow the procedure below.
1. Press (Main Menu).
2. Press the right Any key to select <Additional Func.>.
3. Use [ ] , [ ] or (Scroll Wheel) to select <System Management Set.>, then press [OK].
If the screen appears prompting you to enter the System Manager ID and System Password, enter the System Manager ID and System Password using - (numeric keys), then press (Log In/Out).
4. Use [ ] , [ ] or (Scroll Wheel) to select <Network Settings>, then press [OK].
5. Confirm that a screen shown left appears on the display, then press the right Any key to select <Done>.
6. Use [ ] , [ ] or (Scroll Wheel) to select <TCP/IP Settings>, then press [OK].
7. Use [ ] , [ ] or (Scroll Wheel) to select <IPv4 Settings>, then press [OK].
8. Use [ ] , [ ] or (Scroll Wheel) to select <IP Address Settings>, then press [OK].
9. Press the left Any key to select <Confirm Set.>.

The current IPv4 address settings are displayed.

10. Press (Main Menu) to return to the Main Menu screen.
Proceed to "Checking Network Connection (IPv4)."
Checking Network Connection (IPv4)
To check that the IPv4 network connections are properly set, follow the procedure below.
1. Press (Main Menu).
2. Press the right Any key to select <Additional Func.>.
3. Use [ ] , [ ] or (Scroll Wheel) to select <System Management Set.>, then press [OK].
If the screen appears prompting you to enter the System Manager ID and System Password, enter the System Manager ID and System Password using - (numeric keys), then press (Log In/Out).
4. Use [ ] , [ ] or (Scroll Wheel) to select <Network Settings>, then press [OK].
5. Confirm that a screen shown left appears on the display, then press the right Any key to select <Done>.
6. Use [ ] , [ ] or (Scroll Wheel) to select <TCP/IP Settings>, then press [OK].
7. Use [ ] , [ ] or (Scroll Wheel) to select <IPv4 Settings>, then press [OK].
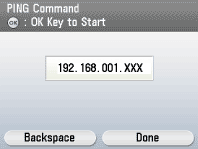
8. Use [ ] , [ ] or (Scroll Wheel) to select <PING Command>, then press [OK].

9. Use - (numeric keys) to enter the desired IPv4 address existing on the network, then press [OK].
When the connection is established, <Received response from the host.> is displayed.
If the connection is not established, <No response from the host.> is displayed. Make sure that the network settings are properly set.
note:
- If the machine is connected to a switching hub, the machine may not be able to connect to a network even when your network settings are appropriate. This problem may be resolved by delaying the startup of network communications for the machine. The startup time can be changed from the <Additional Func.> menu m² <System Management Set.> m² <Network Settings> m² <Startup Time Settings>. (Changes will be effective after the machine is restarted.)
- If the startup time of the machine's network function has been changed, execute the PING command only after the time set as the startup time passes.
10. Press (Main Menu) to return to the Main Menu screen.