Printing the Nozzle Check Pattern
Print the nozzle check pattern to determine whether the ink ejects properly from the print head nozzles.
You need to prepare: a sheet Letter-sized plain paper
Note: If the remaining ink level is low, the nozzle check pattern will not be printed correctly. Replace the FINE Cartridge whose ink is low.
Printing the nozzle check pattern without a computer
Print the nozzle check pattern from the printer itself using the RESUME/CANCEL button.
(1) Make sure that the power is turned on, and load a sheet Letter-sized plain paper.
(2) Hold down the RESUME/CANCEL button until the POWER lamp flashes green twice, then release it immediately.
The nozzle check pattern will be printed.
Do not perform any other operations until the printer completes the printing of the nozzle check pattern.
Examine the nozzle check pattern and take an appropriate action.
-> [ Examining the Nozzle Check Pattern]

- Make sure that the power is turned on.
- Load a sheet Letter-sized plain paper.
- Open the printer driver setup window.
- Print the nozzle check pattern.
(1) Click the Maintenance tab.
(2) Click Nozzle Check.
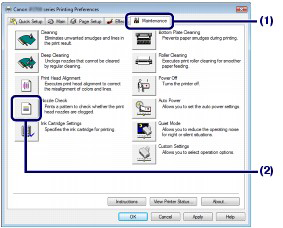
(3) Confirm the message and click Print Check Pattern.
The nozzle check pattern will be printed.
Do not perform any other operations until the printer completes the printing of the nozzle check pattern.
Note: Clicking Initial Check Items displays the items to be checked before printing the nozzle check pattern.
- Examine the nozzle check pattern.
-> [ Examining the Nozzle Check Pattern ]

- Make sure that the power is turned on.
- Load a sheet Letter-sized plain paper.
- Open the Canon IJ Printer Utility.
- Print the nozzle check pattern.
(1) Select Test Print in the pop-up menu.
(2) Click Nozzle Check.

(3) Confirm the message and click Print Check Pattern.
The nozzle check pattern will be printed.
Do not perform any other operations until the printer completes the printing of the nozzle check pattern.
Note: Clicking Initial Check Items displays the items to be checked before printing the nozzle check pattern.
- Examine the nozzle check pattern.
-> [ Examining the Nozzle Check Pattern ]
Examining the Nozzle Check Pattern
Examine the nozzle check pattern, and clean the Print Head if necessary.
- Check if there are missing lines in the pattern (1) or horizontal white streaks in the pattern (2).

If there are missing lines in the pattern (1):
Clean the print head nozzles of the Black ink group (BK).
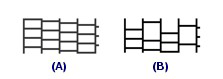
(A) Good
(B) Bad (Lines are missing)
If there are horizontal white streaks in the pattern (2):
Clean the print head nozzles of the Color ink group (C, M, Y).

(A) Good
(B) Bad (Horizontal white streaks are present)
If there are missing lines in the pattern (1) and also there are horizontal white streaks in the pattern (2):
Clean the print head nozzles of the All Colors ink group.
- Take the appropriate action.
When cleaning is not required:
Click Exit on the Pattern Check dialog box to exit the nozzle check pattern examination.
When cleaning is required:
(1) Click Cleaning.
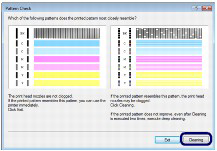

(2) Load a sheet Letter-sized plain paper.
Follow the procedure from (3) in step 4 in [ ] to clean the Print Head.
