
Adjusting Copy Image Quality on MX882
| Article ID: ART109541 | | | Date published: 05/11/2015 | | | Date last updated: 08/17/2015 |
Description
Solution
Making Copies
This section describes the basic procedure to copy a document of a letter size on plain paper.
-
Prepare for copying.
-
Make sure that the power is turned on.
-
Press the COPY button (2).
The copy standby screen will appear.
-
Load paper (3).
In the below illustration, A4 or Letter-sized plain paper is loaded in the cassette.
Note: Load A4, B5, A5, or Letter-sized plain paper in the Cassette. Load other sizes or types of paper in the Rear Tray. -
Open the Paper Output Tray gently, and open the Output Tray Extension (4).

-
Load an original on the Platen Glass or in the ADF.
To load the original on the Platen Glass, align it with the alignment mark WITH THE SIDE TO COPY FACING DOWN as shown below.
 -
Then close the Document Cover gently.
Note: Characters and lines written with a light colored pen or highlight pen may not be copied properly.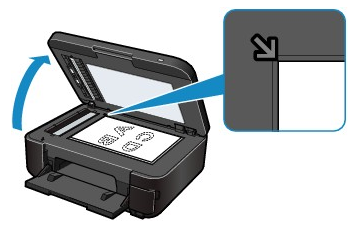
-
-
Start copying.
-
Use the [+] or [-] button (A) to specify the number of copies.

-
Press the right Function button (B) to select Print settings, and specify the magnification, copy intensity, the page size, media type, etc.
Here we confirm that Same size is selected for Magnif, 0 for Intensity, Letter for Page size, and Plain paper for Type. -
On the Standard copy window, use the
 or
or  button (C) to select the item to change, and use the the
  or
or  button (D) to select an option. After confirming or changing the settings, press the OK button to return to the copy standby screen.
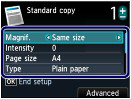
See Changing the Settings.
Note: -
-
You can check the preview of print result if you press the center Function button (E) when copying the original on the Platen Glass. The preview function is not available when copying the document from the ADF.
-
You can select various copy functions, such as Borderless copy, if you press the left Function button (F) to select Copy menu.
-
-
-
Press the <Color> button for color copying, or the <Black> button for black & white copying.
The machine starts copying.
Remove the original on the Platen Glass or the Document Output Slot after copying is completed.
|
|

 Changing the Settings
Press the right Function button to select Print settings on the copy standby screen. You can select the item, such as page size, media type, or print quality, and change the setting.
Use the 
 button to change the setting item, and the
 button to change the setting.

(1) Magnif. (Magnification)
Specify the enlargement/reduction manner. You can specify the copy scale by selecting the page size: A4 to A5, A4 to B5, etc. If you do not want to enlarge/reduce the page size, select Same size.
To specify the scale in units of 1%, press the right Function button to select Advanced. This is not available when Fit to page is set.
(2) Intensity
Specify the intensity when you want to make the darkened/lightened copy. Select Auto to automatically adjust the intensity according to the original. When Auto is selected, the ADF is not available.
(3) Page size
Select the page size of the paper to print: A4, Letter, etc.
(4) Type (Media type)
Select the media type of the paper to print: Plain paper, Plus Glossy II, etc.
|
(5) Print qlty (Print quality)
Select the print quality according to the original to copy: Standard, High, etc. The available print quality settings depend on the paper selected for Type.
(6) 2-sided
Copy a single side of two originals to sides of a single paper, sides of original to single side of paper, or sides of original to sides of paper.
When 1
2sided print, 2
(7) Layout
Select the layout: 2-on-1 copy or 4-on-1 copy.
(8) Orientation
Select the orientation of the original to copy: Portrait or Landscp..
|
 appears at the invalid item. Press the left Function button to select Error details and check the error message, then correct the settings.