If the ink tanks are not installed correctly, you may hear knocking noise and error messages may appear on the printer's display.
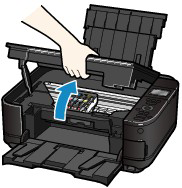
Make sure that the power is turned on, and open the Paper Output Tray gently.
Lift the Scanning Unit (Cover) until it stops.
*external appearance varies by model
The Print Head Holder will move to the replacement (center) position.
Caution:
a) If the Print Head Holder does not move to center position, press the ON button to power off the printer.
b) Unplug the power cord from the back of the printer.
c) Slide the Print Head Holder to center position.
Note:
The printer in the above illustration shows the iP4600 model. Your
printer may have a different number of tanks and / or different
tank order
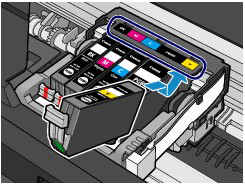
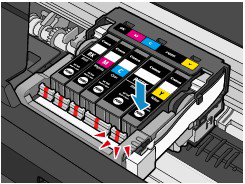
Push down the upper part of the ink
tank until it slides under the cover so that the ink tank fits into place.
The printer in the illustrations below shows the iP4600 model.Your printer may have
a different number of tanks and / or different tank order
Press down on the top of other any
ink tank that may not be seated correctly.
Caution:Handle the ink tank carefully to avoid staining of clothing or the surrounding area.
Reinstall the ink tanks.
If you have to reinstall an ink tank, insert the front end of ink tank into the Print Head at a slant.
Make sure that the position of the ink tank matches the label.
Press the mark (Push) on the ink tank until the ink tank snaps firmly into place. Make sure that the ink lamp lights up red.
Important:
You cannot print if the ink tank is installed in the wrong position.Be sure to install the ink tank in the correct position according to the label on the Print Head Holder.
You cannot print unless all the ink tanks are installed.Be sure to install all the ink tanks.
Lift the Scanning Unit (Cover) slightly, and then close it gently.
Note: * When you start printing after replacing the ink tank, the machine starts cleaning the Print Head automatically. Do not perform any other operations until the machine completes the cleaning of the Print Head.
* If printed ruled lines are misaligned or the print head position is misaligned, adjust the print head position.