|
|
Scan using MP Navigator EX - MX360 (Windows)
| Article ID: ART110760 |
| |
Date published: 05/11/2015 |
| |
Date last updated: 08/17/2015 |
Description
MP Navigator EX is an application that enables you to easily scan photos and documents. It is suitable even for beginners.
Solution
 Scanning Photos and Documents Scanning Photos and Documents
Scan documents such as photographs and text on the platen.
-
Place the document face-down on the platen glass.

-
Launch MP Navigator EX.
-
From the Start menu, select (All) Programs.
-
Click Canon Utilities, MP Navigator EX folder.
-
Then click MP Navigator EX icon.
-
In Scan/Import, click Photos/Documents (Platen).
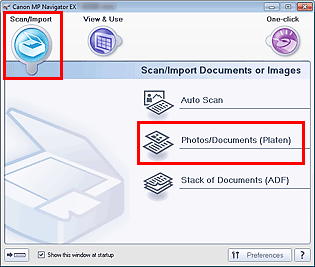
Display varies according to the printer model.
-
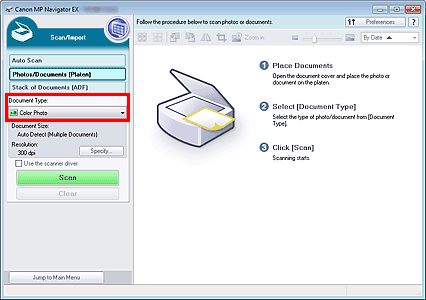
Select Document Type according to the document to be scanned.
Note:
-
When you select Magazine(Color), the Descreen function will be enabled and scanning takes longer than usual. To disable the Descreen function, deselect the Descreen checkbox in the Scan Settings dialog box.
-
Select Text(OCR) to extract the text in the image and convert to editable text data using MP Navigator EX. This setting is not available when the Compress scanned images when transferring checkbox is selected on the "General Tab" of the Preferences dialog box.
-
Color scanning is not available for Text(OCR). To scan in color, open the OCR dialog box from the One-click Mode screen and scan with Color Mode set to Color.
-
Click Specify to set the document size and scanning resolution as required.
When setting is completed, click OK.
 Note: When scanning a large document (such as an A4 size photo), align its corner with the corner at the arrow (alignment mark) of the Platen and specify the document size in the Scan Settings dialog box. Note: When scanning a large document (such as an A4 size photo), align its corner with the corner at the arrow (alignment mark) of the Platen and specify the document size in the Scan Settings dialog box.
-
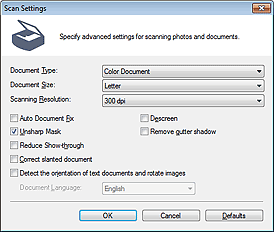
When the Scan Settings window is displayed, select the resolution in Scanning Resolution drop-down.
-
If necessary, set other items as well.
-
Click OK.
-
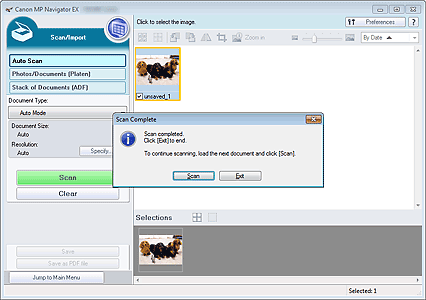
In the Photos/Documents (Platen) window, click Scan to start scanning.
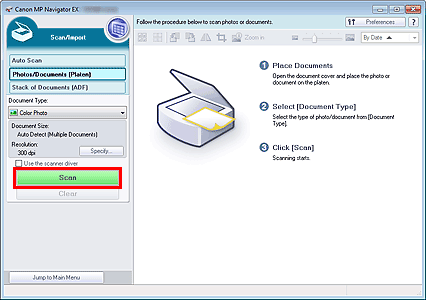
Note: Click Cancel to cancel the scan.
-
When scanning is completed, the Scan Complete dialog box opens. Select Scan or Exit. Select Scan to scan the next document, or select Exit to end.
The scanned images appear in the Thumbnail window.
-
Edit the scanned images as required.
-
Save the scanned images.
Saving
Saving as PDF Files
 TOP TOP
Save images scanned with MP Navigator EX to a computer.
- Select the checkboxes of the images you want to save, then click Save.

-
In the Save dialog box, specify the save settings.
Specify the destination folder, file name, and file type.
Save Dialog Box
 Important: Important:
- You cannot select JPEG/Exif when Document Type is Text(OCR), Text(Simplex), or Text(Duplex).
-
You cannot select JPEG/Exif when Black and White is selected for Color Mode on the Advanced Mode tab of ScanGear (scanner driver).
Note:
-
By default, the scanned images are saved in the following folders.
- Windows 7: MP Navigator EX folder in My Pictures folder
- Windows Vista: MP Navigator EX folder in Pictures folder
- Windows XP: MP Navigator EX folder in My Pictures folder
- Click Save.
Scanned images are saved according to the settings.
TOP
Save images scanned with MP Navigator EX as PDF files.
- Select the checkboxes of the images you want to save, then click Save as PDF file.

-
In the Save as PDF file dialog box, specify the save settings.
Specify the file type, file name, and destination folder.
Save as PDF file Dialog Box
Note:
-
By default, the scanned images are saved in the following folders.
- Windows 7: MP Navigator EX folder in My Pictures folder
- Windows Vista: MP Navigator EX folder in Pictures folder
- Windows XP: MP Navigator EX folder in My Pictures folder
- You can set passwords for PDF files.
- Click Save.
Scanned images are saved according to the settings.
TOP
|
