The machine has two paper sources to feed paper; the cassette and rear tray.
You can load paper in either one of the paper sources, depending on the page size and type of paper. Paper feeds from one of the sources depending on the paper size or type.
 Before you print, select the correct page size and media type. If you select the wrong page size or media type, the machine may feed paper from the wrong paper source or print quality may be poor.
About paper
Load the paper
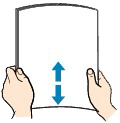
- Align the edges of the paper. If the paper is curled, hold the curled corners and gently bend them in the opposite direction to flatten it.
If you don't align the edges it may cause paper jams.
- Pull out the cassette from the machine.

-
Slide the paper guide (2) (A) to align with the mark of page size. The paper guide (A) will stop when it aligns with the corresponding page size mark.
-
Load the paper stack with the print side facing down and the leading edge to the far side, and align it against the right side of the cassette.
There may be a little space between the paper guide (A) and the paper stack.
-
Slide the paper guide (4) (B) on the left to align completely with the side of the paper stack.
Don't load sheets of paper higher than the load limit mark (C).

-
Insert the cassette (5) all the way into the machine.
-
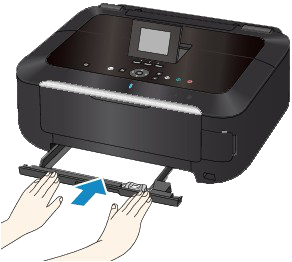
Gently open the paper output tray and the output tray extension.
-
Load the paper, then select the size and type of the loaded paper on the print settings screen of the operation panel or printer program.
Load Photo Paper in the Rear Tray
The instructions below tell you how to load paper in the rear tray. Refer to this article if you want to
load envelopes into the rear tray.
 If you cut plain paper into small size such as 4" x 6", 4" x 8", 5" x 7" or card size to perform a trial print, it can cause paper jams.
-
Align the edges of the paper. If the paper is curled, hold the curled corners and gently bend them in the opposite direction to flatten it.
Don't bend Photo Paper Plus Semi-gloss SG-201, even if the sheet is curled. This may cause cracks on the surface of the paper and reduce the print quality.
-
Open the paper support (1), raise it, then tip it back.
-
Gently open the paper output tray (2), and the output tray extension.

-
Slide the paper guides (3) (A) to open them, and load the paper in the center of the rear tray with the print side facing you.
-
Slide the paper guides (4) (A) to align them with sides of the paper stack.
Don't slide the paper guides too hard against the paper or the paper may not be fed properly.

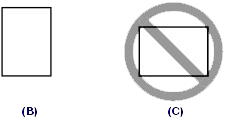
Always load paper in the portrait orientation (B). If you load paper in landscape orientation (C), it can cause paper jams.
Don't load sheets of paper higher than the load limit mark (D).

- After you load the paper, select the size and type of the loaded paper on the print settings screen of the operation panel or from your printer program.
If your product issue was not resolved after following the steps above, or if you require additional help, please create or log in to your Canon Account to see your technical support options.
Or if you still need help, visit our Canon Community by clicking the button below to get answers:

____________________________________________________________________________________________
