If printed lines are misaligned or print results are otherwise unsatisfactory, adjust the print head position.
If printed ruled lines are misaligned or print results are otherwise unsatisfactory, adjust the print head position.
You need to prepare: three sheets of A4 or Letter-sized plain paper
note:
If the remaining ink level is low, the print head alignment pattern will not be printed correctly. Replace the FINE Cartridge whose ink is low.
-> [ ]

1. Make sure that the power is turned on.
2. Load three sheets of A4 or Letter-sized plain paper.
3. Open the printer driver setup window.
4. Print the print head alignment pattern.
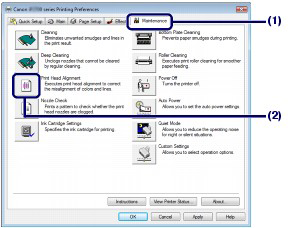
(1) Click the Maintenance tab.
(2) Click Print Head Alignment.
The Start Print Head Alignment dialog box will appear.
(3) Confirm the message and click Align Print Head.
The first sheet of the print head alignment pattern will be printed. Do not perform any other operations until the printer completes the printing of the print head alignment pattern.
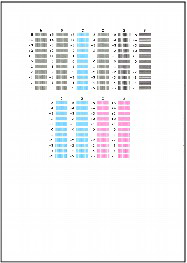
(4) After the pattern below is printed, make sure that the pattern is printed properly, then click Yes.
5. Adjust the print head position.
(1) Check the printed patterns in column A, and select the pattern number that has the least noticeable streaks.

note:
Refer to the samples below to select the pattern that has the least noticeable white streaks and horizontal white stripes.
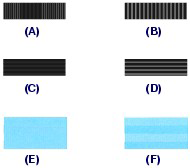
(A) Less noticeable vertical white streaks
(B) Noticeable vertical white streaks
(C) Less noticeable horizontal white streaks
(D) Noticeable horizontal white streaks
(E) Less noticeable horizontal white stripes
(F) More noticeable horizontal white stripes
(2) Repeat the same procedure to input the pattern number for each column B to J, then click OK.
note:
To cancel aligning the Print Head, click Cancel.
(3) Confirm the message and click OK.
The second sheet of the print head alignment pattern will be printed.
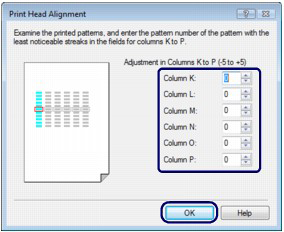
(4) Check the printed patterns, and select the pattern numbers that have the least noticeable streaks for each column K to P, then click OK.
(5) Confirm the message and click OK.
The third sheet of the print head alignment pattern will be printed.
(6) Check the printed patterns in column Q, and select the pattern number that has the least noticeable horizontal stripes.
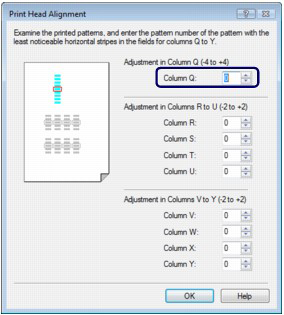
(7) Repeat the same procedure to input the pattern number for each column R to Y, then click OK.
(8) Confirm the message and click OK.
note:
To print and check the current head position adjustment values, click Print Alignment Value in the Start Print Head Alignment dialog box.

1. Make sure that the power is turned on.
2. Load three sheets of A4 or Letter-sized plain paper.
3. Open the Canon IJ Printer Utility.
4. Print the print head alignment pattern.
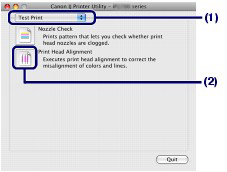
(1) Select Test Print in the pop-up menu.
(2) Click Print Head Alignment.
The Starting print head alignment. dialog box will appear.
(3) Confirm the message and click Align Print Head.
The first sheet of the print head alignment pattern will be printed. Do not perform any other operations until the printer completes the printing of the print head alignment pattern.

5. Adjust the print head position.
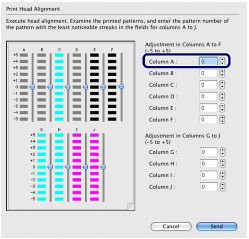
(1) Check the printed patterns in column A, and select the pattern number that has the least noticeable streaks.
note:
Refer to the samples below to select the pattern that has the least noticeable white streaks and horizontal white stripes.

(A) Less noticeable vertical white streaks
(B) Noticeable vertical white streaks
(C) Less noticeable horizontal white streaks
(D) Noticeable horizontal white streaks
(E) Less noticeable horizontal white stripes
(F) More noticeable horizontal white stripes
(2) Repeat the same procedure to input the pattern number for each column B to J, then click Send.
note:
To cancel aligning the Print Head, click Cancel.
(3) Confirm the message and click OK.
The second sheet of the print head alignment pattern will be printed.
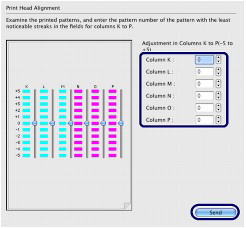
(4) Check the printed patterns, and select the pattern numbers that have the least noticeable streaks for each column K to P, then click Send.
(5) Confirm the message and click OK.
The third sheet of the print head alignment pattern will be printed.
(6) Check the printed patterns in column Q, and select the pattern number that has the least noticeable horizontal stripes.

(7) Repeat the same procedure to input the pattern number for each column R to Y, and click Send.
note:
To print and check the current head position adjustment values, click Print Alignment Value in the Starting print head alignment. dialog box.
