Loading Paper into the Drawer
note:
How to load the paper in the optional paper drawer (Drawer 2): Same as in Drawer 1.
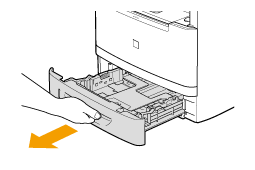
1. Pull out the paper drawer.
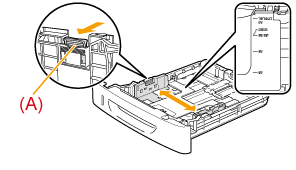
2. Slide the paper guides to the size mark for the paper to be loaded.
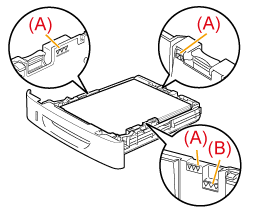
While holding the lock release lever (A), adjust the length of the paper guide.
 To load A6 paper
Slide the center rear paper guide forward.

* If you want to change the size of the paper to be loaded, be sure to register the paper size in .
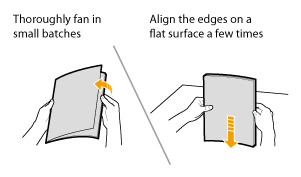
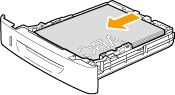
3. Fan the document stack and even the ends.
4. Load the paper with the printing side down so that it aligns with the rear side of the paper drawer.
Load the paper in portrait orientation.

note:
When loading paper with a letterhead or logo
- See Paper Loading Orientation and load the paper in the proper orientation.
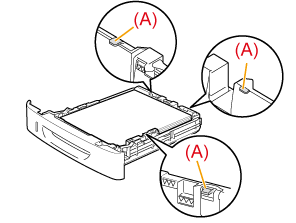
5. Hold down the paper, then set it under the hooks (A) on the paper guides.
important:
Be sure to align the paper guides with the width of paper.
If the paper guides are loose or tight, this may result in misfeeds or paper jams.

6. Make sure that the paper stack does not exceed the line of the load limit mark (A) or (B).
(A): Paper larger than A5
(B): A6 paper
* Make sure that the paper stack does not go over the line of the load limit mark. If the paper stack goes over the load limit mark lines, this may result in misfeeds.
7. Specify the loaded paper size and type.
Paper Loading Orientation
note:
Paper loading orientation when loading in the multi-purpose tray
- The paper loading orientation for the multi-purpose tray is the same as that for the paper drawer.
 When printing paper with a letterhead or logo (previously printed paper)
Load the paper in the proper orientation as follows.
( : Feeding direction)
|
Portrait layout |
Landscape layout |
| 1-sided printing*1 |

(with the printing side facing down) |
(with the printing side facing down) |
| |
| 1-sided printing*2 |
(with the printing side facing up) |
(with the printing side facing up) |
| |
| Automatic 2-sided printing |
(with the back side facing up) |
(with the back side facing up) |
| |
*1 When <Switch Paper Feed Method> is set to <Print Speed Priority> (the default setting)
*2 When <Switch Paper Feed Method> is set to <Print Side Priority>Precautions When Loading Paper into the Drawer
attention:
- Be careful when handling paper.
Handle paper carefully not to cut your hands with the edges of the paper.
- Precautions when inserting the paper drawer
Be careful not to catch your fingers.
important:
- Be sure to align the paper guides with the width of the paper.
If the paper guides are too loose or too tight, this may result in misfeeds or paper jams.
- When using paper that has been poorly cut
If you use paper that has been poorly cut, multiple sheets of paper may be fed at once. In this case, fan the paper thoroughly, and then align the edges of the stack properly on a hard, flat surface.
- Do not exceed the load limit mark when loading paper.
Make sure that the paper stack does not exceed the loading limit marks. If the paper stack exceeds the loading limit marks, this may result in misfeeds.
- When printing on envelopes
Load envelopes with the front side (non-glued side) facing up. You cannot print on the reverse side of envelopes.
Also, be sure to close the flap before loading envelopes.
note:
- Abbreviations on the paper guides inside the paper drawer
Paper guide (Paper size)
LGL (Legal)
LTR (Letter)
EXEC (Executive)
