This function uses signals received from multiple GPS satellites to record location information (latitude, longitude, elevation) in still images and movies. The location information data can also be recorded separately from images and movies. Additionally, this function can be used to automatically update the camera's clock.
The GPS function cannot be used unless the date/time and your time zone are set. Make sure to correctly set the date/time and your time zone beforehand.
GPS stands for "Global Positioning System".
important:
Please keep the following things in mind when using the GPS function.
- In certain countries and regions, the use of GPS may be restricted. Therefore, be sure to use GPS in accordance with the laws and regulations of your country or region. Be particularly careful when traveling outside your home country.
- Exercise caution when using this function in places that restrict the use of electronic devices, as the camera receives signals from GPS satellites.
- The camera’s positioning information recorded in images and movies with the GPS function may contain information that can be used to determine your physical location. Be sure to take adequate precautions when transferring images containing camera positioning data and GPS log files to others, or when uploading these files to the Internet where they can be viewed by numerous people.
For details on where the GPS function can be used and how to hold the camera, please see .
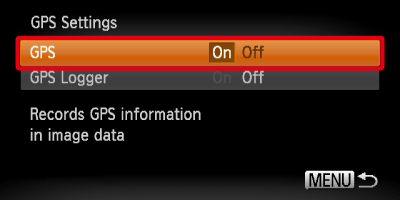
Turning the GPS function [On]
Select the < > button > the [Set up] tab (
 ) > [GPS Settings] to set [GPS] to [On].
reference:
When [GPS] is set to [On], the following icon appears.
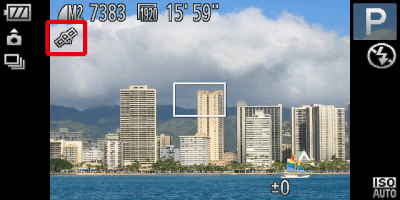
| Icon displayed | Description |
|---|
 (Displayed) (Displayed) | GPS satellite signal received. The camera’s positioning data or the shooting date can be recorded. |
 (Flashing) (Flashing) | Searching for GPS satellite. |
 (Displayed) (Displayed) | Cannot receive GPS satellite signal. |
When shooting in the (Displayed) status, you can record and check the location information (latitude, longitude, elevation) and the shooting date/time in your images and movies.
note:
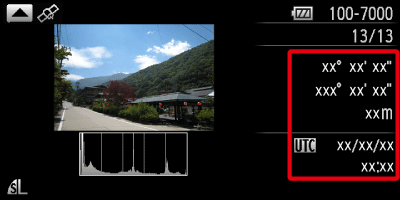
Checking the location information recorded with the GPS function
After pressing < > a few times, if you press the <Directional button> upward in the Detailed information display, you can check the location information (latitude, longitude, elevation) and shooting date/time recorded to still images and movies when [GPS] is set to [On].
note:
- The items displayed, from top to bottom, are latitude, longitude, elevation, and UTC.
- When a signal is not correctly received from a GPS satellite, [---] will appear in place of numerical values for the items where positioning data is incomplete.
- UTC stands for "Coordinated Universal Time," and is approximately equivalent to Greenwich Mean Time.
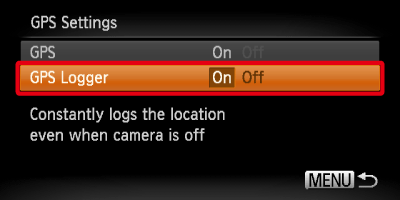
Recording the camera’s location information (Logger Function)
When the camera is turned off, it will continue to receive a signal from GPS satellites for a certain interval of time, and record the route taken.
Based on the received signals, the location information and shooting date for a single day will be recorded in a GPS log file, separate from images. The log files can be used with the included software to view the route travelled on a map.
important:
- (
 ) will appear in the upper right of the screen when a GPS log file is created. If this icon appears, exercise caution when formatting the memory card, as all GPS log files will also be erased.
 - If [GPS Logger] is set to [On], battery power will be consumed even when the camera is turned off. If the camera is in an environment where a GPS signal cannot be received (indoors, etc.), the battery may be depleted in half a day even if you do no shooting. Be sure to set [GPS Logger] to [Off] to prevent battery consumption when not using the logger function.
Make sure that [GPS] is set to [On], and select the <> button > the [Set up] tab () > [GPS Settings] to set [GPS Logger] to [On].
note:
- Even when the camera is turned off, the indicator (on the back of the camera) will blink to notify you that the logger function is operating.
- At certain intervals, the positioning data and shooting date/time based on the GPS satellite signal will be recorded in a log file.
reference:
- If the [GPS Logger] setting is set to [On], and you remove the battery after turning off the camera, the logger function will be temporarily disabled. When switching the battery, turn the camera on and then off again to enable the logger function.
- SD, SDHC and SDXC memory cards have a write-protect tab. If this tab is in the locked position, or an Eye-Fi card is inserted in the camera, you will not be able to save GPS log files.
- The logger function may stop operating when the camera is connected to a computer or printer with the included interface cable, or when connected to a TV with a separately sold stereo AV cable or separately sold HDMI cable. If this happens, unplug the cable from the camera, then turn the camera on and back off again.

 ), only the location information and shooting date of the first movie of the day will be recorded.