Windows
Macintosh
Windows
-
Make sure that the printer is on and then load a sheet of A4 or Letter-sized plain paper in the Rear Tray.
-
Open the Front Tray and extend the Output Tray Extension.
Set the Paper Thickness Lever to the left.
-
Open the printer properties dialog box.
-
Print the Nozzle Check Pattern.
(1) Click the Maintenance tab.
(2) Click Nozzle Check.
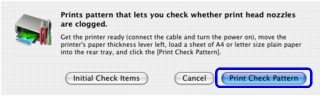
(3) Confirm the displayed message and click Print Check Pattern.

The nozzle check pattern is printed. Do not open the Top Cover while printing.
|
Note
Clicking Initial Check Items displays the items to be checked before printing the pattern.
|
-
Examine the pattern and take the appropriate action.
See Examining the Nozzle Check Pattern.
Macintosh
-
Make sure that the printer is on and then load a sheet of A4 or Letter-sized plain paper in the Rear Tray.
-
Open the Front Tray and extend the Output Tray Extension.
Set the Paper Thickness Lever to the left.
-
Open the Canon IJ Printer Utility dialog box.
-
Print the Nozzle Check Pattern.
(1) Select Test Print in the pop-up menu.
(2) Click Nozzle Check.
(3) Confirm the displayed message and click Print Check Pattern.
The nozzle check pattern is printed. Do not open the Top Cover while printing.
Note
Clicking Initial Check Items displays the items to be checked before printing the pattern.
-
Examine the pattern and take the appropriate action.
See Examining the Nozzle Check Pattern.
Examining the Nozzle Check Pattern
Click here to see examples of a correct nozzle pattern. Click here to see examples of an incorrect nozzle pattern.
If the output is correct, the print head is normal.
If the output is incorrect, perform the following steps:
- Perform a print head cleaning.
- Print the nozzle check pattern again.
- If any lines or colors are missing from the nozzle check pattern perform another print head cleaning.
- Print the nozzle check pattern again.
- If any lines or colors are missing from the nozzle check pattern perform a deep print head cleaning.
Caution: Avoid performing more than three deep cleanings in a twenty-four hour period.
- Print the nozzle check pattern again
- If the Nozzle Check Pattern output is still abnormal even after Deep Cleaning, turn off the printer and letting it sit for 24 hours or more, then perform Deep Cleaning again. The wait time may allow dried ink in clogged print head nozzles to liquefy, and resolve the problem.
If the nozzle check pattern is still incorrect, service may be required.
Click here to return to the top.
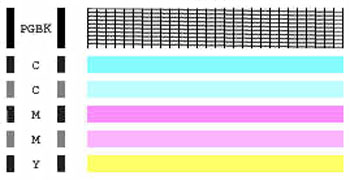
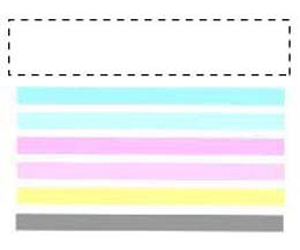
Correct Nozzle Pattern:
- Lines are aligned systematically.
- Black ink: There are no missing lines and lines are aligned systematically.
- Color ink: There are no white streaks.
Click here to return to the top.
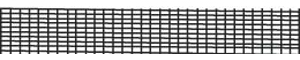
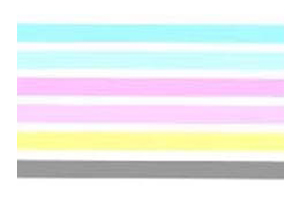
Incorrect nozzle pattern:
- No ink is ejected. (Nothing appears on the output.)
- Some colors of ink are not ejected completely. (Sample: Black ink is not ejected.)
- Some black ink patterns are missing.
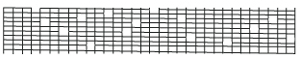
- White streaks appear in color ink.

Click here to return to the top. Click here to view possible solutions.
