Sender Information
If the unit name and unit fax/telephone number are registered, they are printed with date and time as sender information on the recipient's fax.
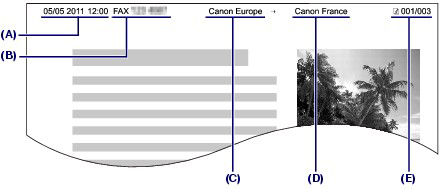
(A) Date and time of transmission
(B) Unit fax/telephone number
(C) Unit name
(D) The registered recipient's name is printed when sending faxes with the coded speed dial.
(E) Page number
reference:
- You can print User's data list to confirm the sender information you have registered.
Available sender information settings
- The following settings are available.
- When sending faxes in black & white, you can select whether to print the sender information inside or outside the image area (TTI position).
- You can select the date print format from three formats: YYYY/MM/DD, MM/DD/YYYY, DD/MM/YYYY (Date display format in Device user settings).
important:
- Before sending a fax, be sure to enter your fax/telephone number and name in Unit TEL no. registr. and Unit name registr. in the FAX user settings screen (for US only).
- Display the Unit TEL no. registr. screen.
- Press the <FAX> button, and press the <Menu> button.
The Fax settings menu will appear.
- Use the
 (-) or
  (+) button to select FAX user settings, and press the <OK> button.
The FAX user settings menu will appear.
- Make sure that Unit TEL no. registr. is selected, and press the <OK> button.
- Enter the unit fax/telephone number.
- Use the Numeric buttons to enter unit fax/telephone number (max. 20 digits, including spaces).
To enter a plus sign (+) before the number, press the  button.

Note:
- In the Unit TEL no. registr. screen, the following operations are available.
- Press a Numeric button to enter that number.
- Press the button twice to enter a space.
- Press the (-) or (+) button to move the cursor.
- To delete a character, move the cursor under the character, and press the Back button.
- The Tone button and the Redial/Pause button are available when entering the recipient's fax/telephone number. These buttons are disabled in the Unit TEL no. registr. screen.
- Press the <OK> button.
- Enter a unit name.
- Make sure that Unit name registr. is selected, and press the <OK> button.

- Use the Numeric buttons to enter unit name (max. 24 characters, including spaces).

Note: For details on how to enter or delete characters, see Entering Numbers, Letters, and Symbols.
- Press the <OK> button.
- Press the <FAX> button to return to the fax standby screen.
With the Numeric buttons on the machine, you can enter the unit name and the recipient's name for the coded speed dial.
The machine has three input modes: uppercase mode, lowercase mode, and numeric mode. The table below shows the characters that can be entered in each mode.
For example, in the uppercase mode, press the  button once to enter "A" and press the button twice to enter "B". Thus, the characters in the table can be entered by pressing the appropriate button repeatedly.
| Button | Uppercase mode (:A) | Lowercase mode (:a) | Numeric mode (:1) | Fax/Telephone no. |
 |
|
| 1 | 1 |
 | ABCÅÄÁÀÃÂÆÇ | abcåäáàãâæç | 2 | 2 |
 | DEFËÉÈÊ | defëéèê | 3 | 3 |
 | GH I Ï Í Ì Î | gh i ï í ì î | 4 | 4 |
 | JKL | jkl | 5 | 5 |
 | MNOÑØÖÓÒÕÔ | mnoñøöóòõô | 6 | 6 |
 | PQRSÞ | pqrsþ | 7 | 7 |
 | TUVÜÚÙÛ | tuvüúùû | 8 | 8 |
 | WXYZÝ | wxyzý | 9 | 9 |
 |
|
| 0 | 0 |
 | - . SP*1  # ! " , ; : ^ ` _ = / | ' ? $ @ % & + ( ) [ ] { } < > \*2 ~*2 # ! " , ; : ^ ` _ = / | ' ? $ @ % & + ( ) [ ] { } < > \*2 ~*2 | # |
|
 | Press the Tone button to switch to the uppercase mode (:A), lowercase mode (:a), or numeric mode (:1). | |
|
*1 "SP" indicates a space.
*2 Displayed only when entering characters in the LAN settings.
- Press the Tone
 button to switch the input mode.
Each time the Tone button is pressed, the input mode will be switched to the uppercase mode (:A), lowercase mode (:a), then numeric mode (:1).
The current input mode appears at the upper right corner of the LCD (:A, :a, :1).
Example: uppercase mode

Note: Here describes the procedure to enter the unit name as example. To display the Unit name registr. screen, see Registering User Information.
- Use the Numeric buttons to enter characters.
Press the button repeatedly until the character you want to enter appears.
- To enter characters (ex., to enter "EU"):
- Press the
 button twice.

- Press the
 button twice.

- To enter a character that is assigned to the same button as the previous entry (ex., to enter "A" after "C"):
- Press the
 button three times.

- Press the
 (+) button, and press the button again.

Note:

 button three times to enter a space.
 (-) or