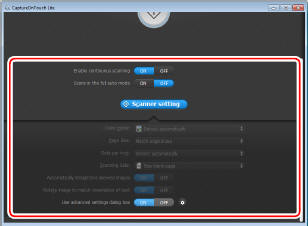
By default, CaptureOnTouch Lite scans with scanning conditions that match the document because scanning in full auto mode is enabled.If you want to specify, for example, the scanning mode and document size, you can configure the desired scanning conditions in the scanner settings.
To configure scanner settings, click [OFF] for [Scans in the full auto mode] in the top screen, and then click [Scanner setting].
Setting Basic Items
Scanner settings include the basic items that are configured in [Scanner setting], and the setting items that are configured in the advanced settings dialog box. The settings in the advanced settings dialog box are applied for settings other than the basic items.The settings in the driver settings dialog box are applied for any other settings.
Color Mode
Select from the following modes for scanning documents.
Detect automatically Automatically determins the color mode based on the document content and scans accordingly.
24-bit Scans the document in color.
Grayscale Scans the document in Grayscale.
Black and White Scans the document in black and white (binary).
Page Size
Specify the page size of the document.If you specify [Match original size], the page size of the scanned document is detected and the images are saved at the detected size.
Dots per inch
Specify the scanning resolution.When [Detect automatically] is specified, the resolution is detected automatically from the content of the scanned document.
Scanning Side
Specify whether to scan only one side or sides of a document.When [Skip blank page] is specified, any blank paged detected within the document is skipped during scanning.
Automatically straightens skewed images
When a document is scanned skewed, the skewed scanned images are detected and then straightened.
Rotate image to match orientation of text
The orientation of text in scanned images is detected, and the images are rotated so that the text is correctly oriented.
Use advanced settings dialog box
If you select [ON] and click , you can configure scanner settings other than the basic setting items. For details, see the following “Advanced Settings” section.

The driver settings dialog box includes setting items that are the same as the basic items in [Scanner setting], but the setting for each of the them is stored separately. Which settings are used during scanning differs as follows depending on the setting of the [Use advanced settings dialog box] check box.
| Setting of [Use advanced settings dialog box] | Basic items | Other than basic items |
| OFF | Settings of [Scanner Settings] | Settings of the advanced settings dialog box of the scanner driver |
| ON | Settings of the advanced settings dialog box of the scanner driver |
Advanced Settings
You can configure scanning conditions and scanner operations in detail in the advanced settings dialog box.
[Basic] tab
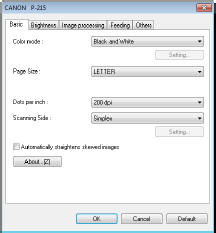
Configure basic scanning conditions.
[Brightness] tab
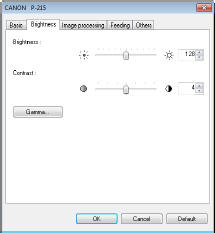
Configure the brightness and contrast of scanned images.
[Image processing] tab

Configure settings related to the processing of scanned images.
[Feeding] tab
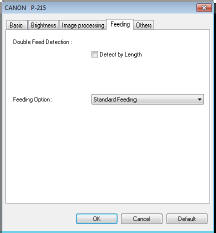
Configure the feeding method for documents.
[Others] tab

Configure settings for specialized scanning and image processing.
Operation in Continuous Scanning Screen
When [Enable continuous scanning] is set to [ON] in the Start screen, the continuous scanning screen appears when all of the pages of the placed document have been fed. You can confirm the scanned images and then continue scanning.
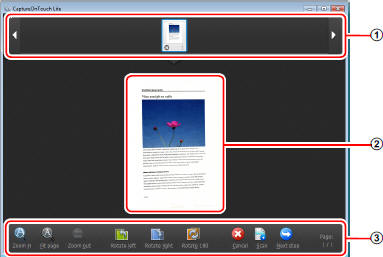
- Thumbnail Display Area
Displays the thumbnail images of the scanned document. The following operations are possible.
Click a thumbnail image to display a preview of that scanned image in the preview area.
Drag thumbnail images to change the positions of pages.
Click  on a thumbnail image to delete the scanned image for that page.
 - Preview Area
Displays the preview images of the scanned document. - Preview Controls
Control the preview images and cancel or continue scanning with the following buttons.
Taskbar Icons
CaptureOnTouch Lite will reside on the taskbar after it starts. The  icon will appear in the taskbar’s notification area during this time.

You can click the icon and perform the following in the menu that appears.
[Open CaptureOnTouch Lite]
If you closed the CaptureOnTouch Lite window, you can click this to open the window again.
[Environmental settings]
Display the [Environmental settings] dialog box. For details, see “Environmental Settings”.
[Version Information]
View version information for CaptureOnTouch Lite.
[Exit]
Quits CaptureOnTouch Lite. CaptureOnTouch Lite will stop residing on the system, and the taskbar icon will disappear.


