Erasing Images
You can protect important images and movies from accidental erasure. The following table shows the different ways you can choose to protect an image.
| Select |
Erase images after selecting them one at a time. |
| Select Range |
For picking a first and last image and erasing all the images in the range. |
| Select by Date |
Erases images corresponding to the selected date. |
| Select by Category |
Erases images in a selected category. |
| Select by Folder |
Erases images in a the selected folder. |
| All Images |
Erases all images on a memory card. |
1. In the [ (Replay)] menu select [Erase] and press the <FUNC./SET> button.
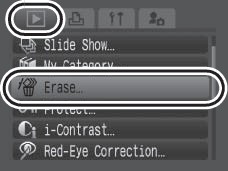
2. Select the desired menu item and press the <FUNC./SET> button.
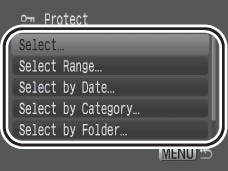
[Select]
- Select the image.
Use the  or
or  button to select the image you wish to erase and press the <FUNC./SET> button.
- Pressing the <FUNC./SET> button again cancels the setting.
- Press the <MENU> button to complete the setting.
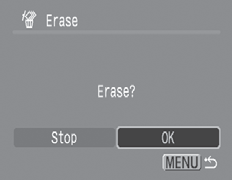
- Erase the image.
Use the or button to select [OK].
Press the <FUNC.SET> button.
- Selecting [Stop] cancels the selection of the image you are about to erase and returns to Step 2.
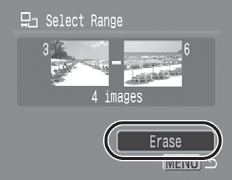
[Select Range]
- Select the first image.
- You can circle your finger on the Touch Control Dial to select the first and last image.
1. Press the <FUNC./SET> button.
2. Use the or button to select the first image for the range to erase.
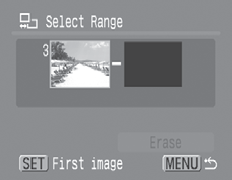
3. Press the <FUNC.SET> button.

Select the last image.
1. Use the button to select [Last Image].

2. Press the <FUNC./SET> button.
3. Use the or button to select the last image in the range.
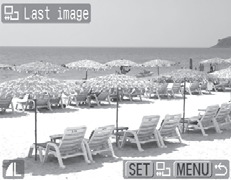
4. Press the <FUNC./SET> button.
- An image with a lower number than the first image cannot be selected as the last image.
- Up to 500 images can be selected.
Erase the Images.
1. Press the  and choose [Erase]
2. Press the <FUNC./SET> button.
[Select by Date], [Select by Category], [Select by Folder]
1. Use the  or buttons to select a date, category, or folder and press the <FUNC./SET> button.
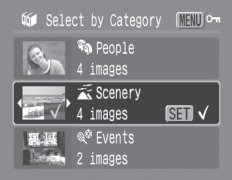
- Pressing the <FUNC./SET> button again cancels the setting.
- You can select multiple dates, categories, or folders.
- Use the or button to confirm each date, category, or folder image.
2. Press the <MENU> button.
- Erase the Images
3. Use the or button to select [OK].
Press the <FUNC./SET> button.
- It then will return to the selection method screen.
- Selecting [Stop] cancels the selection of the protected image and returns you to step 2 of this procedure.
All Images
- Erase the images.
1. Use the or button to select [OK].
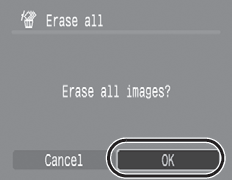
2. Press the <FUNC./SET> button.
- Selecting [Cancel] cancels the selection of the image you are about to erase and returns to step 2.
- Pressing the <FUNC./SET> button while erasing is in progress cancels the procedure.
|

- Please note that formatting (initializing) a SD card erases all data, including protected images and other file types. Please check the contents of a SD card before formatting it.
|
