
Scanning using the Operation Panel (Mac) - MG4120
| Article ID: ART114071 | | | Date published: 05/11/2015 | | | Date last updated: 08/17/2015 |
Solution
Forwarding Scanned Data to the Computer Using the Operation Panel of the Machine
You can forward the scanned data to the computer using the Operation Panel of the machine.
Before forwarding scanned data to the computer, confirm the following:
The necessary application software (MP Drivers and MP Navigator EX) is installed.
If the application software (MP Drivers and MP Navigator EX) is not yet installed, insert the Setup CD-ROM into the computer's disc drive, then perform Custom Install and select MP Drivers and MP Navigator EX to install.
- The machine is connected to a computer correctly.
Make sure that the machine is connected to the computer correctly.
Do not plug in or unplug the USB cable or LAN cable when scanning images with the machine, or when the computer is in the sleep or standby mode.
If you perform scanning via a network connection, make sure that all the required settings have been specified. For details, refer to Network Scan Settings.
- The destination and the file name are specified in MP Navigator EX.
You can specify the destination and the file name in MP Navigator EX. For details on how to perform settings or the initial settings, refer to Scanner Button Settings Tab (Save to PC).
Make sure that the machine is turned on. For details refer to Confiming that the Power is on.
- Select SCAN on the HOME screen. For details see LCD and Operation Panel.
- If you forward the data to the USB-connected computer:
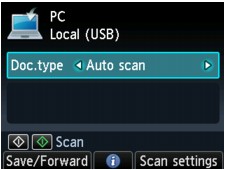
The Scan standby screen is displayed.
Go to step 3.
 Note
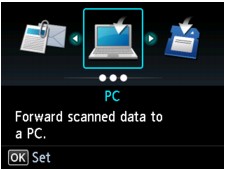
Note- If the screen for selecting to which you save the data is displayed, select PC and press the OK button. The Scan standby screen is displayed.
- If the screen for selecting to which you save the data is displayed, select PC and press the OK button. The Scan standby screen is displayed.
- If you forward the data to the network-connected computer:
The screen for selecting to which you save the data is displayed.
 Note
Note- If the Scan standby screen for forwarding the data to the USB-connected computer is displayed on the LCD, press the left Function button to display the screen for selecting to which you save the data.
Select the computer to forward the scanned data following the procedure below.
Select
 PC, then press the OK button.
- Use the

 button to select the computer to forward the scanned data, then press the OK button.
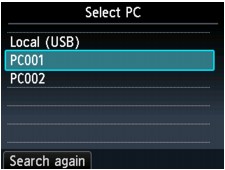
The Scan standby screen is displayed.Note- If you select Local (USB) on the Select PC screen, the data is forwarded to the USB-connected computer.
When you forward the scanned data to the computer using WSD (one of the network protocols supported in Windows 7 and Windows Vista), select Enable for WSD scan from this device on WSD setting on Other settings in LAN settings under Device settings. For details, see WSD.
If you press the left Function button, the machine starts searching for the connected computers again.
- If you select Local (USB) on the Select PC screen, the data is forwarded to the USB-connected computer.
- Use the

 button to select the document type for Doc.type.
  Note
Note When you forward the scanned data to the computer searched using WSD, you cannot select the document type.
Auto scanThis item is available only when the machine is connected to the computer using a USB cable.
The machine detects the type of the originals automatically and the image is forwarded in the optimized size, resolution and data format.
 Important
You can select Auto scan only when you forward the scanned data to the USB-connected computer.
- Load originals properly according to their type; otherwise, some originals may not be scanned properly.
- The following items can be scanned:
Photos, postcards, visiting cards, magazines, newspapers, documents, BD/DVD/CDs - The following items cannot be scanned properly.
A4 sized photos
- Documents smaller than 5 inches x 7 inches (127 mm x 178 mm) such as a paperback with its backbone cut off
- Originals on thin white paper
- Long and narrow originals such as panoramic photographs
- Document
Scans the original on the platen glass as a document data applying the settings specified in Scan settings.
- Photo
Scans the original on the platen glass as a photo data applying the settings specified in Scan settings.
- Press the right Function button to adjust the settings as necessary.
- Load the original document on the platen glass. Note
- You can confirm the procedure to load the original by pressing the center Function button.
- Press the Color button for color scanning, or the Black button for black & white scanning.
- Note
When you forward the scanned data to the computer searched using WSD, press the Color button.
If you select other than PDF or Compact PDF for Format on the scan setting screen:
The machine starts scanning and scanned data is forwarded to the computer.
When you select other than PDF or Compact PDF for Format on the scan setting screen:The confirmation screen asking you if you continue scanning is displayed after scanning is complete.
If you continue scanning, load the original on the platen glass and start scanning.
If you do not continue scanning, press the left Function button. The scanned data is forwarded to the computer.
Scanned data is forwarded to the computer according to the settings specified in MP Navigator EX.
Remove the original on the platen glass after scanning is complete.
ImportantIf the scanning result with Auto scan is not satisfactory, select Document or Photo according to the original in step 3, then specify the scan size or other setting items in step 4.
If you want to scan originals with advanced settings, or if you want to edit or print the scanned images:
If you scan originals from a computer using MP Navigator EX, MP Navigator EX enables you to edit the scanned images, such as optimizing or trimming.
In addition, you can edit or print the scanned images using the bundled application software to make better use of them.

Network Scan Settings
You can connect the machine to a network to share it among multiple computers or scan images into a specified computer.
 Important
Multiple users cannot scan at the same time.
 Note
NoteComplete the network settings of the machine beforehand. (Refer to the printed manual: Getting Started.)
Complete the following settings to enable scanning over a network.
Specifying the Machine
Use IJ Network Scanner Selector EX to specify the scanner you want to use. By specifying the scanner, you can scan over a network using your computer or the Operation Panel of the machine.
ImportantIf the product you want to use is changed with IJ Network Scanner Selector EX, the product used for scanning with MP Navigator EX changes as well. The product for scanning using the Operation Panel also changes.
If the machine is not selected in MP Navigator EX, check that it is selected with IJ Network Scanner Selector EX.
To scan using the Operation Panel of the machine, specify the machine with IJ Network Scanner Selector EX, then click Preferences from Canon IJ Network Scanner Selector EX in the menu bar and select the Enables scanning from the operation panel checkbox in the Preferences dialog.
NoteThe following setting is not required if the machine has already been specified during setup.
From the Go menu of Finder, select Applications, then double-click the Canon Utilities folder, IJ Network Scanner Selector EX folder, then Canon IJ Network Scanner Selector EX icon.
Canon IJ Network Scanner Selector EX appears in the menu bar, and the Scan-from-PC Settings screen appears.
- Select the machine from Scanners.
Select the Bonjour service name set to the machine. When Bonjour is disabled, the MAC address of the machine is displayed.
 Important
If multiple scanners exist on the network, multiple model names are displayed. In that case, you can select one scanner per model. For details, refer to the help file of IJ Network Scanner Selector EX.
- Click OK.
NoteThe scanners selected in the Scan-from-PC Settings screen will be automatically selected in the Scan-from-Operation-Panel Settings screen as well.
Setting for Scanning with MP Navigator EX
To scan over a network using MP Navigator EX, specify the machine with IJ Network Scanner Selector EX, then follow the steps below and change the connection status between the computer and the machine.
Start MP Navigator EX.
Click here for instructions.
- Click Preferences.
- Click the General tab and select "XXX series Network" (where "XXX" is the model name) for Product Name.
 Note
NoteWhen you click Change..., the Scan-from-PC Settings screen of IJ Network Scanner Selector EX appears.
If you have multiple scanners, you can select other scanners.
For USB connection, select "XXX series" (where "XXX" is the model name) for Product Name.
Click OK.
The Preferences dialog box closes. You can now scan via a network connection.
Go to the Main Menu to check whether network scanning is enabled.
Setting for Scanning Using the Operation Panel
You can make settings for scanning using the Operation Panel of the machine.
ImportantSet MP Navigator EX to use the machine via a network connection beforehand.
From the Go menu of Finder, select Applications, then double-click the Canon Utilities folder, IJ Network Scanner Selector EX folder, then Canon IJ Network Scanner Selector EX icon.
Canon IJ Network Scanner Selector EX appears in the menu bar, and the Scan-from-PC Settings screen appears.
Click Scan-from-Operation-Panel Settings.
The Scan-from-Operation-Panel Settings screen appears.
- Select the machine from Scanners and click OK.
The Bonjour service name set to the machine is selected by default. When Bonjour is disabled, the MAC address of the machine is displayed. Note
Note
When multiple scanners are connected via a network, you can select up to three scanners. For details, refer to the help file of IJ Network Scanner Selector EX. - Return to the Scan-from-PC Settings screen and click OK.
NoteIf the Bonjour service name or MAC address of the machine is displayed in gray or not displayed, or cannot be selected, check the following conditions and click OK to close the screen, then reopen it and select the machine
- ScanGear (scanner driver) is installed
- Network settings of the machine is completed after installing ScanGear
- Network communication between the machine and computer is enabled
IJ Network Scanner Selector EX Menu and Setting Screen
Set up IJ Network Scanner Selector EX to scan images into a computer over a network using MP Navigator EX or the operation panel of the machine.
NoteIf IJ Network Scanner Selector EX is not running, from the Go menu of Finder, select Applications, then double-click the Canon Utilities folder, IJ Network Scanner Selector EX folder, then Canon IJ Network Scanner Selector EX icon.
Menu
About Canon IJ Network Scanner Selector EX
Displays the version information.
- Preferences...
Click to open the Preferences dialog and select whether to enable scanning over a network using the operation panel of the machine.
Select the Enables scanning from the operation panel checkbox to scan over a network using the operation panel of the machine. - Hide Canon IJ Network Scanner Selector EX
Hides the settings screen.
To display the settings screen again, click in the Dock.
 - Hide Others
Hides all running applications other than IJ Network Scanner Selector EX.
- Show All
Displays the applications that were hidden with Hide Others.
- Quit Canon IJ Network Scanner Selector EX
Exits IJ Network Scanner Selector EX.
Scan-from-PC Settings Screen
The machine must be selected with IJ Network Scanner Selector EX before scanning over a network.
From the Go menu of Finder, select Applications, then double-click the Canon Utilities folder, IJ Network Scanner Selector EX folder, then Canon IJ Network Scanner Selector EX icon to display the Scan-from-PC Settings screen.
Scanners
The Bonjour service names or MAC addresses of the scanners that can be used over the network are displayed.
You can select one scanner per model. For details, refer to the help file of IJ Network Scanner Selector EX.
Important- If you have disabled Bonjour after selecting the machine by Bonjour service name, reopen the Scan-from-PC Settings screen and select the MAC address of the machine from Scanners.
- If you have changed the Bonjour service name after selecting the machine by Bonjour service name, reopen the Scan-from-PC Settings screen and select the new Bonjour service name from Scanners.
- If you have disabled Bonjour after selecting the machine by Bonjour service name, reopen the Scan-from-PC Settings screen and select the MAC address of the machine from Scanners.
 (Help)
Opens the help file of IJ Network Scanner Selector EX.
- Scan-from-Operation-Panel Settings
The Scan-from-Operation-Panel Settings screen appears. You can select the scanners from which you want to scan using the Operation Panel.
Scan-from-Operation-Panel Settings Screen
Displays when you click Scan-from-Operation-Panel Settings in the Scan-from-PC Settings screen.
Scanners
The Bonjour service names or MAC addresses of the scanners that can be used over the network are displayed.
You can select up to three scanners. For details, refer to the help file of IJ Network Scanner Selector EX.
Important- If you have disabled Bonjour after selecting the machine by Bonjour service name, reopen the Scan-from-PC Settings screen and select the MAC address of the machine from Scanners.
- If you have changed the Bonjour service name after selecting the machine by Bonjour service name, reopen the Scan-from-PC Settings screen and select the new Bonjour service name from Scanners.
- If you have disabled Bonjour after selecting the machine by Bonjour service name, reopen the Scan-from-PC Settings screen and select the MAC address of the machine from Scanners.
Note
If the Bonjour service name or MAC address of the machine is displayed in gray or not displayed, or cannot be selected, check the following conditions and click OK to close the screen, then reopen it and select the machine
- ScanGear (scanner driver) is installed
- Network setup is completed after installing ScanGear
- Network communication between the machine and computer is enabled
- You do not need to use this software when scanning via USB. You can scan via USB even if it is running.
Setting Items on the Operation Panel of the Machine
You can change the scan settings such as the scan size, resolution, or data format.
When the Scan standby screen is displayed, press the right Function button to select the setting item.
Use the button to select the setting item and the button to specify the setting, then press the OK button.
NoteThe scan setting cannot be specified under the following conditions:
When Auto scan is selected for Doc.type to forward the scanned data to the computer
When you forward the scanned data to the computer using WSD (one of the network protocols supported in Windows 7 and Windows Vista)
Depending on the destination, some setting items cannot be selected. This section describes the setting items when you select Memory card on the screen for selecting to which you save the data.
The setting item which cannot be selected is displayed grayed out.
Some settings cannot be specified in combination with the setting of other setting item, the document type selected for Doc.type, or the scan menu on the screen for selecting to which you save the data. If the setting which cannot be specified in combination is selected, Error details is displayed on the LCD. In this case, press the left Function button to confirm the message, then change the setting.
The specified scan settings such as the scan size, resolution, and data format are retained even if the machine is turned off.
When scanning starts in the scan menu that is not available with the specified setting, The specified function is not available with current settings. is displayed on the LCD. Change the setting, following the on-screen instructions.
When you forward the scanned data to the computer or attach the data to an e-mail, you can specify the destination and file name using MP Navigator EX. Refer to Scanner Button Settings Tab (Save to PC) for the settings when forwarding the data to PC, and refer to Scanner Button Settings Tab (Attach to E-mail) for the settings when attaching the data to an e-mail.
If you scan originals from the computer, you can scan with advanced settings.
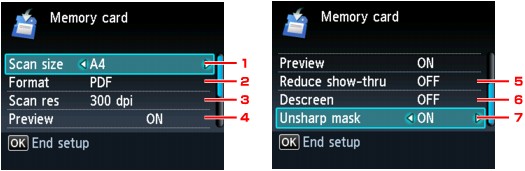
Scan size
Select the size of the original.
Format
Select the data format of the scanned data.
Scan res (Scan resolution)
Select the resolution for scanning.
Preview
Select whether you use preview of the scanned data.
Reduce show-thru (Reducing show-through)
Characters on the back may show through when scanning a thin document such as a newspaper. Select ON if characters seem to show through on the scanned document.
This setting item is not available when Photo is selected for Doc.type.Descreen
A printout consists of minute dots to make characters or graphs. Interfering with each dot may result in uneven shades or a striped pattern. Select ON if you notice any uneven shades or a striped pattern on the scanned image.
This setting item is not available when Photo is selected for Doc.type.NoteEven if ON is selected for this setting, some moire effects may remain if Unsharp mask is set to ON. In that case, select OFF for Unsharp mask.
Unsharp mask
The outline of small characters or thin objects can be accentuated. Select ON if you want to accentuate the outline of the scanned data.
Scanner Button Settings Tab (Save to PC)
On the Scanner Button Settings tab, you can specify how to respond when scanning using the operation panel of the machine.
This section describes the settings available when Select Event is Save to PC.
See "Setting Items on the Operation Panel of the Machine" for details on the items to be set using the operation panel of the machine.
Event
Select Event
Displays the scan modes that can be selected on the operation panel of the machine. Select Save to PC.
Document Type
Displays the document types that can be selected on the operation panel of the machine.
Actions
Scan Settings
Specify...
Opens the Scan Settings dialog box in which you can make advanced scan settings.
Document Size
Set this item using the operation panel of the machine.
Resolution
Set this item using the operation panel of the machine.
Save Settings
Automatically save the image to your computer after scanning it
Select this to save the images to your computer as specified after scanning them.
The File Name and Save in settings will be displayed.
File Name
Enter the file name of the image to be saved (up to 64 characters).
Save as type
Set this item using the operation panel of the machine.
Set...
When Document Type is Auto ScanThe Auto Save Settings dialog box opens and you can specify the file format in which to save images automatically and other advanced save settings. Select a file format for items detected as documents, and for items detected as photos.

When JPEG/Exif is Selected
Click Set... to specify a compression type for JPEG files. Select High(Low Compression), Standard, or Low(High Compression).
ImportantThis setting is not available when the Compress scanned images when transferring checkbox is selected on the General Tab of the Preferences dialog box.
When PDF is Selected
Click Set... to make advanced settings for creating PDF files.
When Document Type is Document or Photo
The Save Settings dialog box opens and you can make advanced settings for saving images scanned using the Operation Panel of the machine as JPEG or PDF files.
Specify JPEG on printer's operation panel
Click Set... to specify a compression type for JPEG files. Select High(Low Compression), Standard, or Low(High Compression).
ImportantThis setting is not available when the Compress scanned images when transferring checkbox is selected on the General Tab of the Preferences dialog box.
- Specify PDF on printer's operation panel
Click Set... to make advanced settings for creating PDF files.
ImportantUse the operation panel of the machine to set the compression type for saving.
- Save in
Displays the folder in which to save the scanned images. To change the folder, click Browse... to specify another one.
By default, the scanned images are saved in the MP Navigator EX folder in the Pictures folder.
- Save to a Subfolder with Current Date
Select this checkbox to create a subfolder in the folder specified in Save in with the current date and save scanned files in it. A subfolder with a name such as "2011_01_01" (Year_Month_Date) will be created.
If this checkbox is not selected, files are saved directly in the folder specified in Save in.
- Open the save dialog box after scanning the image
Select this to open the Save to PC dialog box after scanning the images and specify the save settings such as destination folder and file name.
Scanner Button Settings Tab (Attach to E-mail)
On the Scanner Button Settings tab, you can specify how to respond when scanning using the operation panel of the machine.
This section describes the settings available when Select Event is Attach to E-mail.
See "Setting Items on the Operation Panel of the Machine" for details on the items to be set using the Operation Panel of the machine.
Event
Select Event
Displays the scan modes that can be selected on the Operation Panel of the machine. Select Attach to E-mail.
- Document Type
Displays the document types that can be selected on the Operation Panel of the machine.
Actions
Scan Settings
- Specify...
Opens the Scan Settings dialog box in which you can make advanced scan settings.
Document Size
Set this item using the operation panel of the machine.
- Resolution
Set this item using the operation panel of the machine.
Save Settings
File Size
Not available.
- File Name
Enter the file name of the image to be saved (up to 64 characters).
- Save as type
Set this item using the operation panel of the machine.
- Set...
The Save Settings dialog box opens and you can make advanced settings for saving images scanned using the operation panel of the machine as JPEG or PDF files.
- Specify JPEG on printer's operation panel
Click Set... to specify a compression type for JPEG files. Select High(Low Compression), Standard, or Low(High Compression).
Important- This setting is not available when the Compress scanned images when transferring checkbox is selected on the General Tab of the Preferences dialog box.
- Specify PDF on printer's operation panel
Click Set... to make advanced settings for creating PDF files.
Important- Use the operation panel of the machine to set the compression type for saving.
- Specify JPEG on printer's operation panel
- Save in
Displays the folder in which to save the scanned images. To change the folder, click Browse... to specify another one.
By default, the scanned images are saved in the MP Navigator EX folder in the Pictures folder.
- Save to a Subfolder with Current Date
Select this checkbox to create a subfolder in the folder specified in Save in with the current date and save scanned files in it. A subfolder with a name such as "2011_01_01" (Year_Month_Date) will be created.
If this checkbox is not selected, files are saved directly in the folder specified in Save in.
Attachment Settings
Mail Program
Specify an e-mail software program.
WSD setting items
You can enter this setting menu by following the procedure below:
- Select Setup on the HOME screen.
- Select Device settings -> LAN settings -> Other settings -> WSD setting
Setting items
Enable/disable WSD
Selects whether WSD is enabled or disabled.Note
When this setting is activated, the printer icon is displayed on the Network Explorer in Windows 7 and Windows Vista.
WSD scan from this device
Selecting Enable allows you to transfer the scanned data to the computer using WSD.Timeout setting
Specifies the timeout length.