Creating and Printing Still Images from Videos

Article ID: ART114093 | Date published: 05/11/2015 | Date last updated: 08/17/2015
 

Solution

You can capture video frames to create still images and print them.

Important
  • This function is not available when ZoomBrowser EX Ver.6.5 or later (supplied with Canon digital cameras supporting MOV format video recording) is not installed.

    The same or later version of ZoomBrowser EX as the one supplied with the Canon digital camera that was used to record the video needs to be installed.

  • Videos may not play smoothly depending on your environment.
  • When the color tone of a video is changed via the settings of the graphic driver (video card) or its utility, such a change is not reflected in still images captured from the video. Therefore, color tones may differ between videos and captured still images.
Note
  • Operation(s) for Photo Print is (are) used as example(s) in the following descriptions.

    1. Start Easy-PhotoPrint EX.

      Starting Easy-PhotoPrint EX

    2. Click Photo Print from Menu.

      The Select Images screen appears.

      Note
      • When an item other than Photo Print is selected from Menu, follow these steps.

        1. Select the paper size, layout, etc. in the Page Setup screen.
        2. Click Select Images in the step button area on the left side of the screen.
    3. In the Select Images screen, click (Capture frames from video).
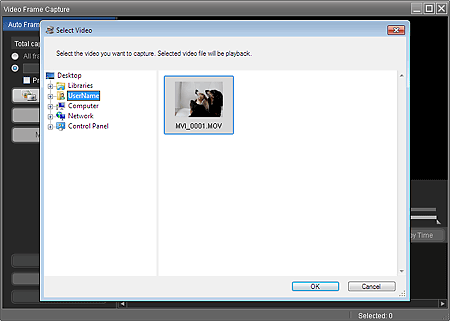
      The Video Frame Capture window and Select Video dialog box appear.

      figure: Video Frame Capture window and Select Video dialog box

      Note
      • You can also display the Video Frame Capture window by clicking (Capture frames from video) in the Add Image dialog box. To display the Add Image dialog box, select the page you want to add images to in the Edit screen, then click (Add Image).

      • See Help for details on the Video Frame Capture window.

    4. From the Folder Tree area of the Select Video dialog box, select the folder containing the video from which you want to capture still images.

      The videos in the folder will be displayed as thumbnails (miniatures).

      Note
      • Only MOV format videos recorded with Canon digital cameras are displayed.

      • The selected video plays.

    5. Select the video from which you want to capture still images and click OK.

      The selected video plays in Preview of the Video Frame Capture window.

      figure: Video Frame Capture window

      Note
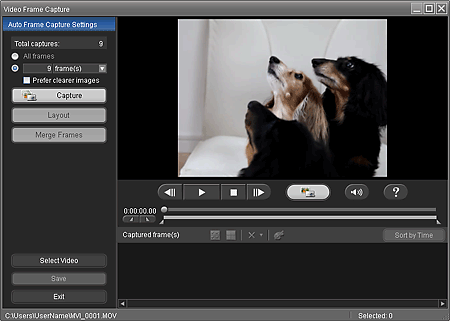
      • (Pause) appears while a video plays, and (Playback) appears while a video is stopped.

      • Use (Pause) and (Frame backward/Frame advance) to display the frame you want to capture.

    6. Display the frame you want to capture and click (Capture).

      The captured still image is displayed in the Captured frame(s) area.

      Important
      • You can capture up to 150 frames from one video.

      Note
      • You can automatically capture multiple still images from a video.

        Display the Auto Frame Capture Settings area, then use (Set start time/Set end time) in the Preview area to specify the time range. In the Auto Frame Capture Settings area, select a capture method and click Capture.

        Select the Prefer clearer images checkbox in the Auto Frame Capture Settings area beforehand to automatically detect and capture less blurry frames. Capture may take time depending on your environment.

      • You can correct the captured still images in the Correct Captured Frames window. To display the Correct Captured Frames window, select the still image(s) you want to correct in the Captured frame(s) area, then click (Correct image). See Help for details on the Correct Captured Frames window.

      • You can create an image (a layout image) in which multiple still images captured from a video are laid out on one page.

        Creating Layout Images from Videos

      • You can overlap and merge multiple still images captured from a video in the order of the time code to create an image depicting the flow of a moving subject.

        Creating Images of Merged Video Frames

    7. Select the still image(s) you want to save and click Save.

      When the Save dialog box appears, specify the save location and file name, then click Save.

      Note
      • Only JPEG/Exif data format is available for saving created still images.

    8. Click Exit.

      Video Frame Capture window will be closed.

      Important
      • The captured still images will be deleted if you exit before saving them.

      Note
      • When the Movie Print window is displayed via Solution Menu EX, you can print the captured still images.

        To print, specify the printer and media in the Print area, then click Print.

        • When you print from the Movie Print window, images are automatically cropped.

          When a full high definition and high definition video is used, large portions will be cut off from the left and right sides.

        • If you want to adjust the cropping area before printing, save the captured still image and print it from a function of Easy-PhotoPrint EX.

    9. The Select Images screen returns; click the image you want to print.

      The selected image itself will appear in the selected image area.

      Note
      • When you opened the Video Frame Capture window from the Add Image dialog box, the Add Image dialog box returns. Select the image(s) you want to add and click OK.

    10. Click Select Paper in the step button area on the left side of the screen.

      The Select Paper screen appears. Select the printer and paper size to be used, etc.

      Note
      • For items other than Photo Print, click Edit in the step button area on the left side of the screen to change the layout, enter text, etc.

    11. Click Layout/Print in the step button area on the left side of the screen.

      The Layout/Print screen appears. Select a layout you want to use.

      Note
      • For items other than Photo Print, click Print Settings in the step button area on the left side of the screen to select the printer and paper to be used, etc.

    12. Click Print in the step button area on the left side of the screen.


Rate this Article
Was this article helpful?
Yes, This document is helpful
No, This document needs a clearer explanation
 
Please provide your comments