
How to Use Apple AirPrint - MG6220
| Article ID: ART114261 | | | Date published: 05/11/2015 | | | Date last updated: 12/01/2015 |
Description
Solution
This document explains how to use Apple AirPrint to print documents from a Canon printer.
AirPrint can use a local wireless LAN to print email, photos, web pages, and other documents from iPad, iPhone, or iPod touch directly to your printer.
Checking Your Environment
First, check your environment.
- Printer software version
Ver. 2.000 and later versions of the printer software support AirPrint.
If your Canon printer does not support AirPrint, you must use the Printer Update Utility to update the printer software.
* Download them from our download page. The Updater will be found in the Firmware section of Drivers & Software.
Click here to go to the product page for the PIXMA MG6220. Click Drivers & Downloads. Then, click the Firmware tab. Click the Select button to the right of the firmware update file you want to download. Place a check in the box to indicate that you agree to the terms of the Disclaimer. Click the Download button to download the firmware update file to your computer.
- AirPrint Operation Environment
All Apple products running Apple iOS 4.2 or a later operating system support AirPrint.
You can check the software version by printing the nozzle check pattern.
-> [Printing the Nozzle Check Pattern ]
Check the software version "Ver. X.XXX" that is printed in the print results of the nozzle check pattern.
- If the software version is printed
Software update is not necessary.
-
If the software version is not printed
Software update is necessary. Update according to "Software Version Update Procedure" described below.
Network Environment
The Apple device (iPad, iPhone, or iPod touch) and your printer must be connected to the same 802.11 wireless LAN. AirPrint uses Bonjour to detect your printer via the local wireless LAN.
Printing with AirPrint1. Check that your printer is turned on and is connected to the local wireless LAN.
2. From the application of your Apple device, tap  to display the menu options.
3. From the dropdown menu, tap Print.
4. From Printer Options, select a printer.
Because some applications do not support AirPrint, Printer Options may not be displayed. If an application does not let you use printer options, you cannot print from that application.
5. For 1 Copy, click + or - to set the number of required copies.
6. For Duplex Printing, click On to enable duplex printing or click Off to disable the function.
7. When printing a file type that has multiple pages, such as a PDF file, click Range and then click All Pages or select the range of pages to be printed.
The printer options differ depending on the application and printer you are using. Normally, when you tap Print and select a printer, the displayed printer options will include up to the following four options:
- Printer: Select a printer that can be used in your wireless LAN.
- Copies: Select the number of print copies.
- Duplex Printing: If the printer supports duplex printing, you can select On or Off.
- Range: The page range can be used only with specific applications and file types (such as PDF files).
8. Tap the Print.
When you execute printing, the printer prints according to the specified settings.
Paper SizeWith AirPrint, the paper size is selected automatically according to the application being used on the Apple device and the region in which AirPrint is used.
When Apple's photo application is used, the default paper size is letter size in Japan, and KG (4"x6") in other countries and regions.
When documents are printed from Apple's Safari application, the default paper size is letter size in the U.S. region, and A4 in Japan and Europe.
Your application may support different paper sizes.
Checking the Print Status
During printing, a Print icon is displayed in the list of recently used applications, and you can use it to check the print progress.
To display the list of latest used applications, touch the Home button on the Apple device twice. The Print icon is displayed at the bottom of the Home window.
Deleting a Print JobTo delete a print job with AirPrint, use one of the following two methods:
- From the printer operation panel: Touch the Stop button to cancel the print job.
- From an Apple device: Touch the Home button on the Apple device twice. Tap the Print icon and open Print Jobs to display the print job list. Tap the print job to be canceled, and then tap Cancel Print.
If the document does not print, check the following:
1. Check that the printer power is on. If the printer power is on, turn it off and then back on again, and check whether the issue is resolved.
2. Check that the printer is connected by wireless LAN connection to the same network subnet as the device on which iOS is installed.
3. Check that the printer software has been updated to the version that supports AirPrint.
4. Check that the printer has enough paper and ink.
5. Check that no error message is displayed on the printer operation panel.
If the problem persists, use the printer driver on your computer to execute printing and check whether the document can be printed normally on the printer.
- After you turn on the printer, it may take few minutes before the printer can communicate through a wireless LAN connection. Confirm that your printer is connected to the wireless LAN, and then try printing.
- If Bonjour is disabled, AirPrint cannot be used. Be sure to enable Bonjour.
- AirPrint is a trademark of Apple Inc.
- Macintosh, Mac, Mac OS, AirPort, Safari, Bonjour, iPad, iPhone and iPod touch are registered trademarks of Apple Inc., registered in the U.S. and other countries.
- IOS is a trademark or registered trademark of Cisco in the U.S. and other countries and is used under license.
- Windows is a trademark or registered trademark of Microsoft Corporation in the U.S. and/or other countries.
- Windows Vista is a trademark or registered trademark of Microsoft Corporation in the U.S. and/or other countries.
- All other company names and products mentioned herein may be trademarks or registered trademarks of their respective companies.
Print the nozzle check pattern.
You need to prepare: a sheet of A4 or Letter-sized plain paper
1. Make sure that the power is turned on.
2. Make sure that one or more sheets of A4 or Letter-sized plain paper are loaded in the cassette.
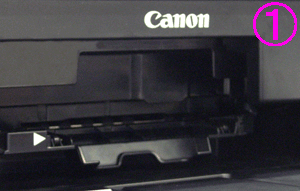
3. Open the paper output tray gently, and open the output tray extension.
If the inner cover is open, close it.
4. Print the pattern:
(1) Select  Setup on the HOME screen.
The setup menu screen will appear.
(2) Select  Maintenance, then touch the OK button.
The Maintenance screen will appear.
(3) Select Print nozzle check pattern, then touch the OK button.
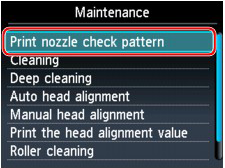
The confirmation screen will appear.
(4) Select Yes, then touch the OK button.
The nozzle check pattern will be printed and two pattern confirmation screens will appear on the LCD.
5. Examine the nozzle check pattern. The printer's software version will be printed below the pattern.
Software Version Update Procedure
Select your Operating System :
|
|
Update Procedure
Operating Environment for Printer Update Utility
-
Target operating systems
-
Windows 7, Windows Vista, Windows XP
-
-
Requirements
-
Computer on which the printer driver is installed.
 Important
-
In the Properties window of the printer driver, display the Ports tab, and select Enable bidirectional support.
-
-
Printer
-
USB cable
-
Printer Update Utility
-
Software Version Update Procedure
-
Connect the computer and the printer by using a USB cable.
If a LAN cable or a USB cable for camera connection is connected, disconnect those cables.
For models with card slots, remove all the cards if they are inserted in the card slots.
 Note
Note
-
Make sure that only one printer is connected to the computer via a USB cable.
-
-
Double-click
 (Printer Update.exe) to start the update utility.
 -
Check the message content of step 1, turn on the printer power, and then click Next.
Note
-
If an error message is displayed, the possible causes are as follows:
-
Cause (1): The USB cable is not connected
Corrective action: Connect the USB cable, and start over from step 1. -
Cause (2): The downloaded update file is for a different printer.
Corrective action: Download the file for the printer to be updated, and start over from step 1.
-
-
-
Check the message content of step 2, and click Start.
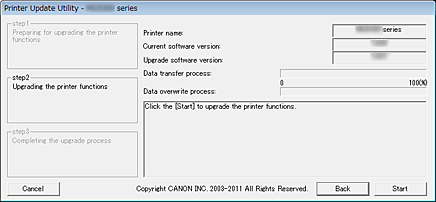
Printer name: Name of the printer connected to the computer.
Current software version: Software version of the connected printer.
Upgrade software version: Software version to which the printer is to be updated at this time.
Important
-
Do not turn off the printer or disconnect the USB cable until the update is complete. Doing so may cause an error.
Note
-
If you are unable to click Start, the update was attempted on a printer that does not require firmware overwriting. Check the Current software version again.
If it does not require the update then cancel it. -
During the update, the error lamp on the printer will flash orange.
-
-
When the step 3 window appears, check the message content, and click Exit.
-
Touch the printer power button to turn off the printer.
This completes the software update. If you are using the printer with LAN connection, disconnect the USB cable first and then, connect the LAN cable.
Note
-
You must turn off the power and then turn it back on again. Otherwise, the printer will not operate properly.
-
If the power is turned off during the update, the update will not end normally.
If the printer does not operate normally even if you turn off the printer power and then turn it back on again, the update may not have ended normally.
-
Error Causes and Corrective Actions
If an error is detected during operation of the Printer Update Utility, an error message is displayed.
If an error message is displayed, perform the operation described in the message instructions.
The following table lists the causes and corrective actions of the main error messages that may be displayed.
|
Message |
Cause |
Corrective action |
|---|---|---|
|
This program does not support the operating system you are using. |
An attempt was made to run the Printer Update Utility on an operating system that the utility does not support. |
Run the Printer Update Utility on the supported operating system. |
|
The printer cannot be found. Check the following items, and then restart the utility:
|
|
|
|
More than one printer is connected. Make sure only one printer is connected with a USB cable, and then restart the utility. |
Two or more printers to be updated are connected to the computer. |
Connect only one printer. |
|
The printer status is abnormal. Turn on the printer again, and then restart the utility. |
The printer was unable to execute the update. |
Turn on the printer again. |
|
An error occurred during the printer function upgrade. Since the upgrade failed, the printer cannot be used in its current condition. Turn on the printer power again, and then be sure to restart the utility. |
The printer power was turned off or the USB cable was disconnected during execution of the update. |
Touch OK button to terminate the Printer Update Utility. Turn off the printer power, wait a few seconds, and then turn on the power again. Start the utility again, and operate it. If the printer does not start normally or if the update cannot be executed, repairs are necessary. |
Update Procedure
Operating Environment for Printer Update Utility
-
Target operating systems
-
Mac OS X Tiger 10.4.11 and later
-
-
Requirements
-
Printer
-
USB cable
-
Printer Update Utility
-
Software Version Update Procedure
-
Connect the computer and the printer by using a USB cable.
If a LAN cable or a USB cable for camera connection is connected, disconnect those cables.
For models with card slots, remove all the cards if they are inserted in the card slots.
Note
-
Make sure that only one printer is connected to the computer via a USB cable.
Important
-
Confirm that the sleep mode is disabled on the computer.
-
-
Double-click
 (Printer Update) to start the update utility.
 -
Check the message content of Step 1, turn on the printer power, and then click Next.
Note
-
If an error message is displayed, the possible causes are as follows:
-
Cause (1): The USB cable is not connected
Corrective action: Connect the USB cable, and start over from Step 1. -
Cause (2): The downloaded update file is for a different printer.
Corrective action: Download the file for the printer to be updated, and start over from Step 1.
-
-
-
Check the message content of Step 2, and click Start.
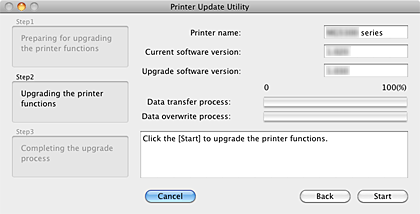
Printer name: Name of the printer connected to the computer.
Current software version: Software version of the connected printer.
Upgrade software version: Software version to which the printer is to be updated at this time.
Important
-
Do not turn off the printer or disconnect the USB cable until the update is complete. Doing so may cause an error.
Note
-
If you are unable to click Start, the update was attempted on a printer that does not require firmware overwriting. Check the Current software version again.
If it does not require the update then cancel it. -
During the update, the error lamp on the printer will flash orange.
-
-
When the Step 3 window appears, check the message content, and click Exit.
-
Touch the printer power button to turn off the printer.
This completes the software update. If you are using the printer with LAN connection, disconnect the USB cable first and then, connect the LAN cable.
Note
-
You must turn off the power and then turn it back on again. Otherwise, the printer will not operate properly.
-
If the power is turned off during the update, the update will not end normally.
If the printer does not operate normally even if you turn off the printer power and then turn it back on again, the update may not have ended normally.
-
Error Causes and Corrective Actions
If an error is detected during operation of the Printer Update Utility, an error message is displayed.
If an error message is displayed, perform the operation described in the message instructions.
The following table lists the causes and corrective actions of the main error messages that may be displayed.
|
Message |
Cause |
Corrective action |
|---|---|---|
|
This program does not support the operating system you are using. |
An attempt was made to run the Printer Update Utility on an operating system that the utility does not support. |
Run the Printer Update Utility on the supported operating system. |
|
Classic is running. Stop Classic and restart the utility. |
An attempt was made to operate the Printer Update Utility while Classic was running on Mac OS X. |
Stop Classic, and operate the Printer Update Utility from Mac OS X. |
|
The printer cannot be found. Check the following items, and then restart the utility:
|
|
|
|
More than one printer is connected. Make sure only one printer is connected with a USB cable, and then restart the utility. |
Two or more printers to be updated are connected to the computer. |
Connect only one printer. |
|
The printer status is abnormal. Turn on the printer again, and then restart the utility. |
The printer was unable to execute the update. |
Turn on the printer again. |
|
An error occurred during the printer function upgrade. Since the upgrade failed, the printer cannot be used in its current condition. Turn on the printer power again, and then be sure to restart the utility. |
The printer power was turned off or the USB cable was disconnected during execution of the update. |
Touch OK button to terminate the Printer Update Utility. Turn off the printer power, wait a few seconds, and then turn on the power again. Start the utility again, and operate it. If the printer does not start normally or if the update cannot be executed, repairs are necessary. |
Return to instructions
