
Making Copies - MX472 / MX479
| Article ID: ART114428 | | | Date published: 05/11/2015 | | | Date last updated: 05/06/2019 |
Description
This article provides information on making copies with the PIXMA MX472 / MX479.
Solution
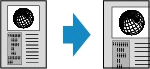
Making Copies
This article describes the basic procedure to perform standard copying.

- Make sure that the printer is turned on.
- Load paper.
- Press the COPY
 button.
The Copy standby screen is displayed.
- Load the original document on the platen glass or in the ADF.
- Confirm the page size and magnification.

- Magnification
- Page size
 Note
Note- To change or confirm the page size, magnification, or other settings, press the Menu
 button, then use the
 button to display the desired setting item.
Refer to [ Setting Items for Copying ] within this webpage.
- Press the COPY button to reset the magnification to 100%.
- Use the (-) (+) button or the Numeric buttons to specify the number of copies.
- Press the Color button for color copying, or the Black button for black & white copying.
The machine starts copying.
Remove the original on the platen glass or from the document output slot after copying is complete.
 Important
- If you load the original on the platen glass, do not open the document cover or remove the original while Scanning... is displayed on the screen.
- If you load the original in the ADF, do not move the original until copying is complete.
Note
- To cancel copying, press the Stop button.
- If you load the original on the platen glass, you can add the copying job while printing.
-> Refer to [ Adding the Copying Job (Reserve copy) ] within this webpage.
- Adding the Copying Job (Reserve copy)
If you load the original on the platen glass, you can add the copying job while printing (Reserve copy).
The screen below is displayed when you can reserve copy.

Load the original on the platen glass and press the same button (the Color button or the Black button) as the one which you previously pressed.
Important
Important- When you load the original on the platen glass, move the document cover gently.
Note- When Image quality is set to High, or you load the original in the ADF, you cannot add the copying job.
- When you add the copying job, the number of copies or the settings such as the page size or media type cannot be changed.
- If you press the Stop button while reserve copying is in progress, the screen to select the method to cancel copying is displayed. If you select Cancel all reserv. then press the OK button, you can cancel copying all scanned data. If you select Cancel last reserv., then press the OK button, you can cancel the last copying job.
- If you set a document of too many pages to reserve copy, Memory is full may appear on the LCD. Press the OK button and wait a while, then try copying again.
- If Try again appears on the LCD when scanning, press the OK button, then press the Stop button to cancel copying. After that, copy the documents that have not been finished copying.
Setting Items for Copying
You can change the copy settings such as the page size, media type, and intensity.
Press the Menu button, use the button to select a setting item, then press the OK button.
button, use the button to select a setting item, then press the OK button.Use the button to adjust each setting item, then press the OK button. The next setting item is displayed.
button to adjust each setting item, then press the OK button. The next setting item is displayed.The LCD returns to the Copy standby screen when all the settings are complete.
Note
Note- The * (asterisk) on the LCD indicates the current setting.
- Some settings cannot be specified in combination with the setting of other setting items or the copy menu.
- The settings of the page size, media type, etc. are retained even if the machine is turned off.
- Enlarge/Reduce
Select the reduction/enlargement method.
-> Refer to [ Reducing or Enlarging a Copy ] within this webpage.
Ex:
 Note
Note
- This setting item is displayed under the following conditions.
- When standard copying is selected
- When Borderless copy is selected for Special copy
- When standard copying is selected
- Copy intensity
Change the intensity.
Ex:
 Note
Note
- If you select Auto adjust, load the original on the platen glass. You will not be able to make copies from the ADF with Auto adjust selected.
- If you select Manual adjust, use the button to decrease the intensity or the button to increase it.
- Page size
Select the page size of the loaded paper.
Ex:

- Media type
Select the media type of the loaded paper.
Ex:

- Image quality
Select the image quality according to the original.
Ex:
 Note
Note
- If you use Draft with the media type set to Plain paper and the quality is not as good as expected, select Standard or High and try copying again.
- Select High to copy in grayscale. Grayscale renders tones in a range of grays instead of black or white.
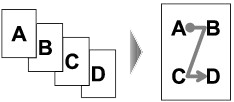
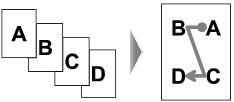
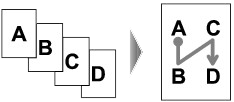
- 4-on-1 layout
Select the layout when copying four original pages onto a single sheet of paper by reducing each image. Four different layouts are available.
Ex:
 Note
Note
- This setting item is displayed only when 4-on-1 copy is selected for Special copy.
-> Refer to [ Copying Four Pages to Fit onto a Single Page ] within this webpage.
- Collate
Select whether to obtain sorted printouts when making multiple copies of a multi-paged original.
Ex:
 Note
Note
- This setting item is displayed when standard copying is selected.
Reducing or Enlarging a Copy
You can specify the magnification optionally or select the preset-ratio copying or fit-to-page copying.
In the copy mode, press the Menu button, use the button to select Enlarge/Reduce, then press the OK button.
button to select Enlarge/Reduce, then press the OK button.Use the button to select the reduction/enlargement method, then press the OK button.
button to select the reduction/enlargement method, then press the OK button.Ex:
 Note
Note
- Some of the reduction/enlargement methods are not available depending on the copy menu.
- Preset ratio
You can select one of the preset ratios to reduce or enlarge copies.

Use the button to select a preset ratio to match the size of your original document and printing paper, then press the OK button.
button to select a preset ratio to match the size of your original document and printing paper, then press the OK button.- Magnification
You can specify the copy ratio as a percentage to reduce or enlarge copies.
Use the (-) (+) button or the Numeric buttons to specify the reduction or enlargement ratio (25 - 400%), then press the OK button.
Note
(-) (+) button or the Numeric buttons to specify the reduction or enlargement ratio (25 - 400%), then press the OK button. Note
- Press and hold the (-) (+) button to quickly advance through the ratios.
- Fit to page
The machine automatically reduces or enlarges the image to fit the page size.
 Note
Note
- When you select Fit to page, the document size may not be detected correctly depending on the original. In this case, select Preset ratio or Magnification.
- When Fit to page is selected, load the document on the platen glass.
About Special copy Menu
The following menus are selectable in the Special copy menu.
- Frame erase copy
When copying thick originals such as books, you can make a copy without black margins around the image and gutter shadows.
-> Refer to [ Copying Thick Originals Such as Books ] within this webpage.
- Borderless copy
You can copy images so that they fill the entire page without borders.
-> Refer to [ Copying without Borders ] within this webpage.
- 2-on-1 copy
You can copy two original pages onto a single sheet of paper by reducing each image.
-> Refer to [ Copying Two Pages to Fit onto a Single Page ] within this webpage.
- 4-on-1 copy
You can copy four original pages onto a single sheet of paper by reducing each image.
-> Refer to [ Copying Four Pages to Fit onto a Single Page ] within this webpage.
Note
Note
- In addition to the copying method in the Special copy menu, the methods below are available.
- You can specify the magnification optionally or select the preset-ratio copying or fit-to-page copying.
-> Refer to [ Reducing or Enlarging a Copy ] within this webpage.
- You can obtain sorted printouts when making multiple copies of a multi-paged original.
-> Refer to [ Collated Copying ] within this webpage.
- You can specify the magnification optionally or select the preset-ratio copying or fit-to-page copying.
Copying Two Pages to Fit onto a Single Page
You can copy two original pages or a two sided page onto a single sheet of paper by reducing each image.

- Make sure that the printer is turned on.
- Load paper.
- Press the COPY button.
The Copy standby screen is displayed.
- Press the Menu button.
The Copy menu screen is displayed.
- Use the button to select Special copy, then press the OK button.
- Use the button select 2-on-1 copy, then press the OK button.
If a page size setting or a media type setting that cannot be used in 2-on-1 copying is selected, the LCD displays the following message.

- Use the button to select the page size, then press the OK button.
- Use the button to select the media type, then press the OK button.
- Load the original document on the platen glass or in the ADF.
- Use the (-) (+) button or the Numeric buttons to specify the number of copies.
Change the print settings as necessary.
-> Refer to [ Setting Items for Copying ] within this webpage.
- Press the Color button for color copying, or the Black button for black & white copying.
- When the document has been loaded on the platen glass:
When the machine finishes scanning the first page, the message below is displayed.

If you have the next page to scan, load it on the platen glass and press the OK button. The machine starts copying.
If you do not need more scanning, press the tone button to start copying. The machine starts copying.
Note
- You can add the copying job while printing.
-> Refer to [ Adding the Copying Job (Reserve copy) ] within this webpage.
- You can add the copying job while printing.
- When the document has been loaded in the ADF:
The machine starts scanning the next sheet of document automatically after one sheet of document finishes being scanned.
Note- If Memory is full appears on the LCD when scanning, set the image quality to Standard or reduce the number of sheets of documents, then try copying again. If the problem is not resolved, set the image quality to Draft and try copying again.
Copying Four Pages to Fit onto a Single Page
You can copy four original pages onto a single sheet of paper by reducing each image. Four different layouts are available.
- When Layout 1 is selected for 4-on-1 layout:
- When Layout 2 is selected for 4-on-1 layout:
- When Layout 3 is selected for 4-on-1 layout:
- When Layout 4 is selected for 4-on-1 layout:

- Make sure that the printer is turned on.
- Load paper.
- Press the COPY button.
The Copy standby screen is displayed.
- Press the Menu button.
The Copy menu screen is displayed.
- Use the button to select Special copy, then press the OK button.
- Use the button to select 4-on-1 copy, then press the OK button.
If a page size setting or a media type setting that cannot be used in 4-on-1 copying is selected, the LCD displays the following message.

- Use the button to select the page size, then press the OK button.
- Use the button to select the media type, then press the OK button.
- Specify the print settings and the layout.
Press the Menu button, then use the button to select a setting item.
Select 4-on-1 layout, press the OK button, then select the layout.
-> Refer to [ Setting Items for Copying ] within this webpage.
Note- The * (asterisk) on the LCD indicates the current setting.
- Load the original document on the platen glass or in the ADF.
- Use the (-) (+) button or the Numeric buttons to specify the number of copies.
- Press the Color button for color copying, or the Black button for black & white copying.
- When the document has been loaded on the platen glass:
When the machine finishes scanning the first page, the message below is displayed.

If you have the next page to scan, load it on the platen glass and press the OK button. The machine starts copying.
If you do not need more scanning, press the Tone button to start copying. The machine starts copying.
Note- You can add the copying job while printing.
-> Refer to [ Adding the Copying Job (Reserve copy)] within this webpage.
- When the document has been loaded in the ADF:
The machine starts scanning the next sheet of document automatically after one sheet of document finishes being scanned.
Note- If Memory is full appears on the LCD when scanning, set the image quality to Standard or reduce the number of sheets of documents, then try copying again. If the problem is not resolved, set the image quality to Draft and try copying again.
Copying Thick Originals Such as Books
When copying thick originals such as books, you can make a copy without black margins around the image and gutter shadows. Using this function, you can reduce unnecessary ink consumption.

- Make sure that the printer is turned on.
- Load paper.
- Press the COPY button.
The Copy standby screen is displayed.
- Press the Menu button.
The Copy menu screen is displayed.
- Use the button to select Special copy, then press the OK button.
- Use the button to select Frame erase copy, then press the OK button.
- Load the original document on the platen glass.
Note- When you use this function, load the original on the platen glass.
- Use the (-) (+) button or the Numeric buttons to specify the number of copies.
Change the print settings as necessary.
-> Refer to [ Setting Items for Copying ] within this webpage.
- Press the Color button for color copying, or the Black button for black & white copying.
The machine starts copying.
Note- Close the document cover.
- There may be a narrow black margin that appears around the image. This function removes the dark margins only. If a scanned book is too thin or when the machine is used near a window or in a bright environment, a faint black frame may remain. Also, if the color of an original is dark, the machine cannot distinguish the document color from the shadow and this may cause slight cropping or a shadow on the crease.
Copying without Borders
You can copy images so that they fill the entire page without borders.

- Make sure that the printer is turned on.
- Load the photo paper.
- Press the COPY button.
The Copy standby screen is displayed.
- Press the Menu button.
The Copy menu screen is displayed.
- Use the button to select Special copy, then press the OK button.
- Use the button to select Borderless copy, then press the OK button.
If a page size setting or a media type setting that cannot be used in borderless copying is selected, the LCD displays the following message.

- Use the button to select the page size, then press the OK button.
- Use the button to select the media type, then press the OK button.
- Load the original document on the platen glass.
Note- When you use this function, load the original on the platen glass.
- Use the (-) (+) button or the Numeric buttons to specify the number of copies.
Change the print settings as necessary.
-> Refer to [ Setting Items for Copying ] within this webpage.
- Press the Color button for color copying, or the Black button for black & white copying.
The machine starts borderless copying.
Note- Slight cropping may occur at the edges since the copied image is enlarged to fill the whole page. You can change the width to be cropped from the borders of the original image as needed. However, the cropped area will be larger if the extension amount is large.
Collated Copying
When you select ON for Collate on Copy menu, you can obtain sorted printouts when making multiple copies of a multi-paged original. In addition, you can copy originals on sides of paper.
- When ON is selected:

- When OFF is selected:
 Note
Note
- When you use this function, load the original in the ADF.
- The number of pages the machine can read varies with the document. If Memory is full appears on the LCD when scanning, reduce the number of document pages to scan and try copying again.
SIMS Doc Id
8202030400