| Solution |
Camera location information (latitude, longitude, and elevation) based on signals acquired from GPS satellites can be added to the still images and movies you shoot, or this information can be logged separately. In addition to geotagging, the camera clock can be updated automatically. Before using GPS functions, make sure the date, time, and home time zone on the camera are set correctly.
IMPORTANT
When using GPS functions, keep the following points in mind.
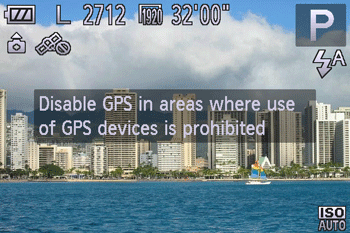
- In certain countries and regions, the use of GPS may be restricted. Therefore, be sure to use GPS in accordance with the laws and regulations of your country or region. Be particularly careful when using GPS outside your home country.
- Be careful about using GPS features where the operation of electronic devices is restricted, because the camera will receive GPS signals.
- Others may be able to locate or identify you by using location data in your geotagged still images or movies. Be careful when sharing these images or GPS log files with others, as when posting images online where many others can view them.
NOTE
GPS: Global Positioning System
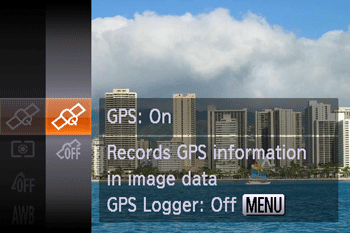
Turning the GPS function [On] 1. Press the power button to turn the camera on.
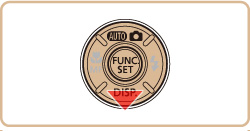
2. Press the <FUNC./SET> (  ) button.
3. Press the <  ><  > buttons to choose  [GPS Settings] in the menu, and then press the <FUNC./SET> ( ) button.


4. Press the < >< > buttons to chose [GPS: On] (  ), and then press the <FUNC./SET> ( ) button.
NOTE
You can also configure GPS settings in [MENU].
- When [GPS] is set to [On], the icon shown in the image below appears.

GPS Reception Status Display
| Icon displayed | Description |
|---|
 (on)*
(on)* | GPS signal received. Location can be recorded. |
 (blinking) *
 | Looking for GPS signal. |
 (on)
(on) | No GPS signal. |
*When you have activated the logger (
 ) is also displayed.
5. The still images and movies you shoot in (blinking) status can be geotagged, automatically adding latitude, longitude, and elevation information.
- You can review the recorded location information on the camera. Using the software, you can also view the locations on a map, with the still images and movies shown next to them.
IMPORTANT
In addition to geotagging your shots, you can also tag shots with the shooting date and time in UTC format.
REFERENCE
NOTE
- Geotagging applies the initial camera location and shooting date and time, as acquired when you begin shooting a movie.
- For digest movies, geotagging applies the initial camera location and shooting date and time, as acquired for the first clip shot that day.
- The GPS function can also be set by pressing the <
 > button to select the [Settings ] ( > button to select the [Settings ] ( ) tab, selecting [GPS Settings], and setting it to [On]. ) tab, selecting [GPS Settings], and setting it to [On].
Checking the location information recorded with the GPS function 1. In <  > Playback mode, press <  > a few times, to display [GPS information display].

2. Press the < > button in detailed information display.
- In the GPS information display, you can view still image and movie location information (latitude, longitude, and elevation recorded when [GPS] was set to [On] and the shooting date and time.
- Press the <> button again to return to detailed information display.

IMPORTANT
- [---] shown instead of numerical values indicates that the information was not received from GPS satellites, or that accurate positioning was not possible.
NOTE
- Latitude, longitude, elevation, and UTC (shooting date and time) are listed from top to bottom.
- UTC: Coordinated Universal Time, essentially the same as Greenwich Mean Time.
Recording the cameras location information (Logger Function) You can keep a record of where the camera was taken by using location information acquired from GPS satellite signals over a period of time. Daily location and time data is logged to a file, separate from image data. Log files can be reviewed on the camera, and with the software, you can use log files to follow the route taken with the camera on a map. Note that the GPS logger will reduce battery life, because some power is consumed even when the camera is off. Charge the battery pack as needed, or keep a spare charged battery pack with you.
1. After setting [GPS] to [On] press the < > button.
2. Press the <  ><  > buttons to set it to [On].

3. When you press the < FUNC./SET > ( ) button, a message about the logger is displayed. Be sure to read the message.
4. Save the GPS log files to the memory card.
- When you turn off the camera, a message about the logger is displayed. The location information, date and time will be saved to the memory card. This information will not remain on the camera.
- The location information, date and time will be saved to the memory card when you do any of the following things.
- Display the log files
- Display the date/time setting screen
- Display the time zone setting screen
- If the camera is off and you want to remove the memory card when the logger is being used, turn the camera on, then turn it off again before removing the memory card.
NOTE
- The GPS Logger function can also be set by pressing the <> button to select the [Settings ] () tab, selecting [GPS Logger] in [GPS Settings], and setting it to [On].
IMPORTANT
- Removing the battery pack after step 4 will deactivate the logger. To reactivate the logger after battery replacement, turn the camera on and then off again.
- Saving GPS log files is not possible when the memory card write-protect tab is in the locked position. Make sure the tab is set to the unlocked side.
- Location information, date and time will be saved to the memory card when the camera is turned off or when displaying log files. For this reason, if the camera is off and you want to remove the memory card when the logger is being used, turn the camera on, then turn it off again before removing the memory card.
- When using the logger function, exercise caution when turning the camera over to another person, as the date and time, and logged location information will remain on the camera until it is saved to a memory card (even if the battery pack runs out of power).
- Be careful when formatting memory cards, because the GPS log file will also be erased.
|
