
Paper Jams
| Article ID: ART115292 | | | Date published: 05/11/2015 | | | Date last updated: 08/15/2015 |
Description
Paper Jams
Solution
| Paper Jams ID: 8202100800_ EN_ 1 | |
| Issue | If the paper is jammed, remove it following the procedure appropriate for each case. |
| Cause | If you can see the jammed paper at the paper output slot: |
| Summary | If you can see the jammed paper at the paper output slot, remove the paper following the procedure below.
|
| See Also | |
| Cause | |
| Summary | 1. Pull the paper out slowly. Hold the paper with your hands, then pull the paper out slowly not to tear it. 
|
| See Also | |
| Cause | |
| Summary | 2. Reload the paper, and tap OK on the touch screen of the machine. If you turned off the machine in step 1, all print jobs in the queue are canceled. Reprint if necessary.
|
| See Also | |
| Cause | |
| Summary | If you cannot remove the paper or the paper tears inside the machine, or if the paper jam error continues after removing the paper, ``3898 |
| See Also | |
| Cause | If the paper is jammed when automatic duplex printing: |
| Summary | If the paper is jammed when performing automatic duplex printing, remove the paper following the procedure below.
|
| See Also | |
| Cause | |
| Summary | 1. Detach the rear cover. Pull out the rear cover.  2. Detach the transport unit cover. Lift up the transport unit cover, then pull it out.  3. Pull out the paper slowly. 
|
| See Also | |
| Cause | |
| Summary | 4. Attach the transport unit cover. Insert the transport unit cover to the back of the machine.  5. Attach the rear cover. Insert the rear cover to the back of the machine. 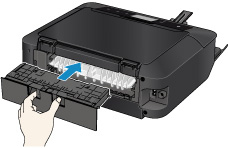 If you were not able to remove the paper out in step 3: 6. Detach the cassette 1 and cassette 2. 7. Pull out the paper slowly.  8. If the paper protrudes from the cassette, remove the paper, then reload it after aligning the edges of the sheets.
|
| See Also | |
| Cause | |
| Summary | 9. Attach the cassettes to the machine, then tap OK on the touch screen. If you cannot remove the paper or the paper tears inside the machine, or if the paper jam error continues after removing the paper, ``3898 |
| See Also | |
| Cause | If the paper loaded in the cassette 1 is jammed: |
| Summary | If the paper loaded in the cassette 1 is jammed, remove the paper following the procedure below.
|
| See Also | |
| Cause | |
| Summary | 1. Detach the rear cover. Pull out the rear cover.  2. Detach the transport unit cover. Lift up the transport unit cover, then pull it out.  3. Pull out the paper slowly. 
|
| See Also | |
| Cause | |
| Summary | 4. Attach the transport unit cover. Insert the transport unit cover to the back of the machine.  5. Attach the rear cover. Insert the rear cover to the back of the machine.  If you were not able to remove the paper out in step 3: 6. Detach the cassette 1 and cassette 2. 7. Pull out the paper slowly.  8. If the paper protrudes from the cassette, remove the paper, then reload it after aligning the edges of the sheets.
|
| See Also | |
| Cause | |
| Summary | 9. Attach the cassettes to the machine, then tap OK on the touch screen. If you cannot remove the paper or the paper tears inside the machine, or if the paper jam error continues after removing the paper, ``3898 |
| See Also | |
| Cause | If the paper loaded in the cassette 2 is jammed: |
| Summary | If the paper loaded in the cassette 2 is jammed, remove the paper following the procedure below.
|
| See Also | |
| Cause | |
| Summary | 1. Detach the rear cover. Pull out the rear cover.  2. Pull out the paper slowly. 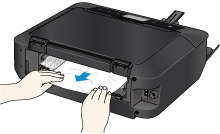
|
| See Also | |
| Cause | |
| Summary | 3. Attach the rear cover. Insert the rear cover to the back of the machine.  If you were not able to remove the paper out in step 2: 4. Detach the cassette 1 and cassette 2. 5. Pull out the paper slowly.  6. If the paper protrudes from the cassette, remove the paper, then reload it after aligning the edges of the sheets.
|
| See Also | |
| Cause | |
| Summary | 7. Attach the cassettes to the machine, then tap OK on the touch screen. If you cannot remove the paper or the paper tears inside the machine, or if the paper jam error continues after removing the paper, ``3898 |
| See Also | |
| Cause | If the paper is jammed as the machine pulled in the printed paper: |
| Summary | If the paper is jammed as the machine pulled in the printed paper, remove the paper following the procedure below.
|
| See Also | |
| Cause | |
| Summary |
|
| See Also | |
| Cause | |
| Summary | 1. Detach the rear cover. Pull out the rear cover.  2. Detach the transport unit cover. Lift up the transport unit cover, then pull it out.  3. Pull out the paper slowly. 
|
| See Also | |
| Cause | |
| Summary | 4. Attach the transport unit cover. Insert the transport unit cover to the back of the machine.  5. Attach the rear cover. Insert the rear cover to the back of the machine.  If you were not able to remove the paper out in step 3: 6. Detach the cassette 1 and cassette 2. 7. Pull out the paper slowly.  8. If the paper protrudes from the cassette, remove the paper, then reload it after aligning the edges of the sheets.
|
| See Also | |
| Cause | |
| Summary | 9. Attach the cassettes to the machine, then tap OK on the touch screen. If you cannot remove the paper or the paper tears inside the machine, or if the paper jam error continues after removing the paper, ``3898 |
| See Also | |
| Cause | If the paper loaded in the cassette 1 is jammed because the paper output tray has been closed: |
| Summary | If the paper loaded in the cassette 1 is jammed because the paper output tray has been closed, open the paper output tray, then confirm if you can see the jammed paper at the paper output slot.
|
| See Also | |
| Cause | |
| Summary |
If you can see the jammed paper at the paper output slot, remove the paper following the procedure below. 1. Pull the paper out slowly. Hold the paper with your hands, then pull the paper out slowly not to tear it. 
|
| See Also | |
| Cause | |
| Summary | 2. Reload the paper, and tap OK on the touch screen of the machine. If you turned off the machine in step 1, all print jobs in the queue are canceled. Reprint if necessary.
|
| See Also | |
| Cause | |
| Summary |
If you cannot see the jammed paper at the paper output slot, remove the paper following the procedure below. 1. Detach the rear cover. Pull out the rear cover.  2. Detach the transport unit cover. Lift up the transport unit cover, then pull it out.  3. Pull out the paper slowly. 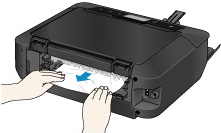
|
| See Also | |
| Cause | |
| Summary | 4. Attach the transport unit cover. Insert the transport unit cover to the back of the machine.  5. Attach the rear cover. Insert the rear cover to the back of the machine.  If you were not able to remove the paper out in step 3: 6. Detach the cassette 1 and cassette 2. 7. Pull out the paper slowly.  8. If the paper protrudes from the cassette, remove the paper, then reload it after aligning the edges of the sheets.
|
| See Also | |
| Cause | |
| Summary | 9. Attach the cassettes to the machine, then tap OK on the touch screen.
|
| See Also | |
| Cause | |
| Summary | If you cannot remove the paper or the paper tears inside the machine, or if the paper jam error continues after removing the paper, ``3898 |
| See Also | |
| Cause | If the paper loaded in the cassette 2 is jammed because the paper output tray has been closed: |
| Summary | If the paper loaded in the cassette 2 is jammed because the paper output tray has been closed, open the paper output tray, then confirm if you can see the jammed paper at the paper output slot.
|
| See Also | |
| Cause | |
| Summary |
If you can see the jammed paper at the paper output slot, remove the paper following the procedure below. 1. Pull the paper out slowly. Hold the paper with your hands, then pull the paper out slowly not to tear it. 
|
| See Also | |
| Cause | |
| Summary | 2. Reload the paper, and tap OK on the touch screen of the machine. If you turned off the machine in step 1, all print jobs in the queue are canceled. Reprint if necessary.
|
| See Also | |
| Cause | |
| Summary |
If you cannot see the jammed paper at the paper output slot, remove the paper following the procedure below. 1. Detach the rear cover. Pull out the rear cover.  2. Pull out the paper slowly. 
|
| See Also | |
| Cause | |
| Summary | 3. Attach the rear cover. Insert the rear cover to the back of the machine.  If you were not able to remove the paper out in step 2: 4. Detach the cassette 1 and cassette 2. 5. Pull out the paper slowly.  6. If the paper protrudes from the cassette, remove the paper, then reload it after aligning the edges of the sheets.
|
| See Also | |
| Cause | |
| Summary | 7. Attach the cassettes to the machine, then tap OK on the touch screen.
|
| See Also | |
| Cause | |
| Summary | If you cannot remove the paper or the paper tears inside the machine, or if the paper jam error continues after removing the paper, ``3898 |
| See Also | |
| Cause | If the paper tears and you cannot remove it from the paper output slot or from the transport unit: |
| Summary | If the jammed paper tears and you cannot remove the paper from the paper output slot or if the jammed paper remains inside the machine, remove the paper following the procedure below.
|
| See Also | |
| Cause | |
| Summary | 1. Turn off the machine, and unplug the power cord of the machine from the power supply. 2. Lift up and open the operation panel until it stops. 
|
| See Also | |
| Cause | |
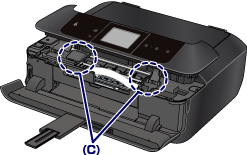
| Summary | 3. Make sure that the jammed paper is not under the print head holder. If the jammed paper is under the print head holder, move the print head holder to the right edge or the left edge whichever is easier to remove the paper. When you move the print head holder, hold the top of the print head holder and slide it slowly to the right edge or the left edge.  4. Hold the jammed paper with your hands. 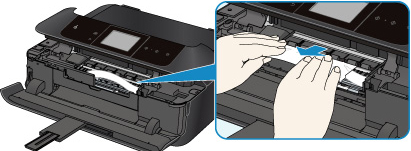 If the paper is rolled up, pull it out.  5. Pull the paper slowly not to tear it, then pull the paper out. Keep an angle of the paper about 45 degrees and pull it slowly.  6. Make sure that all the jammed paper is removed. If the paper is torn, a piece of paper may remain inside the machine. Check the following and remove the piece of paper if it remains.
 7. Close the operation panel slowly. All print jobs in the queue are canceled. Reprint if necessary.
|
| See Also | |
| Cause | |
| Summary | If you cannot remove the paper or the paper tears inside the machine, or if the paper jam error continues after removing the paper, ``3898 |
| See Also | |
| Cause | Cases other than above: |
| Summary | Make sure of the following: Check1: Are there any foreign objects around the paper output slot? Check2: Are the transport unit cover and the rear cover attached properly? Check3: Is the paper curled? Load the paper after correcting its curl. |
| See Also | |

SIMS Doc Id
8202100800