You can often correct print issues or clear errors if you reseat the print head.
Remove the print head
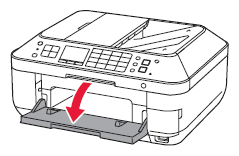
- Make sure the printer is turned ON, then gently open the paper output tray.
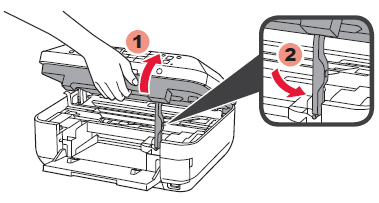
- Lift the cover (scanning unit) (1), then use the scanning unit support (2) to hold the cover open. The print head moves to the replacement position.
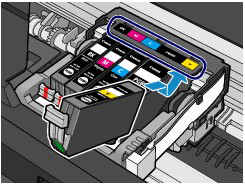
- Push the tab (B) on an ink tank, then lift it out to remove it. Repeat this for each tank.
 Be careful not to touch the print head lock lever (C).

- Raise the print head lock lever.
- Tilt the print head slightly towards the front of the machine and gently lift it out.

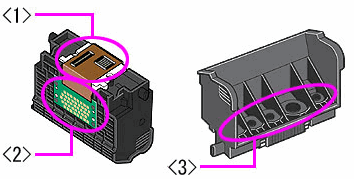
Don't touch the print head nozzles <1>, electrical contacts <2>, or ink supply ports <3>. Doing so may cause printing problems.
Reseat the print head
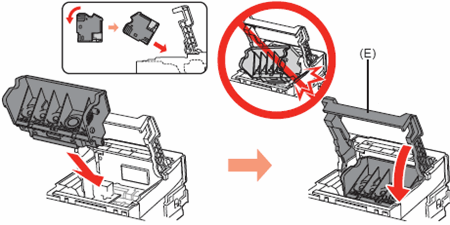
Check the carriage area to make sure there is no packing material, torn paper, etc. Remove anything you find.
- Tilt the print head and set it in place. Lower the print head lock lever (E) completely.
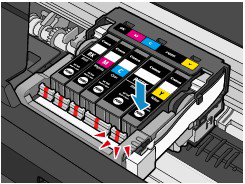
- Insert the front end of each ink tank into the print head at a slant, making sure the position of the ink tank matches the label.
-
Press the Push mark  on each ink tank until the tank snaps firmly into place.
-
Make sure the ink lamp lights up red.
- When all the tanks are replaced, lift the printer cover slightly, set the scanning unit support back to its original position, and gently close the cover.
When closing the cover, be careful not to jam your fingers.

When the next print task begins, the print head will begin an automatic clean.
