The procedure for switching shooting modes is explained below. Switching to AUTO (Smart Auto) Mode For fully automatic selection of the optimal settings for specific scenes, simply let the camera determine the subject and shooting conditions. 1. Press the power button to turn the camera on. 2. Set the Mode Dial to <  >.
 Aim the camera at the subject. The camera will make a slight clicking noise as it determines the scene. Icons representing the scene are displayed in the upper left of the screen. Frames displayed around any detected subjects indicate that they are in focus.
 Switching to Hybrid Auto Mode You can make a short movie of the day just by shooting still images. The camera records 2 4-second clips of scenes before each shot, which are later combined in a digest movie. 1. Press the power button to turn the camera on. 2. Set the Mode Dial to <  >.
 IMPORTANT - Battery life is shorter in this mode than in [
 ] mode, because digest movies are recorded for each shot. ] mode, because digest movies are recorded for each shot. - A digest movie may not be recorded if you shoot a still image immediately after turning the camera on, choosing [ ]mode, or operating the camera in other ways.
- Sounds and vibrations from operating the camera will be recorded in digest movies.
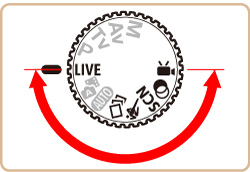
Switching to other Shooting Modes Shoot more effectively in various scenes, and take shots enhanced with unique image effects or captured using special functions. 1. Press the power button to turn the camera on. 2. Set the mode dial to one of the modes within the area indicated by the image below. The setting procedure for <Specific Scene> (  ) is shown here for the purposes of illustration. <Creative Filtesr> (  ) mode can also be set by using the procedure explained.
 3. Press the <FUNC./SET> (  ) button. 4. Press the <  ><  > buttons or turn the <  > dial to choose [Shooting Mode]. (If the settings have not been changed, Portrait (  ) mode is set by default.) Press the <FUNC./SET> ( ) button.

 5. Press the < >< > buttons or turn the <Control dial> to choose the desired [Shooting Mode]. (Portrait (  ) mode has been selected in the example image above.) Press the <FUNC./SET> ( ) button.
 6. If the setting for the desired [Shooting Mode] is displayed in the upper left of the LCD screen, the setting is complete.
 - The available shooting modes are listed below.
| Mode dial | Scene | Shooting mode | Effect |  | Enjoying a Variety of Images from Each Shot | [Creative Shot] ( ) | The camera determines the subject and shooting conditions, automatically applying special effects and recomposing the shot to emphasize the subject. Six still images are recorded for each shot. You can capture multiple still images with effects using camera-determined settings. |  | Brightness / Color Customization | [Live View Control] ( ) | Image brightness or colors when shooting can be easily customized as follows. |  | Shooting moving Subjects | [ Sports] ( ) | Shoot continuously as the camera focuses on moving subjects. | | | Shooting in Various Conditions | Shoot portraits | [Portrait] ( ) | Take shots of people with a softeningeffect. | | Auto Shooting after Face Detection | [Smart Shutter] (  ) ) | The camera can be set to shoot after detecting a smile [Smile Detection], wink [Wink Self-Timer], or the face of another person after they have entered the shooting area [Face Self-Timer] | | High-Speed Continuous Shooting | [High-Speed Burst HQ)] (  ) ) | You can shoot a series of shots in rapid succession by holding the shutter button all the way down. | | Shoot evening scenes without using a tripod | [Handheld NightScene] (  ) ) | Beautiful shots of evening scenes or portraits with evening scenery in the background, without the need to hold the camera very still (as with a tripod).
A single image is created by combining consecutive shots, reducing camera shake and image noise. | | Shoot under low light | [Low Light] (  ) ) | Shoot with minimal camera shake and subject blur even in low-light conditions. | | Shoot with snowy backgrounds | [Snow] (  ) ) | Bright, natural-colored shots of people against snowy backgrounds. | | Shoot fireworks | [Fireworks] (  ) ) | Vivid shots of fireworks. | | | Applying Special Effects | Shooting with a Fish-Eye Lens Effect | [Fish-eye Effect] (  ) ) | Shoot with the distorting effect of a fish-eye lens. | | Shots Resembling Miniature Models | [Miniature Effect] (  ) ) | Creates the effect of a miniature model, by blurring image areas above and below your selected area. | | Shooting with a Toy Camera Effect | [Toy Camera Effect] (  ) ) | This effect makes images resemble shots from a toy camera by vignetting (darker, blurred image corners) and changing the overall color. | | Shooting with a Soft Focus Effect | [Soft Focus] (  ) ) | This function allows you to shoot images as if a soft focus filter were attached to the camera. You can adjust the effect level as desired. | | Shooting in Monochrome | [Monochrome] (  ) ) | Shoot images in black and white, sepia, or blue and white. | | Shoot in vivid colors | [Super Vivid] (  ) ) | Shots in rich, vivid colors. | | Posterized shots | [Poster Effect] (  ) ) | Shots that resemble an old poster or illustration. |  | Shooting Various Movies | Standard movie shooting | [Standard] ( ) | You can shoot movies with smoother motion, or lock or change the image brightness. | | Shooting iFrame Movies | [iFrame Movie] (  ) ) | Shoot movies that can be edited with iFrame-compatible software or devices. You can quickly edit, save, and manage your iFrame movies using the software available from the Canon homepage. | | Shooting Super Slow Motion Movies | [Super Slow Motion Movie] (  ) ) | You can shoot fast-moving subjects for playback later in slow motion. Note that sound is not recorded. |
Switching to [P] Mode You can customize many function settings to suit your preferred shooting style. 1. Press the power button to turn the camera on. 2. Set the mode dial to <  >.
 Customize the settings as desired, and then shoot. NOTE - If adequate exposure cannot be obtained when you press the shutter button halfway, shutter speeds and aperture values are displayed in orange. In this case, try adjusting the ISO speed or activating the flash (if subjects are dark), which may enable adequate exposure.
- Movies can be recorded in <> mode as well, by pressing the movie button. However, some <
 > and < > and < > settings may be automatically adjusted for movie recording. > settings may be automatically adjusted for movie recording.
Switching to Tv, Av, or M mode You can set the camera to one of these modes to take smarter, more sophisticated shots. 1. Press the power button to turn the camera on. 2. Set the mode dial to one of the modes within the area indicated in the image below.
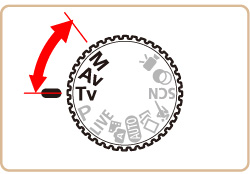 The settings that can be made in each mode are explained bellow: - Tv Mode... Set your preferred shutter speed before shooting. The camera automatically adjusts the aperture value to suit your shutter speed.
- Av Mode... Set your preferred aperture value before shooting. The camera automatically adjusts the shutter speed to suit your aperture value.
- M Mode... Set your preferred shutter speed and aperture value before shooting to obtain the desired exposure.
| 