|
An electronic level can be displayed as a guideline to ensure the camera is level from front to back and left to right.
Please use it as a guide for determining whether the camera is level when shooting.
IMPORTANT
- The following explanations are provided based on the assumption that the [Shooting Mode] is set to [Program AE] (
 ). ).
- In this example, the procedure is shown on a [PowerShot G16]. The position and shape of the operation buttons, screens displayed, and setting items may differ according to the model you use.
Using the Dual Axis Electronic Level 1. Press the power button to turn the camera on.
2. Press the <DISP.> button (  ) a few times to display the [Electronic Level].
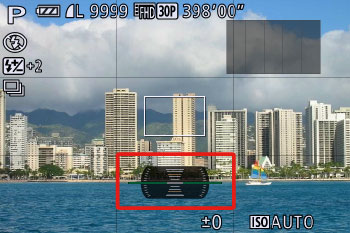
3. If the camera is tilted, move it so that the red level line changes to green.
NOTE
- If the electronic level is not displayed in step 1, press the < MENU > (
 ) button, andon the [Shooting] ( ) button, andon the [Shooting] ( ) tab, choose [Custom Display]. Add a [ ) tab, choose [Custom Display]. Add a [  ] to [ ] to [  ] or [ ] or [  ] to choosethe electronic level. ] to choosethe electronic level.
- The electronic level is not displayed during movie recording.
- If you hold the camera vertically, the orientation of the electronic level will be updated automatically to match the camera orientation.
Calibrating the Electronic Level You can calibrate the electronic level if it seems ineffective in helping you level the camera
If you use the [Grid Lines] to confirm that the camera is level beforehand, you can calibrate the electronic level more accurately.
NOTE
- To display the [Grid Lines], press the <DISP.> button () a few times, and the [Grid Lines] will appear.
- If the grid lines are not displayed, press the < MENU > ( ) button, andon the [Shooting] ( ) tab, choose [Custom Display]. Add a [ ] to [ ] or [ ] to choose the grid lines.
1. Place the camera on a flat surface, such as a table.
2. Press the <MENU> ( ) button. 3. The following screen appears.
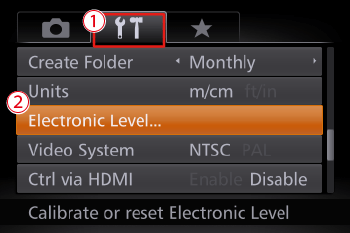
Press the <  ><  > buttons to choose the  [Set Up] (  ) tab. Press the <  ><  > buttons to choose  [Electronic level]. Press the <FUNC./SET> (  ) button.
4. The following screen appears.
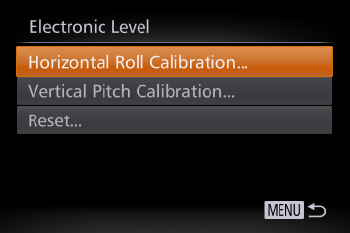
To adjust left/right tilt, choose [Horizontal Roll Calibration], and to adjust forward/ backward tilt, choose [Vertical Pitch Calibration], followed by the <FUNC./SET> ( ) button.
NOTE
If you want to restore the default settings for the [Electronic Level], select [Reset]. Note that this is not possible unless you have calibrated the electronic level.
5. The following screen appears.

Press the < >< > buttons to choose [OK], and then press the <FUNC./SET> ( ) button.
6. The following screen appears.

This concludes the electronic level calibration procedure.
|
