|
This camera can display an [Electronic Level] as a guide to determine whether the camera's LCD monitor is level.
Please use it as a guide for determining whether the camera is level when shooting.
IMPORTANT
The position and shape of the operation buttons, screens displayed, and setting items may differ according to the model you use.
Displaying the Electronic Level 1. Press the power button to turn the camera on.
2. 2. Press the <DISP.> button a few times to display the [Electronic Level].
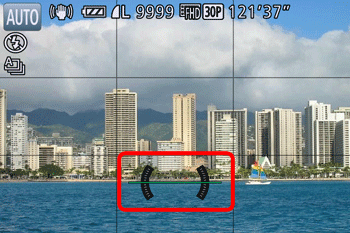
3. Make sure the camera is level.
- Place the camera on a flat surface, such as a table.
Level the camera so that the center of the electronic level is green.
NOTE
Calibrating the Electronic Level Calibrate the electronic level if it seems ineffective in helping you level the camera.
For greater calibration accuracy, display grid lines to help you level the camera in advance.
NOTE
- To display the [Grid Lines], press the <DISP.> button a few times, and the [Grid Lines] will appear.
- If the grid lines are not displayed, press the < MENU > (
 ) button, andon the [Shooting] ( ) button, andon the [Shooting] ( ) tab, choose [Custom Display]. Add a [ ) tab, choose [Custom Display]. Add a [  ] to [ ] to [  ] or [ ] or [  ] to choose the grid lines. ] to choose the grid lines.
4. Press the <MENU> ( ) button.
5. Press the <  ><  > buttons to choose the  [Set Up] (  ) tab. Press the <  ><  > buttons to choose  [Electronic level]. Press the <FUNC./SET> (  ) button.

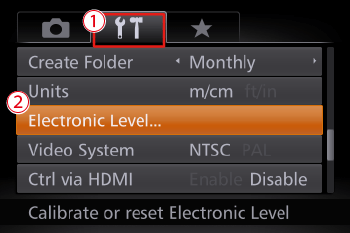
6. Choose [Calibrate] and press the <FUNC./SET> ( ) button.

NOTE
If you want to restore the default settings for the [Electronic Level], select [Reset]. Note that this is not possible unless you have calibrated the electronic level.
7. The following screen appears.
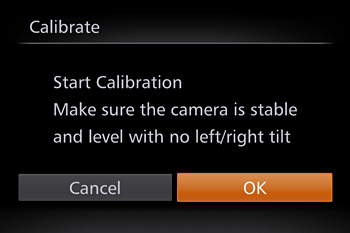
Press the < >< > buttons to choose [OK], and then press the <FUNC./SET> ( ) button.
8. The following screen appears.

This concludes the electronic level calibration procedure.
|
