If you have more than one scanning device or have changed from a USB to a network connection, the network environment for IJ Scan Utility must be set up. If you haven't already, complete the Network Scan Settings to enable scanning over the network.
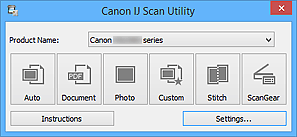
Start IJ Scan Utility
Follow the steps below for your operating system.
Windows 10
-
From the Start menu, select All apps > Canon Utilities > IJ Scan Utility.
-
If IJ Scan Utility is not displayed in the menu, click on the Search bar at the bottom of the screen and search for IJ Scan Utility.
Windows 8.1 / Windows 8
-
Select IJ Scan Utility on the Start screen to start IJ Scan Utility.
-
If IJ Scan Utility is not displayed on the Start screen, select the Search charm, then search for IJ Scan Utility.
Windows 7 / Windows Vista/Windows XP
If your product issue was not resolved after following the steps above, or if you require additional help, please create or log in to your Canon Account to see your technical support options.
Or if you still need help, visit our Canon Community by clicking the button below to get answers:

____________________________________________________________________________________________