|
You can use the Digital Photo Professional Ver. 4.0 tool palette to erase dust and other marksin a shot image and to correct an image by copying part of the image and pasting it onto an unnecessary part of the image. Note that you can use the functions in this tool palette with JPEG and TIFF images as well as RAW images.
IMPORTANT
- A dust-erased image does not change, merely dust erasure information is saved to the image. The dust-erased RAW image actually becomes a dust-erased image when converted to a JPEG or TIFF image and saved.
Automatic Dust Erasure Processing in the Main Window In the main window, you can also automatically erase dust spots in multiple images appended with Dust Delete Data.
1. In the main window, select the image from which you want to erase dust spots.

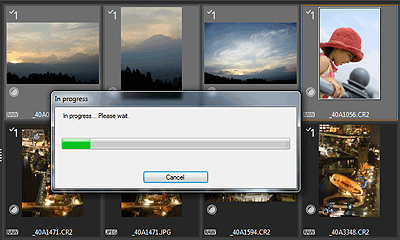
2. Select the [Adjustment] menu on the toolbar -> [Apply Dust Delete Data].

3. Dust spots in all the selected images are erased in a single operation.
4. Save the corrected image.
The image becomes a dust-erased image by converting to a JPEG or TIFF image and saving.
Performing Automatic Dust Erasure Processing (apply Dust Delete Data) The Dust Delete Data that is appended to images can be used to automatically erase dust spots.
This function is compatible only with the following cameras. For more information on how to append the Dust Delete Data to the image, refer to the instruction manuals that came with your camera.
| EOS-1D C | EOS-1D X | EOS 5D Mark III |
| EOS 6D | - | - |
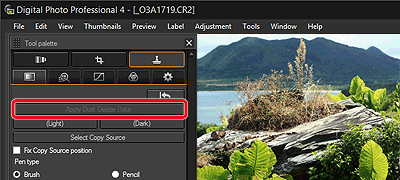
1. Start Digital Photo Professional Ver. 4.0 and Select an image with dust delete data attached in the main window, etc.
2. Select [Tool Palate] from the [View] menu on the toolbar to display the [Tool Palate].

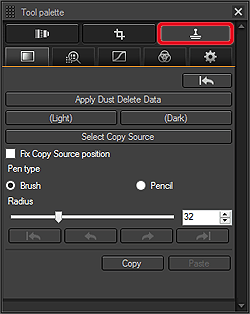
3. Click the [  ] button to display the [Dust Delete/Copy Stamp tool palette].
- You cannot make adjustments with the Dust Delete/Copy Stamp tool palette in a window that only shows thumbnails.
4. When the image has redrawn itself, click the [Apply Dust Delete Data] button.

5. Dust spots are erased in a single operation.
NOTE
The [Apply Dust Delete Data] cannot be clicked
Even with an image that has Dust Delete Data attached to it in the camera, if there is no dust to remove by Digital Photo Professional Ver. 4.0 from the image, the [Apply Dust Delete Data] button will be disabled.
6. Return to the main window.
7. Save the corrected image.
The image becomes a dust-erased image by converting to a JPEG or TIFF image and saving.
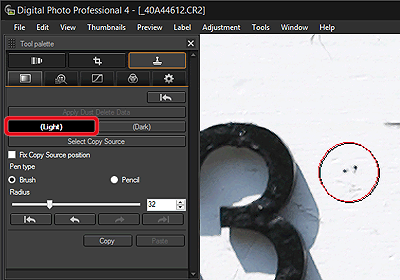
Manually Erasing Dust (Repair Function) 1. Start Digital Photo Professional Ver. 4.0 and Select an image with dust delete data attached in the main window, etc.
2. To display the [Tool Palate], select [Tool Palate] from the [View] menu on the toolbar.
3. Click the [ ] button to display the [Dust Delete/Copy Stamp tool palette].
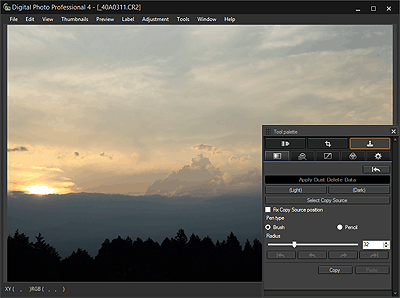
4. After the [Dust Delete/Copy Stamp tool palette] is displayed, double-click the image to change the display to 100% view.
5. Put your mouse pointer on the image. When its shape changes to  , drag the image to display the section you want to correct.
6. Specify the correction range. When you click the [Repair(Light)] button, the shape of the mouse pointer changes as shown below. Position the circle so that it covers the unwanted spot. If the unwanted spot is darker than surrounding color, use [Repair(Light)].
7. Cover the unwanted spot with the correction range and click to delete the spot. When the dust spot cannot be erased,  is displayed.
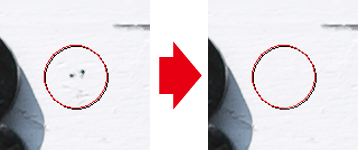
To correct another section of the image, cover the spot with the mouse pointer and click it. If you need to scroll to display the section to be corrected, cancel the repair function by clicking the right button on the mouse or clicking the [Repair(Light)] button, and then perform the operation again from step 5.
NOTE
You can apply dust erasure to the same place in another image by clicking the [Copy] button to copy the dust erasure results and then displaying the other image to which you want to apply the results and clicking the [Paste] button.
8. Return to the main window.
9. Save the corrected image.
The image becomes a dust-erased image by converting to a JPEG or TIFF image and saving.
This completes the procedure for erasing dust spots from an image.
|