Loading Plain Paper / Photo Paper
You can load paper in the cassette.
 If you cut plain paper into small sizes such as 4" x 6" (10 x 15 cm) or 5" x 7" (13 x 18 cm) to perform trial prints, it can cause paper jams.
 We recommend Canon genuine photo paper for printing photos.
You can use general copy paper.
 For loading envelopes, see Loading Envelopes.
-
Align the edges of paper. If paper is curled, flatten it.
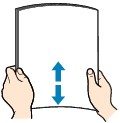
Align the edges of paper neatly before loading. Loading paper without aligning the edges may cause paper jams.
If paper is curled, hold the curled corners and gently bend them in the opposite direction until the paper becomes completely flat.
When using Photo Paper Plus Semi-gloss SG-201, even if the sheet is curled, load one sheet at a time as it is. If you roll up this paper to flatten, this may cause cracks on the surface of the paper and reduce the print quality.
-
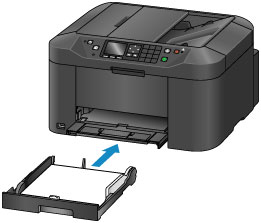
Pull out the cassette from the machine.

-
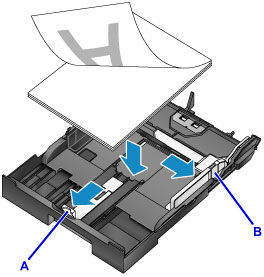
Slide the paper guide (A) in front and (B) on the right to open the guides.
-
Load the paper stack WITH THE SIDE TO PRINT ON FACING DOWN, and place it in the center of the cassette.
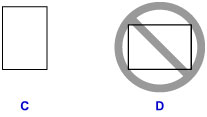
Always load paper in the portrait orientation (C). Loading paper in the landscape orientation (D) can cause paper jams.
If paper has print side (front or back), such as photo paper, load it with the whiter side (or glossy side) facing down.
Align the paper stack with the edge of the cassette as shown in the figure below. If the paper stack is in contact with the protrusion (E), the paper may not be fed properly.

To load 5" x 7" (13 x 18 cm) size paper or smaller, raise the tab (F) of the paper guide.

To load paper larger than A4 size in the cassette, press down the lock (G) on the cassette, then extend the cassette all the way out.

-
Align the paper guide (A) in front with the paper stack.
For standard sizes, set the paper guide (A) to where it clicks into place.
-
Slide the paper guide (B) on the right to align the right and left guides with sides of the paper stack.
Do not slide the paper guides too hard against the paper. The paper may not be fed properly.
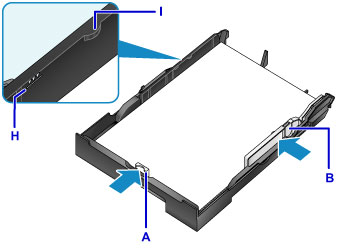
Do not load sheets of paper higher than the load limit mark (H).
Keep the paper stack height below the tabs (I) of the paper guides.
-
Insert the cassette into the machine.
Push the cassette into the machine until it stops.
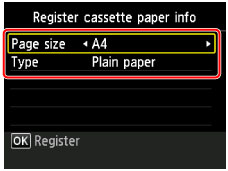
After inserting the cassette into the machine, the paper information registration screen for the cassetteis displayed on the LCD.
When A4 or Letter-sized paper or smaller is loaded, the cassette stops at the same position as the extended paper output tray, which then covers the cassette.
When paper larger then A4 or Letter size is loaded, the extended cassette protrudes beyond thepaper output tray. Do not force the cassette into the machine any further. This can damage themachine or cassette.

-
Select the size and type of the loaded paper in the cassette at Page size and Type, then press the OK button.
If a message is displayed on the screen, follow the directions in the message to complete registration.
-
Extend the output tray extension (J), then open the paper output support (K).

When printing, select the size and type of the loaded paper on the print settings screen of the operation panel or printer driver.
If your product issue was not resolved after following the steps above, or if you require additional help, please create or log in to your Canon Account to see your technical support options.
Or if you still need help, visit our Canon Community by clicking the button below to get answers:

____________________________________________________________________________________________
