Printing and Examining the Nozzle Check Pattern - MG2920 / MG2922 / MG2924

Article ID: ART117084 | Date published: 05/12/2015 | Date last updated: 05/17/2019
 

Description

This article explains how to print and examine the nozzle check pattern on the PIXMA MG2920 / MG2922 / MG2924.


Solution

Print the nozzle check pattern to determine whether the ink ejects properly from the print head nozzle.


Note

  • If the remaining ink level is low, the nozzle check pattern will not be printed correctly. Replace the FINE cartridge whose ink is low.
 

You need to prepare: a sheet of A4 or Letter-sized plain paper

  1. Make sure that the power is turned on.
     

  2. Load a sheet of A4 or Letter-sized plain paper in the rear tray.
     

  3. Pull out the paper output tray and the output tray extension.
     

  4. Hold down the Stop button until the Alarm lamp flashes once, then release it immediately.

    The nozzle check pattern will be printed.

    Do not perform any other operations until the machine completes the printing of the nozzle check pattern.
     

  5. Examine the nozzle check pattern, and clean the print head if necessary.

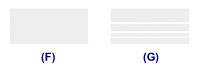
    1. Check if there are missing lines in the pattern (A) or horizontal white streaks in the pattern (B).


      • (C) Number of sheets printed so far
         

      If there are missing lines in the pattern (A):

      Cleaning the print head is required.


      • (D) Good
         
      • (E) Bad (lines are missing)
         

      If there are horizontal white streaks in the pattern (B):

      Cleaning the print head is required.


      • (F) Good
         
      • (G) Bad (horizontal white streaks are present)


    Note

    • The total number of sheets printed so far is shown in increments of 50 sheets on the printout of the nozzle check pattern.


Rate this Article
Was this article helpful?
Yes, This document is helpful
No, This document needs a clearer explanation
 
Please provide your comments