Names and Functions of Parts
Front
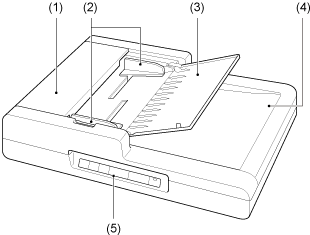
| (1) | Feeder Cover |
| | | Open this to clear paper jams or to perform cleaning. |
| | | |
| (2) | Document Guides |
| | | Adjust this to the width of the document. |
| | | |
| (3) | Document Feed Tray |
| | | Open this when placing documents into the feeder. |
| | | |
| (4) | Document Eject Tray |
| | | Documents scanned through the feeder are ejected here. |
| | | |
| (5) | Operation Panel |
| | | Buttons for operating the scanner are located here. |

| (6) | Pressue Board |
| | | This presses documents placed on the flatbed against the glass. |
| | | |
| (7) | Scanning Glass (Feeder) |
| | | |
| (8) | Scanning Glass (Flatbed) |
| | | Place documents here with their scanning sides facing down. |
Operation Panel
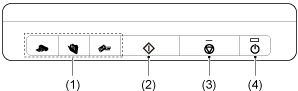
| (1) | Job Buttons |
| | | Specific jobs are assigned to these buttons. Scanning will start when any of these buttons are pressed.
The scanned images will be processed as follows for each button:
COPY: Prints scanned images to a specified printer.
FILE: Saves scanned images in a specified folder.
E-MAIL: Sends a new e-mail message with scanned images.
|
| | | |
| (2) | START Button |
| | | This button performs the following functions.
- Executes jobs selected with the user defined job buttons or scroll keys.
- Starts scanning when an application is used and the [Feeding Option] is set to [Panel-Feeding].
- Launches the application configured with the Windows Event function.
|
| | | |
| (3) | STOP Button |
| | | Press this button to stop scan procedures or clear error displays, such as those for paper jams. |
| | | |
| (4) | POWER Button |
| | | Press this button to turn the scanner ON, and the power indicator will light.
When you press and hold this button (for 2 seconds) while the scanner is turned ON, the scanner and power indicator will turn OFF.
|

The scanner's auto power off setting is enabled by default, and the scanner will turn off automatically if it is not operated for 4 hours.
