|
With using imagePROGRAF Print Plug-In (Print Entire Sheet) For resizing the entire sheet to fit the roll width. Choose this option to enlarge the currently displayed sheet before printing.
1.Start Microsoft Excel.
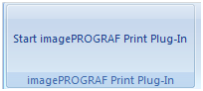
2.If Start imagePROGRAF Print Plug-In is displayed, click it.
NOTE
- In case of imagePROGRAF Print Plug-In toolbar or ribbon is not displayed, obtain [imagePROGRAF Print Plug-In for Office] from download site.
3.Click Print from the imagePROGRAF Print Plug-In toolbar/ribbon.
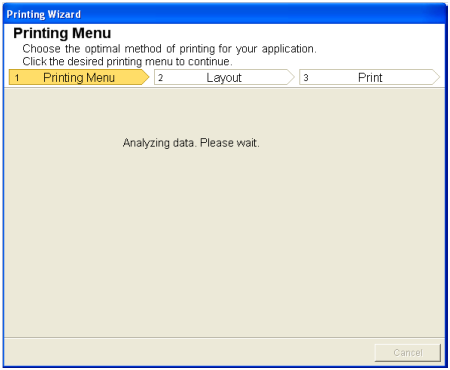
The Printing Wizard dialog box is displayed.
IMPORTANT
- When more than one worksheet is selected, the Printing Wizard cannot be run. Select only one worksheet and click Print again.
NOTE
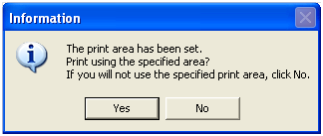
- If a print area is set, a confirmation message dialog box will
appear.
To print the entire sheet, cancel the setting of the print area.
4.Click Print Entire Sheet.
A message will appear informing you that analysis is in progress.
The Layout menu will appear automatically.
NOTE
- If data analysis requires time, a message dialog will appear. If you select No, you will return to the application.
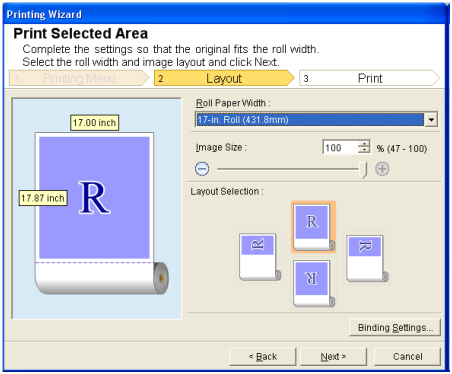
5.Select Roll Paper Width that is set in the printer.
6.Select image size.
7.Select layout.
8.To configure Binding, click the Binding Settings button.
9.Select Next.

10.Select Media Type.
11.Enter Copies.
12.If the upper and lower margins are too wide, check No Spaces at Top or Bottom (Conserve Paper).
The upper and lower margins can be checked in Print Preview.
NOTE
- When Print in Draft mode is selected, printing is fast but the print quality is poor.
- When Saturation is selected, you can print posters, etc., vividly.
- Press the Print Preview button to display the preview screen. You can check and make changes to the layout in the preview screen.
- When you print to the edge of the roll width, the maximum print length is 18.0m.
13.Press Print to start printing.
IMPORTANT
- If divided into plural pages, try reducing the data size or the range you select.
- You cannot run Print or Print Preview if you select it for a worksheet with no data displayed.
With using imagePROGRAF Print Plug-In (Print Select Area) For resizing the selected range of cells to fit the roll width. Choose this option to enlarge a particular part of the sheet before printing.
1.Start Microsoft Excel.
2.If Start imagePROGRAF Print Plug-In is displayed, click it.
NOTE
- In case of imagePROGRAF Print Plug-In toolbar or ribbon is not displayed, obtain [imagePROGRAF Print Plug-In for Office] from download site.
3.Click Print from the imagePROGRAF Print Plug-In toolbar/ribbon.
The Printing Wizard dialog box is displayed.
IMPORTANT
- When more than one worksheet is selected, the Printing Wizard cannot be run. Select only one worksheet and click Print again.
NOTE
- If a print area is set, a confirmation message dialog box will appear.
To print the selected area, cancel the setting of the print area.
4.Click Print Selected Area.
IMPORTANT
- If only one cell is selected, Print Selected Area cannot be selected.
A message will appear informing you that analysis is in progress.
The Layout menu will appear automatically.
IMPORTANT
- If the range selected in Excel 2007 or later is too large, it will not be possible to analyze the data. Select a smaller range and then run the analysis.
NOTE
- If data analysis requires time, a message dialog will appear. If you select No, you will return to the application.
5.Select Roll Paper Width that is set in the printer.
6.Select image size.
7.Select layout.
8.To configure Binding, click the Binding Settings button.
9.Select Next.

10.Select Media Type.
11.Enter Copies.
12.If the upper and lower margins are too wide, check No Spaces at Top or Bottom (Conserve Paper).
The upper and lower margins can be checked in Print Preview.
NOTE
- When Print in Draft mode is selected, printing is fast but the print quality is poor.
- When Saturation is selected, you can print posters, etc., vividly.
- Press the Print Preview button to display the preview screen. You can check and make changes to the layout in the preview screen.
- When you print to the edge of the roll width, the maximum print length is 18.0m.
13.Press Print to start printing.
IMPORTANT
- If divided into plural pages, try reducing the data size or the range you select.
- You cannot run Print or Print Preview if you select it for a worksheet with no data displayed.
Without using imagePROGRAF Print Plug-In 1. Click [start] button, then click [Devices and Printers].
2. Right-click [Canon iPFxxxx], and click [Printing Preferences].
*"iPFxxxx" is the printer in use.
3. Click [Page Setup] tab, then click [Size Options].
4. Input a name into [Custom Paper Size Name], then input [Width] and [Height]of [Paper Size].
*The paper of the example is 609.6mm (24 inch) in width, and 3000.0mm in height.
5. When inputting these information is finished, click [Add] button. Close the print setting window of printer driver, [Paper Size Options], and [Printing Preferences], with [OK] button.
6. Start up [Microsoft Excel]. (It is indicated as following Excel.)
7. After Excel is started up, click [Print] in [Office] button. Select [Canon iPFxxxx] for printer driver, and click [Cancel] button to close.
8. Click [Page Setup] in [Page Layout] menu.
Open [Page] tab. Select [Paper Size] that has been registered in [Printing Preferences] of printer driver.
9. Click [Margin] tab in [Page Setup]. Change the Margin size if necessary. Close [Page Setup] window with [OK] button.
10. Click [Zoom] in [View] menu. Change display size of the window to [10%].
The whole image of the original copy still can not be pictured, yet, it will be successfully printed if the characters and objects are inside of the frame border.
This is the end of print setting.
Finally, create the data, click [Print] in [Office] button, and press [OK] button. Then large-format printing of the created data is completed.
|