|
If printing is faint or affected by banding in different colors, make sure the Printhead nozzles are clear by printing a test pattern to check the nozzles.
NOTE
- Nozzles are periodically checked to ensure they are clear. Configure the settings on the Control Panel menu in [Nozzle Check].
<Paper to Prepare>
When Using Rolls: An unused roll at least 254.0 mm (10.00 in) wide
When Using Sheets: One sheet of unused paper of at least A4/Letter size
1. Load paper.
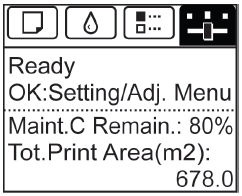
2. On the Tab Selection screen of the Control Panel, press  or  to select the Settings/Adj. tab (  ).
NOTE
- If the [Tab Selection screen] is not displayed, press the [Menu] button.
3. Press the [OK] button.
The [Set./Adj. Menu] is displayed.
4. Press  or  to select [Test Print], and then press the [OK] button.
5. Press or to select [Nozzle Check], and then press the [OK] button. The printer now prints a test pattern for checking the nozzles.
6. Check the printing results.
If the horizontal lines are not faint or incomplete, the nozzles are clear.
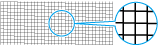
If some sections of the horizontal lines are faint or incomplete, the nozzles for those colors are clogged.
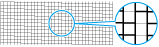
If horizontal lines are faint or incomplete, follow the steps below and check again for nozzle clogging.
<How to Cleaning the Printhead>
Choose one of two Printhead cleaning modes ([Head Cleaning A] or [Head Cleaning B]), depending on the problem to resolve.
Use this mode if printing is faint or contains foreign substances. This method of cleaning consumes the least amount of ink. It takes about three minutes to complete.
Use this mode if no ink is ejected at all, or if [Head Cleaning A] does not solve the problem. It takes about three and a half minutes to complete.
IMPORTANT
- Do not remove the Maintenance Cartridge or ink tanks during either [Head Cleaning A] or [Head Cleaning B]. Ink may leak or an error may occur.
- If printing does not improve even if you execute [Head Cleaning B], try repeating [Head Cleaning B] once or twice. If this still does not improve printing, the Printhead may have reached the end of its useful life. Contact your Canon dealer for assistance.
NOTE
- By default, nozzles are checked at fixed intervals. Configure the settings on the Control Panel menu in [Nozzle Check].
1. On the Tab Selection screen of the Control Panel, press or to select the Settings/Adj. tab ( ).

NOTE
- If the [Tab Selection screen] is not displayed, press the [Menu] button.
2. Press the [OK] button.
The [Set./Adj. Menu] is displayed.
3. Press  or  to select [Maintenance], and then press the [OK] button.
4. Press  or  to select [Head Cleaning], and then press the [OK] button.
5. Press  or  to select [Head Cleaning A] or [Head Cleaning B], and then press the [OK] button. Head cleaning is now executed.
6. Print a test pattern to check the nozzles, and determine whether cleaning has cleared the nozzles.
|
