You can connect wirelessly to your network right from the printer's display panel.
Complete the standard setup
- Press the setup button on the printer display.

- When the setup menu appears, use the left and right arrows to select Wireless LAN setup.
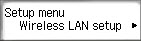
-
Press OK.
- The printer will search for an access point (wireless router). If a message tells you to press the WPS button on the access point, press the Stop button on the printer.

- After it completes the search, use the left or right arrows and select Standard setup.
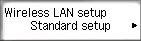
-
Press OK.
-
The printer will search for access points again.
- When Select access point appears, use the left or right arrows to select the wireless network to connect to.
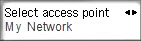
-
Press the OK button twice.
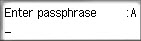
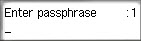
- If there is a passphrase (a security key) for the router, you will be prompted to enter it. Use the numeric keypad to do this. To the right of Enter passphrase you will see :a
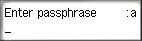
-
When :a is on the screen, the numeric keypad will display lowercase letters. To enter a letter, press the corresponding key until the letter you want appears. For example, to enter the letter "c" you would press the number 2 three times.
- To enter uppercase letters, press the asterisk key once. :A will appear to the right of Enter passphrase.

- To enter numbers, press the tone key again. :1 will appear to the right of Enter passphrase.
- To enter symbols, press the pound key repeatedly until the desired symbol appears on the screen. For example, press the pound key 5 times to enter a blank space.

- To delete a character, press the left or right arrows to move the cursor under the character to be deleted. Then press the back key to delete the character.

-
After the passphrase has been entered, press OK. The printer will attempt to connect to the wireless network.
-
If message below appears, press OK to complete the setup.

 If the printer fails to connect, a message will appear telling you that the unit failed to connect to the access point. Press OK and verify that the network key has been entered correctly. Make any changes needed and press OK to attempt to connect again.
