| Solution | When saving movies on a computer, you can use Transfer Utility LE for AVCHD movies and ImageBrowser EX for MP4 movies. NOTE Saving AVCHD Movies (Windows only) Saving MP4 Movies and Photos
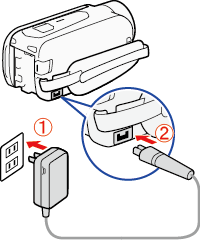
Saving AVCHD Movies 1. Power the camcorder using the compact power adapter.
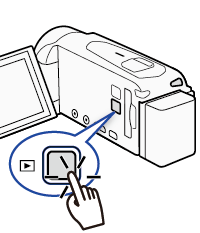
2. Camcorder: Press <  > to set the camcorder to Playback mode.
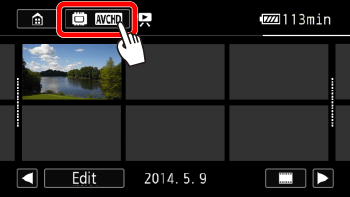
3. Camcorder: Open the desired index screen for AVCHD movies.
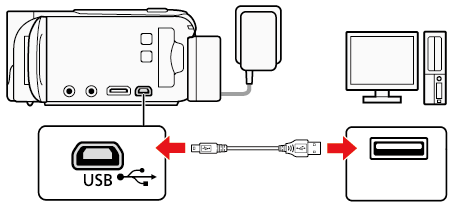
 4. Connect the camcorder to the computer using the supplied USB cable.
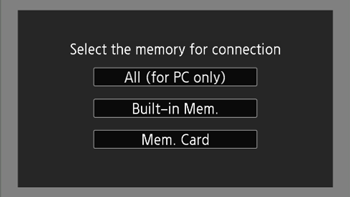
 NOTE Camcorder: When the [Select the memory for connection] message appears, touch [All (for PC only)]. Note: that this screen will not appear for users of the VIXIA HF R500. This step only applies cameras with dual memory options (VIXIA HF R50 and VIXIA HF R52).
5. Computer: Double-click the icon shown below to open the software Transfer Utility LE.
 6. Use Transfer Utility LE to save your AVCHD movies. IMPORTANT - When the camcorder is connected to a computer:
- Do not open the memory card slot cover and do not remove the memory card. - Do not access, change or delete any of the camcorders folders or files directly from the computer as this may result in permanent data loss. When saving AVCHD movies on a computer, use Transfer Utility LE. - Observe the following precautions while the ACCESS indicator is on or flashing. Failing to do so may result in permanent data loss.
- Do not open the memory card slot cover. - Do not disconnect the USB cable. - Do not turn off the camcorder or the computer. - Do not change the camcorders operating mode. - If you wish to use the recordings on your computer, make copies of them first. Use the copied files, retaining the originals.
NOTE - See the instruction manual of your computer.
- Depending on the computer, the software may not work correctly or you may not be able to play back movies.
- The following types of MP4 scenes will be recognized as multiple files on other devices.
- Scenes exceeding 4 GB - Scenes recorded at 35 Mbps exceeding 30 minutes - Scenes recorded at a video quality other than 35 Mbps exceeding 1 hour
Saving MP4 Movies and Photos 1. Power the camcorder using the compact power adapter.
2. Camcorder: Press < > to set the camcorder to Playback mode.
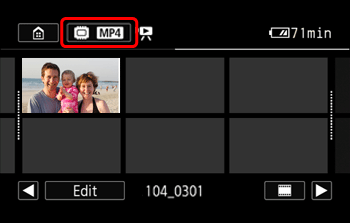
3. Camcorder: Open the [Movie Playback] index screen for MP4 movies or [Photo Playback] index screen.
 4. Connect the camcorder to the computer using the supplied USB cable.
5. Computer: Start CameraWindow. Windows: Open CameraWindow. Mac: CameraWindow will open automatically. 6. Computer: Save the desired MP4 movies or photos to the computer. IMPORTANT - When the camcorder is connected to a computer:
- Do not open the memory card slot cover and do not remove the memory card. - Do not access, change or delete any of the camcorders folders or files directly from the computer as this may result in permanent data loss. When saving recordings on a computer, use ImageBrowser EX for MP4 movies and photos. - Observe the following precautions while the ACCESS indicator is on or flashing. Failing to do so may result in permanent data loss.
- Do not open the memory card slot cover. - Do not disconnect the USB cable. - Do not turn off the camcorder or the computer. - Do not change the camcorders operating mode. - If you wish to use the recordings on your computer, make copies of them first. Use the copied files, retaining the originals.
NOTE - See the instruction manual of your computer.
- Depending on the computer, the software may not work correctly or you may not be able to play back movies.
- The following types of MP4 scenes will be recognized as multiple files on other devices.
- Scenes exceeding 4 GB - Scenes recorded at 35 Mbps exceeding 30 minutes - Scenes recorded at a video quality other than 35 Mbps exceeding 1 hour - Regardless of the charge conditions of the battery pack in the camcorder, Battery Capacity on the camcorders details area of Camera- Windows main screen will always appear as 'Full'.
- Users of Windows XP and later versions, or Mac OS X: Your camcorder is equipped with the standard Picture Transfer Protocol (PTP) allowing you to transfer photos (JPEG only) simply by connecting the camcorder to a computer using the supplied USB cable, without having to install ImageBrowser EX.
|