
Setting up the printer and computer for printing via Bluetooth - Macintosh - MP810
| Article ID: ART118062 | | | Date published: 05/12/2015 | | | Date last updated: 08/17/2015 |
Description
Solution
Printing Data via Bluetooth Communication (Macintosh)
Preparation |
 |
In order to print via Bluetooth communication with Macintosh, the following system requirements must be satisfied.
|
Computer |
A Macintosh with an Apple Bluetooth module or a Macintosh attached D-LINK DBT-120 USB Bluetooth rev.B |
|
OS |
Mac OS X v.10.3.3 or later |
In order to connect the Bluetooth unit and print via Bluetooth communication, the following steps are required.
STEP 1
Check that the Bluetooth unit is properly attached to the printer.
STEP 2
Install the MP Drivers.
See Installing the MP Drivers.
STEP 3
Check the device name of the printer using the LCD.
See Setting the Printer.
STEP 4
Register the printer as a Bluetooth device using Bluetooth Setup Assistant.
 Attaching the Bluetooth Unit to the Printer
Removing the Bluetooth Unit from the Printer
 Attaching the Bluetooth Unit to the Printer
Attach the Bluetooth unit to the direct print port of the printer in accordance with the following procedure.
The illustrations in this section refer to the MP610 series.
1. Check the status of the Power lamp on the printer.
Ensure that the Power lamp on the printer is lit.
2. Insert the Bluetooth unit to the direct print port of the printer.
Detach the cap from the Bluetooth unit. Store the cap in a safe location.

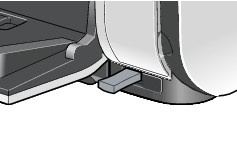
Note
When the Bluetooth unit is properly attached to the printer, the Power lamp on the printer flashes twice.
Removing the Bluetooth Unit from the Printer
Remove the Bluetooth unit from the direct print port of the printer in accordance with the following procedure.
1. Remove the Bluetooth unit from the direct print port of the printer.
Caution
Ensure that the lamp on the Bluetooth unit is neither lit nor flashing before you remove the Bluetooth unit.
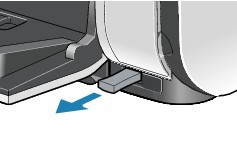
Important
Store the Bluetooth unit with the cap attached.
Installing the MP Drivers
Before connecting the Bluetooth unit to the printer for wireless printing, first the USB cable must be connected between the printer and computer, and the MP Drivers must be installed using the Setup CD-ROM.
|
A USB cable is required to install the MP Drivers. |
If the MP Drivers have not been installed
Install the MP Drivers according to your setup guide.
If the MP Drivers have already been installed
Move to the next step.
See Setting the Printer.
Setting the Printer
This section describes the procedures for checking the settings of the Bluetooth unit on the LCD of the printer in preparation for Bluetooth printing.
The LCD screens in this section refer to the MP610 series.
1. Ensure that the Bluetooth unit is attached and the printer is turned on.
For information about how to attach the Bluetooth unit, see Attaching to and Removing from the Printer.
2. Display the Bluetooth settings screen on the LCD.
For information about how to display the Bluetooth settings screen, refer to your printer's manual.
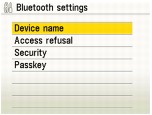
If the Bluetooth settings screen does not appear on the LCD, the Bluetooth unit may not be attached correctly. Remove the Bluetooth unit from the printer and attach it once again.
For details, see Attaching to and Removing from the Printer.
If the Bluetooth settings screen still does not appear, the Bluetooth unit may be faulty. In this case, contact your Canon service representative.
3. Select Device name.
The Device name screen appears.
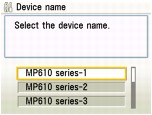
4. Check the device name.
The device name is necessary to register the printer as a Bluetooth device using Bluetooth Setup Assistant. Be sure to note the device name.
Registering the Printer
Register the printer as a Bluetooth device using Bluetooth Setup Assistant.
|
The operations described in this section are for printing in Mac OS X v.10.4.x. |
1. Click the Bluetooth icon on the menu bar and then select Set up Bluetooth Device.
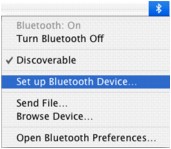
Bluetooth Setup Assistant starts.
When the Bluetooth icon is not displayed on the menu bar
Select Bluetooth from System Preferences, check Show Bluetooth status in the menu bar on Settings.
When using Mac OS X v.10.3.x, select Applications from the Go menu, double-click the Utilities folder, and the Bluetooth Setup Assistant icon.
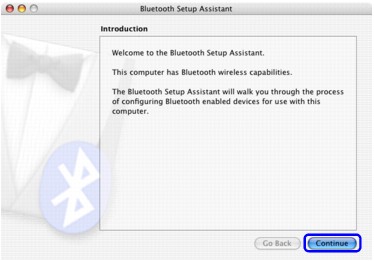
2. Click Continue.
3. Select Printer, then click Continue.
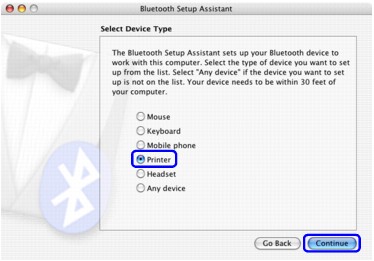
If your Mac OS X is earlier than 10.3.3, Printer does not exist on the list. See The version of your Mac OS X is earlier than 10.3.3. in Troubleshooting.
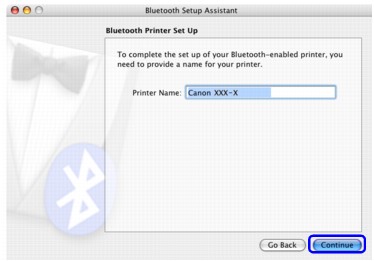
4. Select the same device name of the printer and click Continue.

Select the same device name as that checked under Setting the Printer.
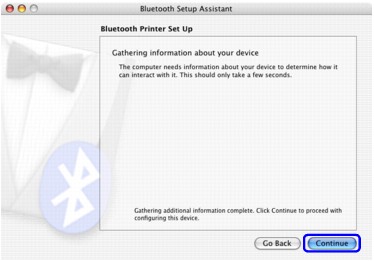
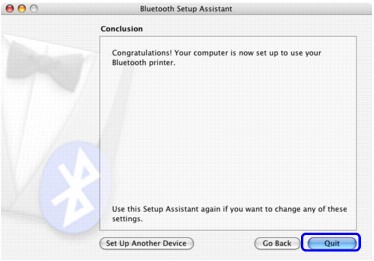
5. Click Continue.
6. Click Continue.
Depending on your computer, you may not be able to register the printer as a Bluetooth device using Bluetooth Setup Assistant. In this case, follow the procedure described below to register the printer in Printer Setup Utility.
1. Select Applications from the Go menu.
2. Double-click the Utilities folder, and then the Printer Setup Utility icon.
3. Click Add in Printer List.
4. In Mac OS X v.10.4.x, click More Printers in Printer Browser. In Mac OS X v.10.3.x, Printer Browser does not appear. Go to the next step.
5. Select Bluetooth in the pop-up menu.
6. Select the device name of the printer from Name, and then click Add.
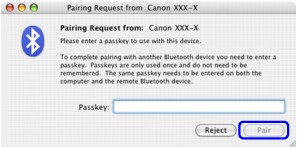
If you set a passkey in the printer, enter the passkey set on the Passkey Screen and click Pair.
7. Click Quit.
8. Select Applications from the Go menu, double-click the Utilities folder, and then the Printer Setup Utility icon to check whether the device name selected in Step 4 is registered in Printer List.
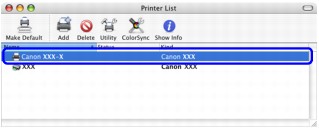
Now, the settings for printing via Bluetooth communication are ready.
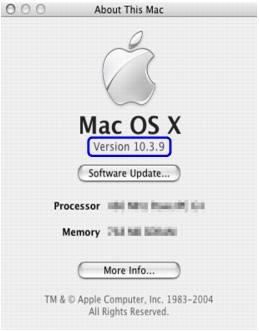
The version of your Mac OS X is earlier than 10.3.3.
Check that the version of your Mac OS X is 10.3.3 or later.
Select About This Mac from the Apple menu and check the version of your Mac OS X.
If it is earlier than 10.3.3, download an update program from the Apple website and upgrade the Mac OS X.
Back to Registration instructions