
Making copies from film negatives or slides (MP970)
| Article ID: ART118552 | | | Date published: 05/12/2015 | | | Date last updated: 08/17/2015 |
Description
Solution
How to scan a photo from film or slides and print it
This section describes how to scan 35 mm film strips and slides. Also mount film in the Film Guide in the same way as described in this section when scanning films from your computer.

(A) 35 mm film strip
(B) 35 mm slide
|
Do not scan different types of films (Color negative film, B&W negative film, Color positive film, and Mount (for slides)) at the same time. |
1. Prepare for scanning.
(1) Turn on the machine.
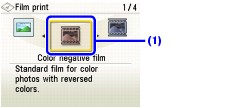
(2) Select Film print
on the HOME screen, then press the OK button.
2. Select the type of film to scan.
(1) Select the type of film to scan.
The following type of film can be selected.
Color negative film, B&W negative film, Color positive film, and Mount (for slides)
(2) Press the OK button.
The procedure to set the film is displayed.
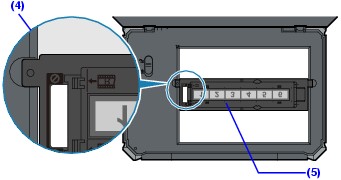
3. Remove the Film Guide.
(1) Lift the Document Cover and remove the FAU Protective Sheet from the Document Cover.
(2) Remove the Film Guide (A) from the rear of the FAU Protective Sheet.
(A) Film Guide


Important
Once the scanning of film is finished, be sure to put back the Film Guide on the rear of the FAU Protective Sheet and attach the FAU Protective Sheet to the Document Cover. The FAU Protective Sheet should be attached when copying or scanning originals other than film originals (e.g., documents or photographs).
4. Mount film in the Film Guide and load it on the Platen Glass.
Note
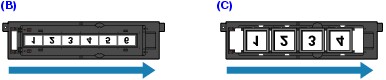
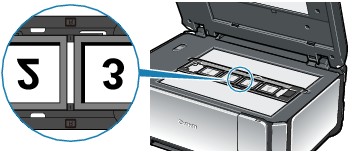
Film is scanned in the order from left to right.
Depending on the model or brand of your camera, the scanning order may differ from the frame order of the film.Scanning order
(B) 35 mm film strip
(C) 35 mm slides
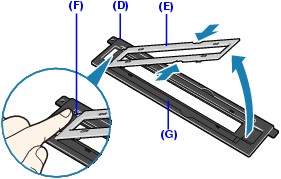
(1) On the Film Guide (D), open the Film Holder (E).
Squeeze the edges of the Film Holder inward lightly to release it.
Put your finger on the hinge part (F) of the Film Strip Frame (G) so that it does not come off the Film Guide when opening the Film Holder.
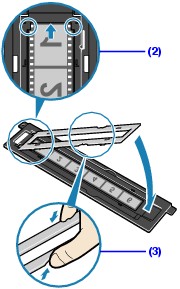
(2) Mount the film in the Film Strip Frame on the Film Guide with the front side (the side showing the correct image) facing down, and with the frame order running from left to right. Set the tip of the film under the tabs of the Film Strip Frame and position the film so that the separation lines between frames are aligned with the white line marks of the Film Holder.
Depending on the films, the separation lines between frames may not be aligned with the white line marks of the Film Holder when you set the tip of the film under the tabs of the Film Strip Frame. In this case, give priority to aligning the separation lines between frames with the white line marks.
(3) Squeeze the edges of the Film Holder inward lightly and close it completely.
(4) With the mark
on the Film Guide facing up, align the Film Guide with the grooves on the right and left sides of the Platen Glass.
(5) Confirm that the front side of the film (the side showing the correct image) faces down.
(1) On the Film Guide, open the Film Holder.
Squeeze the edges of the Film Holder inward lightly to release it.
(2) Lift the Film Holder (H) to remove the Film Strip Frame (I) from the Film Guide (J).
(3) Align the Film Guide with the grooves on the right and left sides of the Platen Glass.
(4) Mount the slides in the Film Guide with the front side (the side showing the correct image) facing down, with the frame order running from left to right, and with the image upside down. Load the slides in the landscape orientation, making sure they are not loose in the Film Guide.


To attach the Film Strip Frame on the Film Guide after scanning slides is complete
1. Align the circle marks (
) on the Film Strip Frame with the circle marks (
) on the Film Guide, and insert the tabs on the tip of the Film Strip Frame into the Film Guide.
2. Squeeze the edges of the Film Holder inward lightly and close it completely.
Make sure that all the protrusions on the outer edges of the Film Holder fit into the slots in the Film Guide when closing the Film Holder. If the Film Holder does not close completely, press the whole Film Holder gently downward.


5. Gently close the Document Cover and press the Color button.
The film is scanned.
See Printing Scanned Photographs to go on to print the scanned photographs.
Do not stare at the light directly for an extended period of time when scanning films.
Printing Scanned Photographs
1. Prepare for printing.
(1)
Scan a photo or film.
(2)
Load paper.
2. Select the print menu.
(1)
Make sure that Select and printis selected, then press the OK button.
Besides Select and print, other useful printing functions are available.
(2)
Confirm the paper source, page size, media type, and other settings.
(3)
Select Next, and then press the OK button.The photo selection screen is displayed.
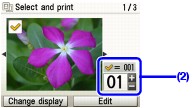
3. Select the photo to print and specify the number of copies for each photo.
(1)
Use the Easy-Scroll Wheel or theor
button to display a photo to print.
(2)
Press the [+] or [-] button to specify the number of copies.The following screen is a sample screen in easy photo reprint mode.
(3)
Repeat steps (1) and (2) to specify the number of copies for each photo.(4)
Press the OK button.The print confirmation screen is displayed.
4. Start printing.

(1)
Confirm the print settings.
To change the settings, select the item and press the OK button.
(2)
Confirm the total number of copies for selected photos.(3)
Change the advanced print settings.
In the advanced print settings, Face brightener, Fade restoration, Brightness, Contrast, and Color hue can be selected.
(4)
Press the Color button to print in color, or the Black button to print in black & white.The specified number of copies of each photo will be printed.
When scanning and printing films, be sure to put back the Film Guide on the rear of the FAU Protective Sheet and attach the FAU Protective Sheet to the Document Cover after you finish printing scanned films. The FAU Protective Sheet should be attached when copying or scanning originals other than film originals (e.g., documents or photographs).
Top of Page