Replacing the Print Head (iPF8000S/iPF8100)
Caution
Do not touch the Printhead immediately after printing. The Printhead becomes extremely hot, and there is a risk of burns.
Note
- Prepare a new Ink Tank when ink levels are low.
- Your hands may become dirty during Printhead replacement. During replacement, wear the gloves provided with the new Printhead .
- Press the Menu button to display MAIN MENU.
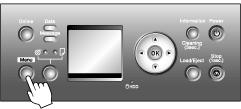
- Press
 or
or  to select Maintenance, and then press the
  button.
- Press or to select Replace P.head, and then press the button.
- Press or to select Yes, and then press the OK button.
Select Printhead L when replacing Printhead L and Printhead R when replacing Printhead R . When replacing , select L & R Printheads . Be sure to specify the correct Printhead.
Ink is now absorbed.
After about three minutes, a message is shown on the Display Screen instructing you to open the Top Cover.
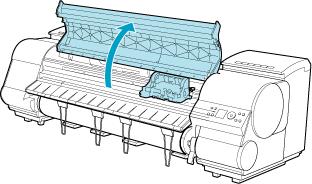
- Open the Top Cover.
Instructions are now shown on the Display Screen regarding Printhead replacement.
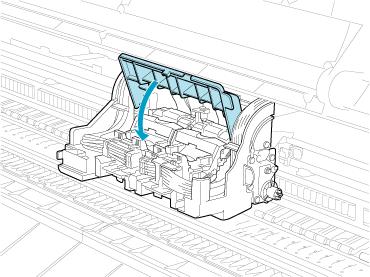
- Lift the Carriage Cover to open it fully.
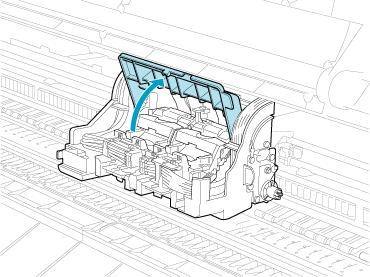
- Pull the Printhead Fixer Lever forward all the way to open it completely.

- Lift the Printhead Fixer Cover to open it fully.
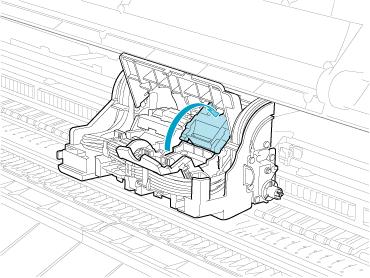
- Remove the used Printhead.

- Holding the new Printhead by the grips (a), remove it from the case.

- While firmly holding the Printhead you have removed, use your other hand to remove the orange Safety Cap 1 (a). Squeeze the grips (c) of Safety Cap 2 (b) and pull it down to remove it.

- With the nozzles facing down and the metal contacts toward the back, tilt the Printhead slightly forward as you insert it in the Carriage . Carefully push the printhead firmly into the Carriage , ensuring that the nozzles and metal contacts do not touch the carriage.

- Pull the Printhead Fixer Cover down toward the front to lock the Printhead in place.

- Push the Printhead Fixer Lever toward the back of the printer until it clicks.

- Push the Carriage Cover down toward the front.
- Close the Top Cover.

Ink now fills the system.
After about ten minutes, the Printhead will be automatically aligned, and the printer will go online.
If no paper has been loaded, a message is displayed requesting you to load paper.
Important
- Never remove an Ink Tank or Maintenance Cartridge while the system is filling with ink.
- If Auto Print is Off in the printer menu, the Printhead will not be aligned. In this case, adjust the alignment after Printhead replacement by accessing Advanced Adj. in Auto Head Adj.
