Using the Photo-1 / Photo-2 Buttons in MP Navigator EX
Using the Photo-1 / Photo-2 Buttons in MP Navigator EX (Windows)
- Start MP Navigator EX and click the icon you want.
Click [Photo-1] icon.
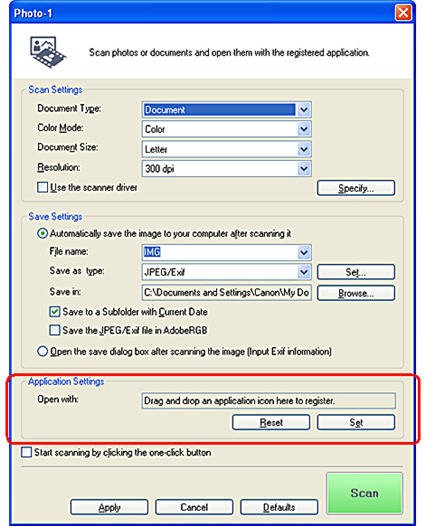
If you click [Photo-1] on the [Custom Scan with One-click] tab or in the one-click mode screen, the [Photo-1] dialog box opens.
ArcSoft PhotoStudio is used as an example.

- When you click [Photo-1] on the [Custom Scan with One-click] tab or in the one-click mode screen, the [Photo] dialog box opens.
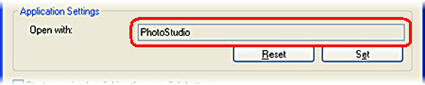
The name of the currently registered application is displayed in [Application Settings].
If no application is registered, "Drag and drop an application icon here to register" is displayed in [Open with:].
-
To register or change the application registered with [Photo-1], drag the Arcsoft PhotoStudio (or an application you want to register) icon or alias and drop it to [Open with:] (If no application is assigned, "Drag and drop an application icon here to register" is displayed in it).
After it is registered, the application name is displayed in [Open with:] on the [Photo-1] dialog box.
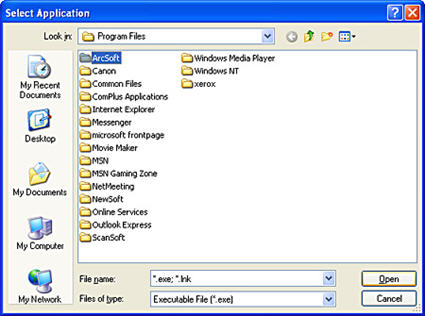
- If you cannot locate the Arcsoft PhotoStudio (or an application you want to assign) icon, click the [Set] button in [Application Settings] to display [Select Application] dialog box.

- In [Select Application], open the [Program Files] folder, select the executable file with the extension ".exe" (*1) in the folder with its name or the manufacturer's name and then click the [Open] button.

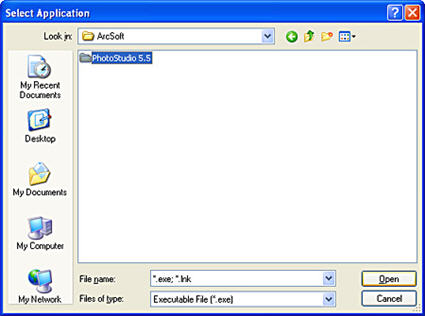
- After it is registered, the application name is displayed in [Open with:] on the [Photo-1] dialog box.

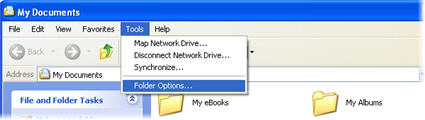
*1: If file name extensions are set not to display, open the [My documents], select the [Tools] menu, followed by [Folder Options] and the [View] tab, and remove the check mark from the [Hide extensions for known file types] option

Using the Photo-1 / Photo-2 Buttons in MP Navigator EX (Macintosh)
- Open MP Navigator EX and click the button you want.
ArcSoft PhotoStudio is used as an example.

- Click [Photo-1] button in MP Navigator EX to open the [Photo-1] dialog box.
The name of the currently registered application is displayed in [Application Settings].
If no application is registered, "Drag and drop an application icon here to register" is displayed in [Open with].

- To register or change the application registered with [Photo-1], drag the Arcsoft PhotoStudio (or an application you want to register) icon or alias and drop it to [Open with:] (If no application is assigned, "Drag and drop an application icon here to register" is displayed in it).
After it is registered, the application name is displayed in [Open with:].

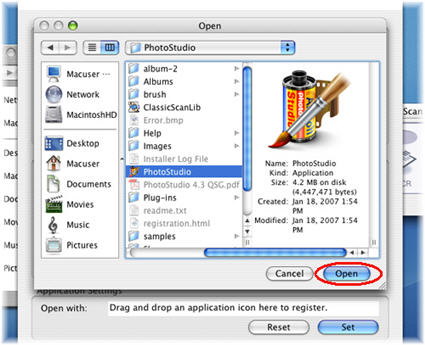
- If you cannot locate the Arcsoft PhotoStudio (or an application you want to register) icon or alias, click [Preference] button in [Application Settings] to display [Open] screen.

- Most application programs are contained within folder labeled with its name or the software manufacturer's name inside the [Applications] folder.
Search the icons in the folder for the executable file. (Folders may also be displayed as icons.)
Select the executable file and click [Open].

- After it is registered, the application name is displayed in [Open with:] on the [Photo-1] dialog box..

- Click [Apply] on the [Photo-1] dialog box to complete the setting.