Downloading images with direct transfer PowerShot A650 IS and A720 IS.
Article ID: ART120651
|
Date published: 05/12/2015
|
Date last updated: 08/17/2015
Description
Downloading images with direct transfer PowerShot A650 IS and A720 IS.
Solution
Downloading Images by Direct Transfer
Use this method to download images using camera operations. Install the supplied software and adjust the computer settings before using this method for the first time. Use this method to download images using camera operations except in Windows 2000.
You can select the following methods in the Direct Transfer:
All Images
Transfers and saves all images to the computer.
New Images
Transfers and saves to the computer only the images that have not been previously transferred.
DPOF Trans. Images
Transfers and saves to the computer only the images with DPOF Transfer Order settings.
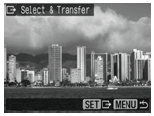
Select & Transfer
Transfers and saves single images to the computer as you view and select them.
Wallpaper
Transfers and saves single images to the computer as you view and select them. The transferred images display on the computer desktop.
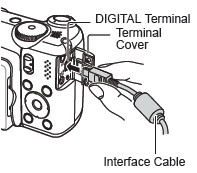
Use the supplied interface cable to connect the computer's USB port to the camera's DIGITAL terminal.
Power the camera on in the Playback mode. The following screen will appear.
Select [Canon CameraWindow Download images from Canon Camera].
Click [OK].
CameraWindow appears.
The camera Print / Share buttonwill then light up in blue.
Confirm that the Direct Transfer menu is displayed on the camera's LCD monitor. Press the button if the Direct Transfer menu fails to appear.
To transfer All Images/New Images/DPOF Trans. Images. - Use the or button to select , or , and press the button. - The images will download. - The button will blink blue while downloading is in progress. - The display will return to the Direct Transfer menu when the download is complete.
To cancel the transfer, press the <FUNC./SET> button.
The display will return to the Direct Transfer menu when the download is complete.
When the images are downloaded and the operation is complete, ZoomBrowser EX will launch automatically. The downloaded images will be stored in folders named for each shooting date, and will be displayed in the main window of ZoomBrowser EX.
The main window of ZoomBrowser EX
The images are stored in these folders.
Select & Transfer/Wallpaper
Use the or button to select or , and press the button (or <FUNC./SET> button).
Use the or button to select images to download and press the button (or <FUNC./SET> button). - The images will download. - The button will blink blue while downloading is in progress.
Press the <MENU> button. - The Direct Transfer menu will reappear.
Only JPEG images can be downloaded as wallpaper for a computer. On the
Windows platform, the files are automatically created as BMP images.
The option selected with the button is retained even when the camera's power is turned off. The previous setting will be in effect the next time the Direct Transfer menu is displayed. The image selection screen will appear directly when the [Select & Transfer] or the [Wallpaper] option was last selected.


 button if the Direct Transfer menu fails to appear.
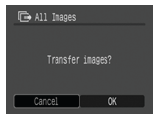

 , and press the