Basic Printing from Easy-PhotoPrint
1. Load the paper in the printer.
2. Open the image file to be printed from Adobe Photoshop or Digital Photo Professional.
Note: The supported Adobe Photoshop version is CS / CS2 / CS3 / CS4 and Elements version 6 and 7 with the latest version of Easy-PhotoPrint Pro. The supported Digital Photo Professional version is 2.1 or later.
3. Launch Easy-PhotoPrint Pro.
Note: For details, see the Related Information at the end of this page.
4. Confirm the print settings.
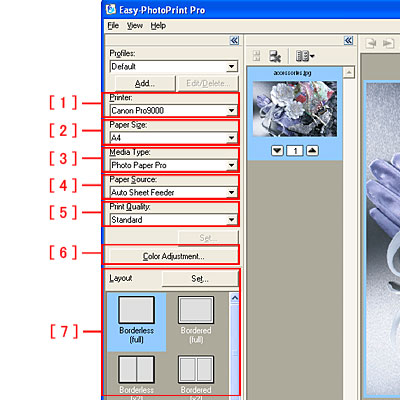
[ 1 ] Select the printer for printing.
[ 2 ] Specify the paper size.
[ 3 ] Specify the media type.
Note: The paper source is restricted depending on media type.
[ 4 ] Specify the paper source in which you loaded paper:
- Auto Sheet Feeder
- Front Tray
[ 5 ] Select the preferred print quality from the following:
- High
- Standard
- Fast
- Custom
[ 6 ] To perform Correction or Color Management, click Color Adjustment.
[ 7 ] Select the preferred layout.
Note: If you see streaks or uneven printing at the top or bottom of paper in monochrome printing, select Bordered full [(Margin 45)].

To print in grayscale click the 'Grayscale Photo' check box above Color Adjustment button.

5. Click 'Print' to start printing.

