Windows 2000/XP - Server Settings
By setting your machine as a shared printer on your network, the network users can share the machine for printing. The printer server and clients do not need to use the same operation system, and it is possible to print from a Windows 98/Me client to a Windows 2000/XP print server.
Setting the Machine as a Shared Printer
|
If you plan to share your Canon imageCLASS MF5500 Series machine on a network, install the print server locally, then make the following settings.
 Adding Server Service (Windows XP)
- Click [Start] on the Windows task bar, select [Control Panel].
The [Control Panel] folder appears.
- Click [Network and Internet Connections].
The [Network and Internet Connections] folder appears.
- Click [Network Connections].
The [Network Connections] folder appears.
- Right-click the [Local Area Connection] icon, select [Properties] from the pop-up menu.
The [Local Area Connection Properties] dialog box appears.
- Select [File and Printer Sharing for Microsoft Networks], then click [OK].
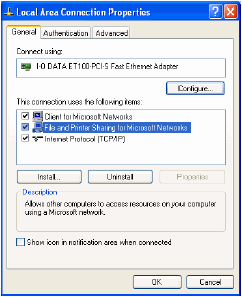
The server service is added.
Adding Server Service (Windows 2000)
- Click [Start] on the Windows task bar, select [Settings], then [Network and Dial-up Connections].
The [Network and Dial-up Connections] folder appears.
- Right-click the [Local Area Connection] icon, then select [Properties] from the pop-up menu.
The [Local Area Connection Properties] dialog box appears.
- Select [File and Printer Sharing for Microsoft Networks], then click [OK].
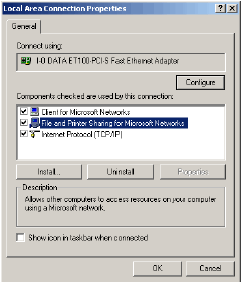
The server service is added.
Setting Printer Sharing
- Open the printer properties dialog box, then select [Share this printer] (Windows 2000: [Shared as]) in the [Sharing] tab sheet.
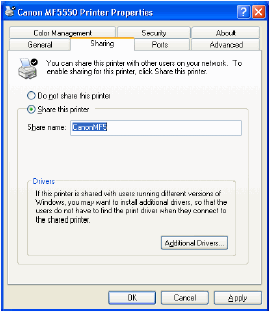
- Enter a share name in the edit box as needed.

Do not enter a space or special character in the [Share name] edit box.
- Click [OK].
The Printer driver icon changes to indicate sharing.
Sharing settings may also be made during installation.
