Perform Manual Print Head Alignment (Mac OS X)
Aligning the print head adjusts for differences in the print head position, and resolves problems such as color misalignment and incorrect print position.
Note: After confirming that the cable is connected and the printer is powered on, perform the following:
Confirm that printing is not being performed, then launch the BJ Printer Utility.
Note: In versions of Mac OS X older than 10.4, open the IJ / BJ Printer Utility from the Library>Printers>Canon>BJPrinter>Utilities folder.
- In the Apple menu select System Preferences
- Open Print & Fax.
- Make sure the correct printer is selected and, depending on OS version, click 'Open Print Queue...' or 'Print Queue...'.
- Click the Utility icon.
- Select the printer, then click 'Maintenance'.
- The IJ Printer Utility is launched.
-
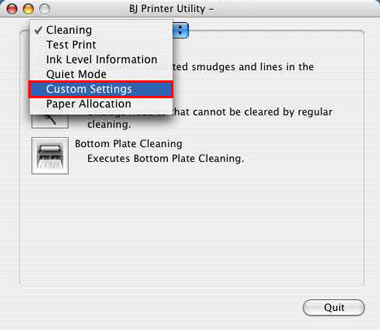
From the drop-down menu select 'Custom Settings'.
-
Check 'Align heads manually' and click 'Send'.

-
Click 'OK'.

-
The setting details are sent to the printer.

-
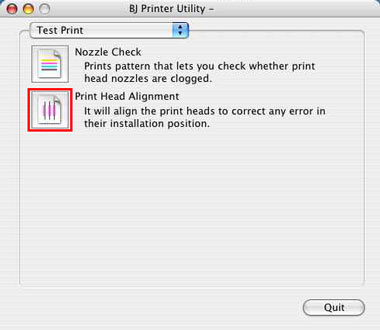
Settings for the manual print head alignment are completed. Next, select 'Test Print' from the drop-down menu.

-
Click the Print Head Alignment icon.
-
Confirm that a sheet of A4 or letter size plain paper is loaded in the paper source selected by the Paper Feed Switch, and click 'Print Head Alignment'.
Note: Click 'Check Setting' to print the current adjustment values.

-
The power lamp flashes, and print head cleaning is started. After cleaning has finished, the head alignment pattern will be printed.
Note: Do not perform other operations until printing is completed.

-
The pattern will be printed.

-
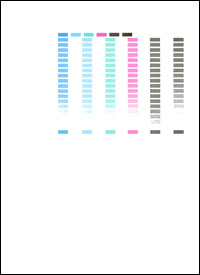
Refer to the printed sheet, and follow the procedures below.

- Select the pattern with the fewest visible vertical stripes in column 1A.
- Enter the selected pattern's number in the column 1A box.
- Similarly, enter the selected numbers in the boxes for columns 1B to 1K.
- After all numbers have been entered, click 'Send'.

*Display may vary depending on the printer.
<1> Example of highly visible vertical stripes in the pattern.
<2> Example of the fewest visible vertical stripes in the pattern.
-
Now, print the second pattern. Confirm that A4 or letter-sized plain paper is in the auto sheet feeder, and click 'OK'.

-
The pattern is printed.

-
Refer to the printed sheet, and enter the numbers on the Print Head Alignment window the same way as procedure 14.

-
After entering all the numbers, click 'Send'. Do not try other operations until the printing is complete.
-
Now, print the third pattern. Confirm that one sheet of A4 or letter-sized plain paper is in the auto sheet feeder, and click OK.
-
The third pattern will be printed.

-
Refer to the printed sheet, and enter the numbers on the Print Head Alignment window the same way as procedure 14.
-
After entering all the numbers, click 'Send'.
If this is your first Print Head Alignment ever (if you did not perform Print Head Alignment during printer driver installation), go to the procedure 23 and print one more pattern. If not, this is the end of the procedure.
-
Print the pattern. Confirm that one sheet of letter-sized plain paper in the auto sheet feeder, and click 'OK'.
-
The pattern will be printed.
-
Manual print head alignment is completed.
