533G Speedlite : How to assemble the Speedlite and bracket.
| Article ID: ART122703 |
| |
Date published: 05/12/2015 |
| |
Date last updated: 08/17/2015 |
Description
How to assemble the Speedlite and bracket.
Solution
|
|
Bracket to Camera
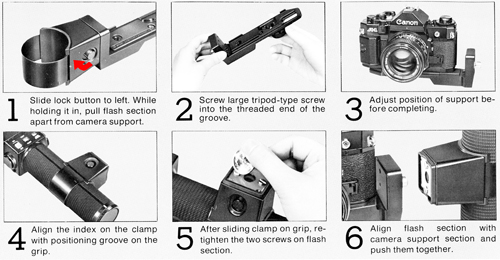
- Slide the lock button on the flash section of the bracket to the left and while holding the button in, separate the flash section from the camera support section
- Screw the large tripod -socket screw into the threaded end of the groove of the camera support section
- Screw the tripod-type screw part way into the tripod socket on the camera's base. Before screwing if in the rest of the way, shift the camera support back and forth until the ridges across the front of it are right up against the front of the camera. Make sure the camera is not sitting on top of these ridges. Also adjust the support sideways for the best fit. Then finish tightening the screw.
|
Bracket to the 533G's Grip
- With a coin or a similar object, loosen the two large screws on the flash section. Separate the clamp from the rest of the section
- Align the index on the clop with the positioning groove on the grip and slide the clamp as far up around the grip as you want.
- Realign the flash section with the clamp and retighten the two screws. The clamp should be positioned on the grip so that when assembly is completed, the flash will be facing straight ahead, in the same direction as the lens.
|
|
Flash Section to Camera Support Section
Align the flash and camera support section of the bracket and push them together. The lock button on the flash section will spring to the right when the two parts are locked together.
- To separate the two sections of the bracket, slide the lock button on the flash section to the left and push it in. The lock button must also be in the this position for coupling the two sections as above.
|
