Adding a Printer to the Printer List in MAC OSX 10.4 or later - TCP/IP Connection
Article ID: ART122908
|
Date published: 05/12/2015
|
Date last updated: 11/04/2015
Description
After installing the printer driver, you need to specify the printer you want to use in the Printer Setup Utility in order to print a document.
Solution
Adding a Printer to the Printer List in Mac OSX 10.4 or later - TCP/IP Connection
After installing the printer driver, you need to specify the printer you want to use in the Printer Setup Utility in order to print a document.
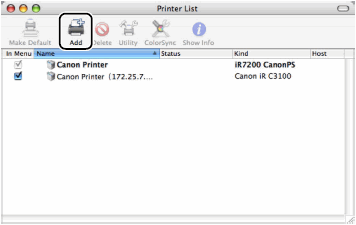
Select the hard disk drive you are using click <Applications> <Utilities> double-click the <Printer Setup Utility> icon. The <Printer List> dialog box is displayed.
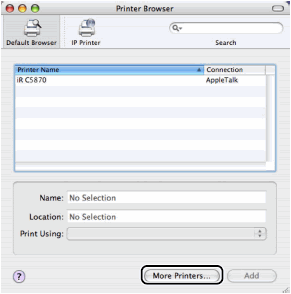
Click the <Add> icon. The <Printer Browser> dialog box is displayed.
Click <More Printers>.
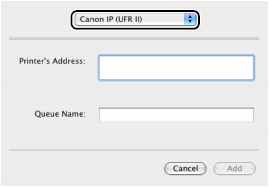
Select <Canon IP (UFR II)>.
Enter your printer's IP address or DNS name in [Printer's Address].
If you want to use the IP address as the printer name, leave [Queue Name] blank.
Click <Add> in the <Printer List> dialog box.
Confirm that the printer has been added in the [Printer List] dialog box close the dialog box.
Confirm that the driver name corresponding to your printer is displayed under [Kind] in the [Printer List] dialog box.
If the driver name for your printer does not exist in the table [Canon Printer UFR II] will be displayed.