
Copying Instructions MP520
| Article ID: ART123063 | | | Date published: 05/12/2015 | | | Date last updated: 08/17/2015 |
Description
Solution
Copying
Making Copies |
 |
This section describes the basic procedure to make copies.
1. Prepare for copying.
(1) Turn on the machine.
(2) Make sure that Copy
is selected on the HOME screen, then press the OK button.
Note
You can also press the Color or Black button instead of the OK button.
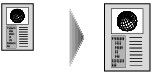
(3) Load paper.
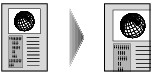
(4) Load the original document on the Platen Glass.
2. Start copying.
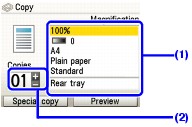
(1) Confirm the paper source, page size, media type, and other settings.
To change the settings, select the item and press the OK button. See Setting Items.
(2) Press the [+] or [-] button to specify the number of copies.
(3) Press the Color button for color copying, or the Black button for black & white copying.
The machine starts copying.
Important
 Setting Items
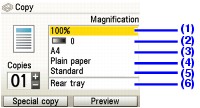
(1) Magnification
Specify the reduction/enlargement method. For details, see Reducing or Enlarging a Copy.
(2) Intensity
Specify the intensity. For details, see Changing Intensity Setting.
(3) Page size
Select the page size of the loaded paper.
(4) Media type
Select the media type of the loaded paper.
(5) Print quality
Adjust print quality according to the original.
(6) Paper source
Select the paper source. Before printing, confirm that the location where you have loaded paper is selected as the paper source.
Reducing or Enlarging a Copy
You can select from the following reduction/enlargement methods according to your purpose.
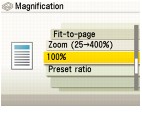
If you want to copy originals with automatic reduction or enlargement to fit the loaded paper
The machine automatically reduces or enlarges the image to fit the page size.
Select Fit-to-page.
If you want to copy originals in a custom reduction/enlargement ratio
You can specify the copy ratio as a percentage to reduce or enlarge copies.
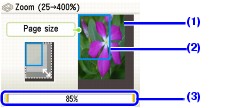
Select Zoom (25 - 400%).
On the screen that appears when selecting Zoom (25 - 400%), change the ratio using the Easy-Scroll Wheel or the  ,
,  ,
,  , or
, or  button, and then press the OK button to finalize the setting.
If you want to copy originals of a standard page size onto papers of other standard page size
You can select one of the preset ratios to reduce or enlarge copies.
Select Preset ratio.
On the screen that appears when selecting Preset ratio, select the ratio using the Easy-Scroll Wheel or the or button, and then press the OK button to finalize the setting.
Changing Intensity Setting
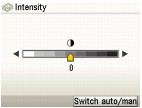
Turn the Easy-Scroll Wheel clockwise to increase intensity or counterclockwise to decrease it. You can also use the or button to make settings.
Press the right Function button in the Intensity screen to automatically match the intensity to the original on the Platen Glass and then print the image.
The slide bar for the intensity adjustment on the LCD changes to Auto when it is done.
While Auto is selected, you cannot change the intensity by using the Easy-Scroll Wheel. Press the right Function button to enable manual intensity settings again and then specify the intensity.
Displaying the Preview Screen
When you press the right Function button while Preview is displayed on the screen, you can preview an image of the printout on the preview screen.
(1) Preview of the original document
The original that is set on the Platen Glass is displayed. If the displayed image is skewed, reset the original properly, then display the preview screen again and preview the original.
(2) Page size
A frame showing the selected page size appears over the image. The inside of the frame will be printed.
(3) Magnification
The magnification setting, which was set when the preview screen was displayed, is displayed. If Preset ratio, Zoom (25 - 400%), or 100% is selected, you can change the magnification setting on the preview screen.