
Exporting images in ZoomBrowser EX ver. 6.x.
| Article ID: ART123095 | | | Date published: 05/12/2015 | | | Date last updated: 11/16/2015 |
Description
Solution
Exporting images in ZoomBrowser EX ver. 6.x
This explains how to change the size, resolution or data type of a selected image and write it to a new file, and to export an image for use as a screen saver or wallpaper. It also describes how to export the shooting information to a text file.
 Export Formats
The following types of image export formats are available. Click on the type of export format for procedures and options.
Export Still Images
You can change the data type and/or image size and save it to a new file. Select one of three data types: JPEG, TIFF or Windows Bitmap (BMP). You can also add identifying characters to the start of the file name.
Export Movies
You can change the movie size or type and export it as a different file. See "Exporting Movies" for an explanation of the procedures.
Extract frames from a movieYou can extract and save stills from your favorite frames recorded in a movie. (Windows Vista and Windows XP).
Export Shooting Properties
You can select specific items from the shooting information and export it to a text file.
Export Images as a Screen Saver
You can export an image as a screen saver file.
Export an Image as a Wallpaper
You can export an image as a wallpaper file. This function will not work with multiple files selected.
Backup to CDYou can save images along with their shooting information to CD-R/RW discs. (Windows Vista and Windows XP only).
Export Still Images
| REFERENCE The shooting information is saved along with the image when you save an image as a JPEG in the Export window. |
1. Click [Export] in the Main Window and select the [Export Still images] option.
2. Confirm that [1. Select Images] is selected, and select the images in the Browser Area.
-
You can select multiple images by pressing and holding the [Ctrl] key while you click on successive images. You can also select a series of adjacent images by pressing and holding the [Shift] key while clicking on the first and last images.
3. Click [2. Specify Export Settings] and set the export settings.
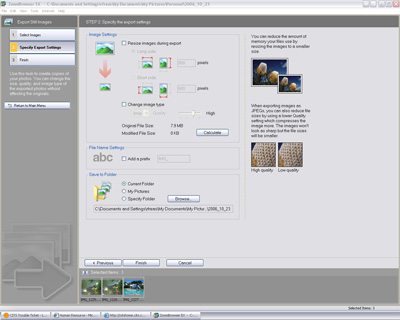
Define the settings to rename, resize, or convert the selected images. If you have selected multiple images, these settings will apply to all selected images. The total size of original images in their original format is displayed at the top of the dialog.
-
Resize images during export: Check this box to resize the selected image(s), then enter a value into one of the text boxes. You cannot enter a value in text boxes.
-
-
Long side ? specify the number of pixels for the longest side of the image.
-
Short side ? specify the number of pixels for the shortest side of the image.
-
The system resizes the image(s) to maintain the proportions of the original image(s). You cannot change these proportions.
-
-
Change image format: Check this box to change the format or quality of the selected image(s).
-
-
New format - Keep the original file type or select a new format from the drop down list. Available file formats are: JPEG (*.jpg), TIFF (*.tif), and Windows bitmap (*.bmp)
-
Quality - This only applies to JPEG files. Use the slider to change the quality of the image(s). The slider contains 4 steps from lowest to highest and the name of each step is displayed beside the slider bar dynamically. The higher the quality, the larger the file.
-
-
Add a prefix to exported images: Check this box to add a prefix to all image(s) exported in this session. If the new file name already exists, ZoomBrowser will save the filename with a numbered suffix, eg. IMG0023_1).
-
Review file size: Review the sizes of the original and changed images. The size and quality of the image affects file size.
-
-
Total size of original images - the total size of selected images before conversion or resizing.
-
Total size of changed images - the total size of selected images after conversion and/or resizing.
-
-
Calculate file size (optional): If the quality or size of the compressed images is unacceptable, resize the images or change quality. Repeat until you are satisfied. Click [Calculate] to recalculate the total size.
-
Save to folder: ZoomBrowser EX automatically suggests the current folder as the default. If you don't want to accept the default, click [Browse] to locate another folder.
4. Click [3. Finish].
Export Movies
1. Click [Export] in the Main Window and select the [Export Movies] option.
2. Confirm that [1. Select Movies] is selected, and select the movie(s) in the Browser Area.
-
You can select multiple movies by pressing and holding the [Ctrl] key while you click on successive thumbnails. You can also select a series of adjacent movies by pressing and holding the [Shift] key while clicking on the first and last thumbnails.
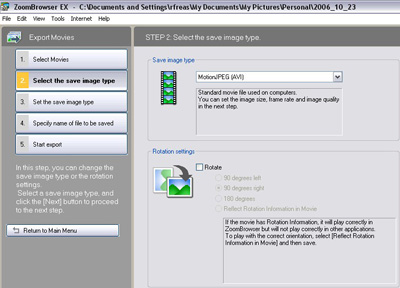
3. Click [2. Select the save image type], and select the movie file type to save. You can also set the image rotation.
On this step, you can modify the following:
-
Save format:
-
-
MotionJPEG (AVI): The file is a movie file generally used on a computer.
-
QuickTime Movie (mov): The file is a movie file is that used by QuickTime. The file can be played by QuickTime.
-
-
Rotate:
-
-
Check [Rotate] if you want to rotate the image.
-
You can select the rotation angle once [Rotate] is checked.
-
Rotation options are 90 degrees left (counterclockwise), 90 degrees right (clockwise), and 180 degrees.
-
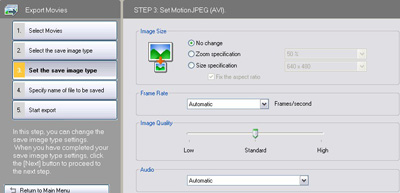
4. Click [3. Set the save image type] and modify the settings as desired.
-
In step 3, the save format selected in step 2 is set. The items that can be set in step 3 differ depending upon the save format selected in step 2.
Depending on which options were selected in the previous step, some or all of the following can be modified:
Image Size: Set the image size of the movie file to be saved. You can select from the following options:
-
No change: The image size does not change and is processed as the original image size.
-
Zoom specification: Select the image resize ratio.
-
-
You can select from [100]%, [50]%, and [25]%.
-
-
Size specification: Select the image size.
-
-
You can select from [640x480], [320x240], and [160x120].
-
The image aspect ratio is sustained if [Fix the aspect ratio] is checked.
-
If the check is removed from [Fix the aspect ratio], the image is resized to the set image size.
-
Frame Rate: Select the number of frames per second.
-
The file size increases as the number of frames increase.
Image Quality: Set the image quality.
-
You can select from [Low], [Standard], and [High].
-
The file size increases as the image quality increases.
Audio: Select the audio quality.
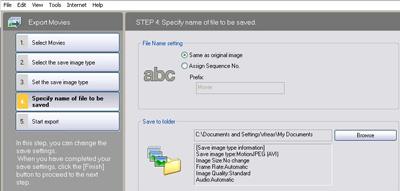
5. Click [4. Specify name of file to be saved] and specify the name and folder location for the exported movie.
-
File Name Setting: You can select from either [Same as original image] or [Assign Sequence No.]
-
-
If [Assign Sequence No.] is selected, the file name is the initial text with a 3 digit number added.
-
-
Save To Folder: Specify the save destination folder.
-
-
The file is saved to the folder specified here.
-
6. Click [5. Start export].
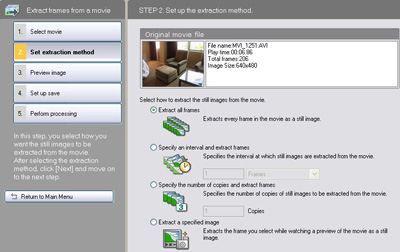
1. Click [Export] in the Main Window and select [Extract frames from a movie].
2. Confirm that [1. Select Movies] is selected, and select the movie(s) in the Browser Area.
3. Click [Next] or [Set Extraction] method and choose the desired settings.
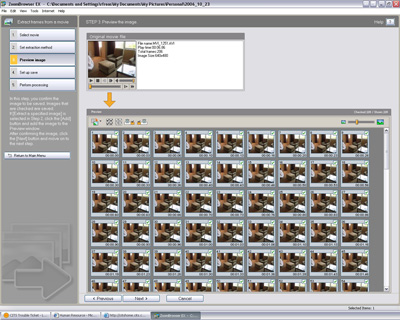
4. Click [Next] or [Preview Image] to preview the images to be saved from the selection method.
5. Click [Next] or [Set up save] to set the name, save location and if a new folder is to be created.
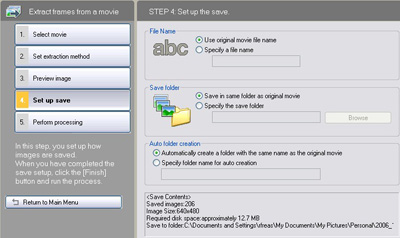
6. Click [Next] or [Perform processing] to begin the still image extraction.
Export Shooting Properties
1. Click [Export] in the Main Window and select the [Export Shooting Properties] in the next menu.
2. Confirm that [1. Select Images] is selected, and select the image(s) and/or movie(s) in the Browser Area.
-
You can select multiple items by pressing and holding the [Ctrl] key while you click on successive thumbnails. You can also select a series of adjacent files by pressing and holding the [Shift] key while clicking on the first and last thumbnails.
3. Click [2. Specify Export Settings], and select the shooting properties you wish to export.
- All available shooting information from all selected files is displayed in the list box. Check each property you want to export. The default is all items.

4. Accept the default file and folder, or specify the name of the file to hold the shooting information. You can also use Browse to select an existing file. The default filename is ZBShootingProperties.txt. If the new file name already exists, ZoomBrowser will save the filename with a numbered suffix, eg. ZBShootingProperties_1.txt..
5. Click [3. Finish].
Export Images as a Screen Saver
1. Click [Export] in the Main Window and select the [Export Images as a Screen Saver] option.
2. Confirm that [1. Select Image] is selected, and select the image in the Browser Area.
3. Click [3. Specify Export Settings].
-
The following window will display:
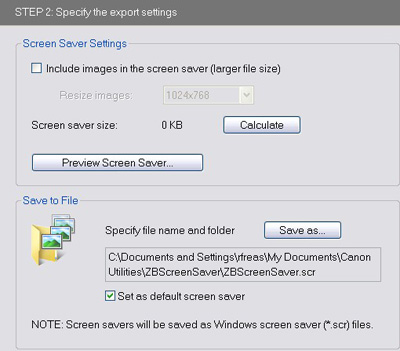
4. Define your settings for creating a screen saver.
Complete your settings as follows...
-
Include images in the screen saver (larger)
-
-
Check this box to embed your selected images in a new screen saver file, rather than linking to them. If you choose this option you should select the output resolution you want from the choices in the drop down list. Select the Output resolution for the images from the drop down list.
-
-
Total size of screen saver
-
-
This displays the total size of the screen saver. Click Preview to see what your screen saver looks like.
-
If the quality or size of the screen saver is unacceptable, re-select images or change the resolution, then click Calculate to recalculate the total size.
-
Repeat this step until you are satisfied.
-
-
Install as your Windows' screen saver
-
-
Check this box to install the file as your current Windows? screen saver. This is not supported if you are running Windows 98 or ME.
-
-
Save in Windows default directory for screen savers or
-
Save in another directory
-
-
Choose the directory in which you want to save the screen saver file. ZoomBrowser EX automatically suggests a folder and filename. If you don't want to accept the default, click Browse to locate another folder or file. A file with the name ZBScreenSaver.scr is the default.
-
5. Click [3. Finish].
Export an Image as a Wallpaper
1. Click [Export] in the Main Window and select [Export as a Wallpaper] in the next menu.
2. Confirm that [1. Select Images] is selected, and select the image in the Browser Area.
3. Click [2. Specify Export Settings], and define your settings for creating a wallpaper.
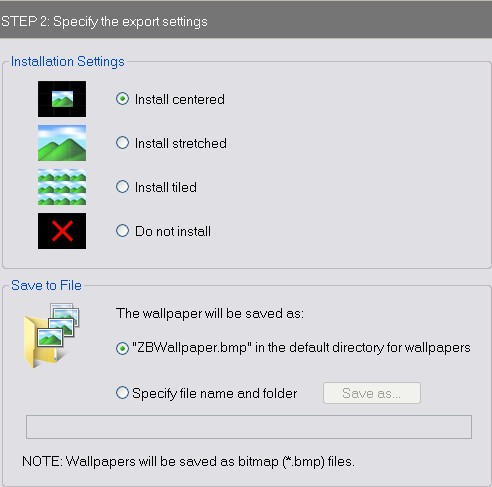
Complete your settings as follows...
-
Include images in the screen saver (larger)
- Check this box to embed your selected images in a new screen saver file, rather than linking to them. If you choose this option you should select the output resolution you want from the choices in the drop down list. Select the Output resolution for the images from the drop down list. -
Total size of screen saver
- This displays the total size of the screen saver. Click [Preview] to see what your screen saver looks like.
- If the quality or size of the screen saver is unacceptable, re-select images or change the resolution, then click [Calculate] to recalculate the total size.
- Repeat this step until you are satisfied. -
Install as your Windows' screen saver
- Check this box to install the file as your current Windows? screen saver. This is not supported if you are running Windows 98 or ME. -
Save in Windows default directory for screen savers or Save in another directory
- Choose the directory in which you want to save the screen saver file. ZoomBrowser EX automatically suggests a folder and filename. If you don't want to accept the default, click [Browse] to locate another folder or file. A file with the name ZBScreenSaver.scr is the default.
4. Click [3. Finish].
1. Click [Export] in the Main Window and select the [Backup to CD] option.
2. Confirm that [1. Select Images] is selected, and select the images in the Browser Area.
-
You can select multiple images by pressing and holding the [Ctrl] key while you click on successive images. You can also select a series of adjacent images by pressing and holding the [Shift] key while clicking on the first and last images.
3. Click [Next] or [Specify Backup Settings] and choose the desired options and make sure a blank CD has been placed in the CD-R/RW drive.
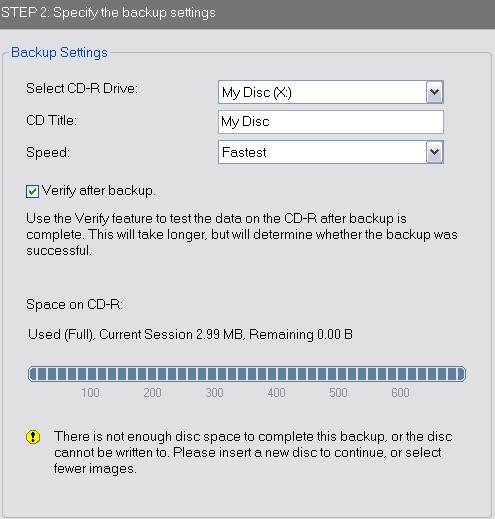
3. Once the desired selections have been made click [Start Backup] to begin writing the files to a blank disk.