Print Head Cleaning / Head Refreshing
If the printed nozzle check pattern is broken, missing, or a specific color is not printed, clean the print head (Cleaning) or print head deep cleaning (Deep Cleaning).
Note:
Cleaning the print head consumes a small amount of ink. Cleaning too often reduces the amount of ink in the ink tanks.
Print head cleaning is performed when you connect the power cord. Your machine may perform print head cleaning periodically to avoid clogging.
Printing the Nozzle Check Pattern
|
 |
Print the nozzle check pattern to determine whether the ink ejects properly from the print head nozzles.
1. Make sure that the machine is turned on, then load a sheet of A4 or Letter-sized plain paper in the Rear Tray.
2. Open the Paper Output Tray, then set the Paper Thickness Lever.
(1) Put your finger in the rounded indent beside the Paper Output Tray and open it gently.
(2) Open up and set the Output Tray Extension completely by pressing down the hollow on its front side.
(3) Set the Paper Thickness Lever to the left.
3. Print the nozzle check pattern.
(1) Press the Menu button repeatedly until MAINTENANCE appears.
(2) Press the  or
or  button to select NOZZLE CHECK, then press the OK button.

The machine prints a nozzle check pattern.
4. Examine the pattern and take the appropriate action.
See Examining the Nozzle Check Pattern.
Examining the Nozzle Check Pattern
|
|
Examine the nozzle check pattern, and perform cleaning if necessary.
|
 Note Note
The nozzle check pattern will not be printed correctly if there is not enough ink. Replace the FINE Cartridge if the remaining amount of ink is insufficient.
|
1. Check the nozzle check pattern you printed.
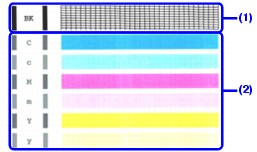
(1) If lines of this pattern are missing, the print head nozzles need cleaning.
Example: When lines are missing (Black ink)

(2) If these patterns have white streaks, the print head nozzles need cleaning.
Example: When white streaks appear (Color ink)

2. When cleaning is necessary, perform Print Head Cleaning.
See Print Head Cleaning.
Print Head Cleaning
|
|
Clean the Print Head if lines are missing or if white streaks appear in the printed nozzle check pattern. Cleaning unclogs the nozzles and restores the print head condition. Note that cleaning the Print Head causes used ink to be absorbed in the ink absorber. Cleaning the Print Head consumes ink, so perform Print Head Cleaning only when necessary.
1. Make sure that the machine is turned on.
2. Start Print Head Cleaning.
(1) Press the Menu button repeatedly until MAINTENANCE appears.
(2) Press the or button to select CLEANING, then press the OK button.

Print Head Cleaning starts.
Do not perform any other operations until Print Head Cleaning finishes. This takes about 50 seconds.
3. Confirm the condition of the Print Head.
When Print Head Cleaning finishes, the LCD returns to the standby mode.
Print the nozzle check pattern to check the print head condition.
See Printing the Nozzle Check Pattern.
|
Note
If the problem is not resolved after performing Print Head Cleaning twice, try Print Head Deep Cleaning. See Print Head Deep Cleaning.
|
Print Head Deep Cleaning
|
|
If print quality does not improve by standard Print Head Cleaning, try Print Head Deep Cleaning, which is a more powerful process. Note that cleaning the Print Head causes used ink to be absorbed in the ink absorber. Print Head Deep Cleaning consumes more ink than standard Print Head Cleaning, so perform this procedure only when necessary.
1. Make sure that the machine is turned on.
2. Start Print Head Deep Cleaning.
(1) Press the Menu button repeatedly until MAINTENANCE appears.
(2) Press the or button to select DEEP CLEANING, then press the OK button.

Print Head Deep Cleaning starts.
Do not perform any other operations until Print Head Deep Cleaning finishes. This takes about one minute.
3. Confirm the condition of the Print Head.
(1) Print the nozzle check pattern to check the print head condition.
See Printing the Nozzle Check Pattern.
(2) If the problem is not resolved, perform Print Head Deep Cleaning again.
(3) If this does not solve the problem, a FINE Cartridge may have run out of ink. Replace it with a new one.


