Load paper properly into the MP610
| Article ID: ART123482 |
| |
Date published: 05/12/2015 |
| |
Date last updated: 08/17/2015 |
Description
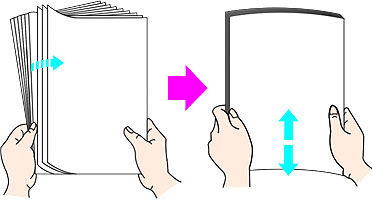
Fan paper prior to inserting into the rear tray.
Solution
Fan paper thoroughly
Fan paper prior to inserting it into the rear tray or the cassette.
Rear tray:
- Remove paper from the rear tray.
- Fan out the sheets of paper so that they do not stick together.
- Align the edges of the paper.
- Load a few sheets of letter or A4-sized paper (print side facing up) into the rear tray (1).

- Pinch and adjust the paper guide to the width of the stack (2).
- Ensure the paper stack does not exceed the paper limit mark.
- Press the Open button and pull out the extension completely.
- Ensure the Feed Switch light is set for the rear tray.
- Press <OK> to clear any messages on the display.
- If printing from an application, follow the instructions displayed on the computer monitor.
Cassette:
-
Pull out the cassette from the machine.
-
Remove the paper from the cassette.
-
Fan out the sheets of paper so that they do not stick together.
-
Align the edges of the paper.
-
Load paper on the upper-right corner of the cassette with the print side facing down.
Note:
Since the Credit Card sized paper, Canon Photo Stickers, and Legal sized paper cannot be fed from the cassette, load them in the rear tray.
-
Pinch and slide the paper guides to the paper's edge.
-
Close the lid and push the cassette all the way into the printer.
-
Ensure the Feed Switch light is set for cassette.
*MP500 shown
-
Press <OK> to clear any messages on the display.
-
If printing from an application, follow the instructions displayed on the computer monitor.
